Adopt-a-Pack
The Cortex XSOAR Adopt-a-Pack program provides our technical partners a way to ‘take over’ a pack that was originally written by Demisto or Cortex XSOAR developers. The partner becomes the maintainer and supporter of the pack and receives several benefits as outlined below.
Benefits for our Partner#
Adopting a pack has several advantages for the partner:
- Differentiation: deliver unique solutions, commands, use cases, etc. in the pack.
- Control: Directly set the pack’s roadmap, features and release timing.
- Feedback: Receive direct input from actual users in the form of defects and enhancement requests.
- Visibility: See and review all community updates to that pack as a GitHub Reviewer.
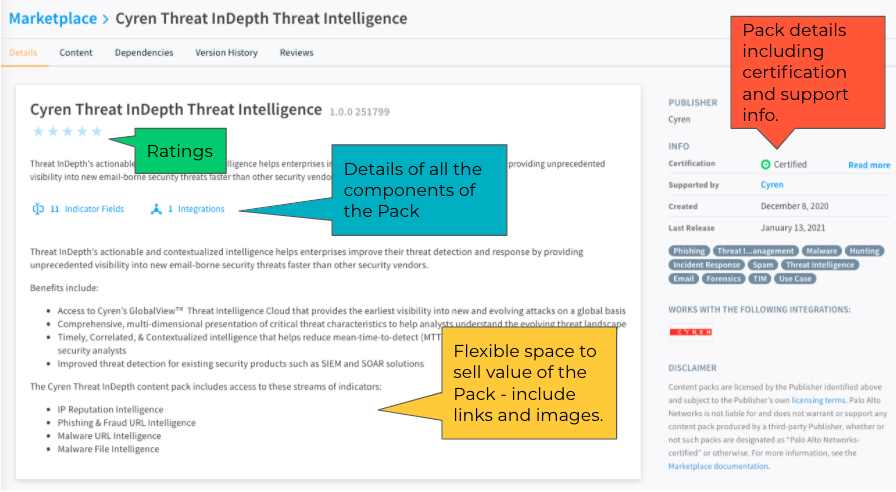
Marketing with Palo Alto Networks#
- Opportunity to place company name and logo on the pack.
- Add detailed description and marketing to the pack (see yellow box, below) including links, images, company overview, etc.
- Engage in marketing activities with Palo Alto Networks.
Process#
Choose one of the options below and follow the step by step instructions or watch the video tutorials below to learn how to submit your adoption Pull Requests.
Working on a local clone of Content repository#
Choose either one of the methods below to start or complete adoption.
The adoption methods offered below assume that you have already forked the Content repository and cloned the fork onto your local machine.
Adopt Using Helper Script
This script will automatically perform the necessary steps to create an adoption PR.
Note: The script is supported for Ubuntu and Mac OS. If you encounter any issues, please report it by opening an issue.
Requirements: Before using this automation, make sure you have git and python3 installed and in your PATH. This script will install demisto-sdk Python package if it does not exist in your environment.
Follow the steps below to adopt using the helper script:
Inside your terminal, change your working directory to the root of the Content repository. This is the location where you cloned the forked
contentrepository.Look for the pack you want to adopt under the
Packs/directory. You will use the folder name as the second argument (<MyPackName>) to theadopt_pack.bashscript.Run the following
bashscript:When the script finishes its execution, it will print a link to GitHub to open a Pull Request with the changes. Click on the link or copy it into your browser and fill out the Pull Request form.
For example, if we wanted to start adopting the
HelloWorldPack, we would run the following command:
After 90 days
Prepare the following information as you will be prompted to submit those as part of the script execution:
- Your organization/company's name.
- A link to your organization's support site.
- Email address for your organization's support.
- A link to download your author image. If no link is supplied, you will be asked to add it manually to
content/packs/<MyPackName>/Author_image.png.
Once you have all the necessary information, run the script:
For example, if we were to complete the adoption of the HelloWorld Pack, we would run:
Adopt Using a Text Editor/IDE
You can also perform the necessary steps to adopt using any text editor or an IDE of your choice and the command line.
Requirements: To follow along, you'll need to have Demisto SDK installed on your machine.
Follow the steps below to adopt using the a text editor or IDE. For additional guidance, you can watch how to perform the steps using Visual Studio Code.
Locate your company's Pack folder and open the
README.mdfile. Paste the below text into the file:Make sure you change the
MONTH,DAY, andYEARto the appropriate date that is 90 days from your submission date.Once everything is updated, save your changes and run the
demisto-sdk update-release-notes -i <path to pack> -f. The command output will instruct you to open the newly-created release note. Find the file and open it.Replace the
%%RN%%placeholder with the following text:Go to Source Control tab and commit the changes. Click on the Publish Branch button. This will open a Pull Request.
Fill out the pull request details and create the pull request.
After 90 days
Please follow the steps below to complete the adoption process:
Open the
README.mdfile and update the top of the file with the following:Open the
pack_metadata.jsonfile and update the following sections:support- must say “partner”author- must say your company nameurl- must be changed to your company’s support siteemail- must be your company's support emailAlso, update your Author image using the Author image instructions.
Repeat step 3 in the previous section. Replace the
%%RN%%placeholder with the following text:Once the Cortex XSOAR engineering team merges your Pull Request, you will have successfully adopted your pack!
Adopt Using GitHub UI#
If you prefer to create the Pull Request directly from GitHub, please follow the instructions below. For additional guidance, watch the GitHub tutorial.
Requirements: Make sure you are working on fork of the Content repository and you are logged in with your GitHub account.
Instructions
1. Go to the `Packs` folder and find your company’s pack.Find the
README.mdfile and then click the on the right side of the screen to edit the file.
In the first line of the file, copy and paste the below text to show that the support is moving over:
Make sure you change the MONTH, DAY, and YEAR to the appropriate date that is 90 days from your submission date.
While still in the README.md file, scroll down to the bottom of the page where select the 'Create a new branch for this commit and start a pull request'. Change the name of the new branch to partner-COMPANY_NAME-adoption-start and click on 'Propose changes'.
At the bottom of the screen, edit the Pull Request title to '
COMPANY_NAMEPack Adoption' and adjust the description to 'Updating README file for adoption'.Create a new branch named
partner-COMPANY_NAME-adoption-start.Now, click the green “Commit Changes” button. This will take you to your Pull Request.
As your Pull Request is not ready yet, will create an initial draft Pull Request as follows: At the bottom of the page, to the right of the
Create pull requestbutton there is a small button with an arrow, click and choose theDraftoption. This will still create the Pull Request but the XSOAR eng team will not review it until it is taken out of draft mode.
Your Pull Request is not ready yet, continue following the instructions below.
- At the top of your Pull Request, you will see your branch name that you created earlier. Click your branch and it will redirect you back into the main
contentrepository. Ensure that the top left corner of the repository has your branch name before continuing.
![Branch_name]/docs/doc_imgs/partners/Branch_name.png)
- Now, click into the
Packsfolder and find your company’s folder. Once you are in your company’s folder, click thepack_metadata.jsonfile.
Click the pencil to edit this file just as you did previously.
Next, update the version number in the line titled
currentVersion- increase the version up one number. For example, if it is “1.2.10” change it to “1.2.11”.Once the number is updated, go to the bottom of the page, make sure you have selected “Commit directly to the branch you’ve already created“ and then click the green “Commit changes” button.
Now this step is completed, onto the next one!
- Go back to your
Packsfolder and click intoReleaseNotes.
Since we updated the version, we need to create a new release notes file. Find the file that has your original release notes number before you changed it. For example, if you changed “1_2_10” to “1_2_11” then you need to click into “1_2_10”.
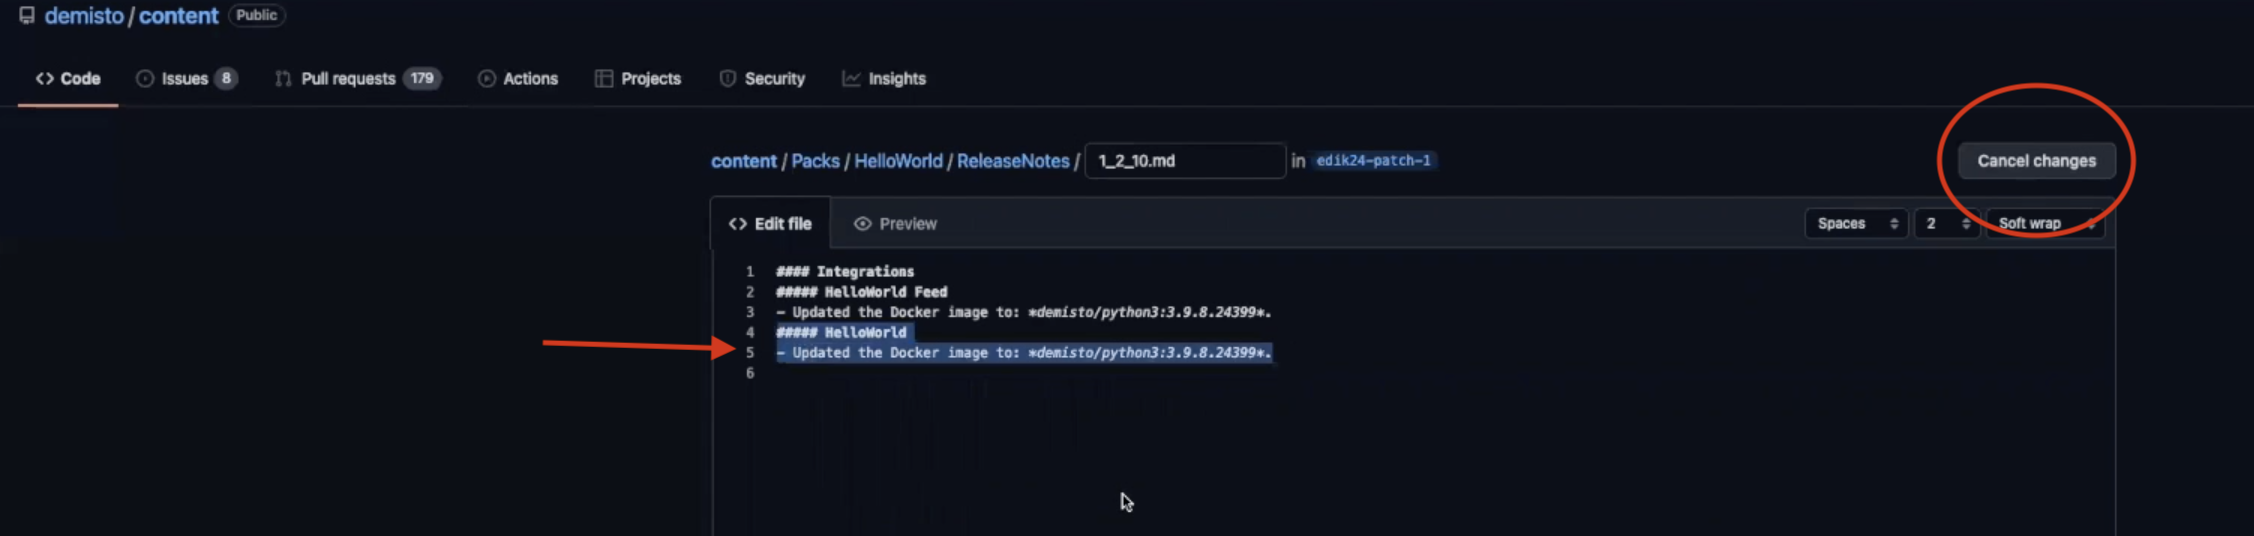
Once you find the correct release note, click the edit pencil icon as you did in the previous steps, and copy the last line in the file to keep the same format. Once you have it copied, click cancel changes and go back to the
ReleaseNotesfolder.
Next, on the top right hand corner of the screen, click “Add file” and “Create new file”. Name your file the new version number you created earlier, which for this example would be
1_2_11.md.Add the following text to the release note under the Pack name:
- Started adoption process.
Name the subject of this to “update release notes”, make sure it is committing to your branch and then click “Commit new file”
Note: If your Pull Request is still in draft, please commit the changes and remove from draft.
Done! You have started the adoption process.
After 90 days
Follow the below steps to complete the adoption process:
In order to complete the second adoption step, first you will need to update your
README.mdfile and open a pull request with this text:Next, go to the
pack_metadata.jsonfile and update the following sections:currentVersion- update the version. Using the video as our example, we would be updating it to “1.2.12”.support- must say “partner”Author- must say your company nameurl- must be changed to your company’s support siteEmail- must be your company's support email- Also, update your Author image using the our documentation.
Repeat step 10 from the previous section. Add the following text to the release note:
Once the Cortex XSOAR engineering team merges your Pull Request, you will have successfully adopted your pack!