Powershell Remoting - Configuration
PowerShell Remoting is a built-in feature in Windows hosts that enables connecting to hosts remotely in order to execute scripts and PowerShell commands. By using PowerShell Remoting, the SOC analyst or incident responder is able to connect to the Windows host in order to perform various tasks such as gathering data, remediating the host, move files to and from the host to XSOAR, and much more.
Pack Workflow#
Follow the instructions in this article to configure your Windows environment and the PowerShell Remoting integration.
After configuring the integration you will be able to perform various tasks on Windows hosts, including running PowerShell commands and scripts, as well as gather forensic data.
In This Pack#
The PowerShell Remoting content pack includes the following content item.
Integrations#
The PowerShell Remoting integration.
Before You Start#
Disclaimer: The integration was created and tested on Windows Server 2016 with PowerShell version 5.1.14393.3866. This article provides configuration instructions for this environment. Your required configuration may vary if using a different Windows Server version. Keep in mind that WinRM is entirely a Microsoft feature. We highly recommend you perform all actions listed here on test/staging environments prior to implementing on production environments. Also it's important to note that WinRM has security implications to consider as described here.
The integration in its current version works with HTTP using NTLM authentication or HTTPS using basic authentication. PowerShell remoting does encrypt the session even on HTTP; however, the initial connection is unencrypted. If you decide to use basic authentication keep in mind it isn`t considered a secure authentication method; however, since the whole session is encrypted via SSL this compensates for the less secure authentication method.
Network Settings#
Your XSOAR server will require access on ports 5985,5986 TCP to the hosts on which you want to run the integration. Take into consideration both the network firewall and the localhost firewall. If using the Windows firewall, make sure to create a relevant Group Policy Object (GPO) to allow traffic on the relevant ports. The configuration of the Windows firewall GPO is not in the scope of this article. The same goes for other local host firewall agents. For WinRM over HTTPS, open port 5986 TCP.
Permissions#
The user who will execute the PowerShell remote commands on the endpoint will require local admin credentials. Potentially more granular permissions can be applied; however, this was not tested and therefore not in the scope of this article. For basic authentication make sure to use a local user and not a domain user.
Domain Settings#
For a Windows 2016 environment Active Directory domain, perform the following.
On your 2016 Domain Controller, create a new OU (Organizational Unit) and move the computer accounts you wish to enable Powershell Remoting on to the new OU.
- Open the Active Directory Users and Computers tool.
- Right-click the domain, and select New > Organizational Unit.
For example:
- Drag and drop the computer account to the new OU.
Keep in mind that you can also use an existing OU. In this article we recommend creating a new OU for testing purposes.
GPO settings#
Create a new GPO.
Open the Group Policy Management tool.
Right-click the OU for which you want to apply the GPO (where the relevant computer accounts are located) and select Create GPO in this domain and Link it here.
Provide a name for the new GPO and click OK.
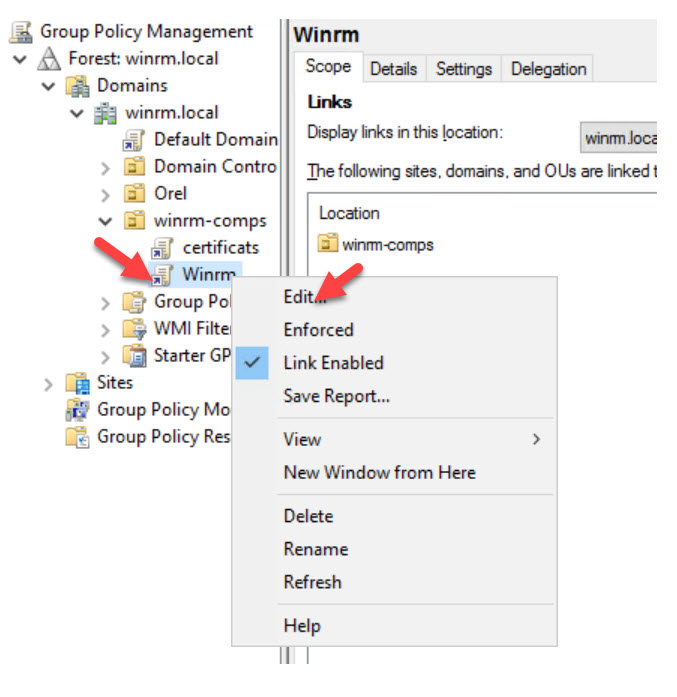
Right-click the new GPO and click Edit.

Enable PowerShell Remote
- Navigate to Computer Configuration > Policies > Administrative Templates > Windows Components >Windows Remote Management (WinRM) > WinRM Service.
- Select Allow remote server management through WinRM.
- Click Edit policy setting.
- Select Enabled.
- Provide the IP or the XSOAR server. * is also a valid option but keep in mind that this will allow any address to initiate a WinRM connection to the affected hosts.
- Click OK. This setting will enable Powershell remoting to the relevant hosts.
Allow Basic Authentication. Configure this setting only if you want to use Basic authentication and not Negotiate.
Configure the WinRM service.
Navigate to Computer Configuration > Policies > Windows Settings > Security Settings >System Services.
Select Windows Remote Management (WS-Management).
Select Define this policy setting.
Select Automatic for the service startup mode. This setting will ensure that the WinRM service will be started automatically on the relevant hosts.
Click *OK.
Workgroup settings#
It is possible to configure the Powershell Remoting to work in a workgroup (non-domain) environment. The network settings and configuration are the same as described in the Domain Settings section. To configure the host within the workgroup to accept PowerShell remote connections:
- For the host on which to enable PowerShell remoting, open the Powershell command prompt as an administrator and type Enable-PSRemoting.
2. From the Administrative command line run the command winrm set winrm/config/client @{TrustedHosts="*"}.
Integration Configuration#
Once the GPO has been applied or the workgroup settings are in effect, configure the integration instance settings and validate if the integration is working.
To configure the integration, provide the following settings.
| Field | Description |
|---|---|
| Domain | Provide the DNS domain name (suffix). For example, winrm.local. This allows the integration commands to work for hostnames so the user won't have to supply the FQDN of hosts when running the integration commands. |
| DNS | Provide the IP address of the DNS server to provide name resolution. Make sure your XSOAR machine has access to the DNS server on port 53. |
| Username | Provide the username that has proper administrative privileges on the relevant hosts. If you are using Basic Authentication, provide a local user on the hosts and not a domain user. |
| Password | Provide the password for the username provided. |
| Test Hostname | This optional parameter tests if the integration can perform a connection to a the specified hostname. |
| Use SSL | This option enables the PS remote session to be encrypted with SSL. In order to configure your environment to use SSL, see Configure WinRM over HTTPS For a Domain Environment. Currently, SSL only works with basic authentication. |
| Authentication Type | This option selects the authentication method used by the integration. Valid options are Basic which currently requires SSL and Negotiate which currently does not support SSL. |
Testing the Integration#
When you click Test in the integration settings, it will perform the following on the host specified in the Test Hostname parameter.
- Attempt to resolve the hostname specified.
- Attempt to test connectivity via ports 5985 or 5986 (if SSL is enabled).
- Attempt to open a PowerShell Remote session to the host.
If the test fails, an error message will describe at which point an error occurred. Review the Troubleshooting section for further assistance.
Troubleshooting#
- Host Troubleshooting
- XSOAR Troubleshooting
- Name Resolution Troubleshooting
- Network Connectivity Troubleshooting
- Authentication Troubleshooting
- Incidents Injestions Delays
Host Troubleshooting#
A common issues with regards to working with WinRM is that the network connectivity is not properly configured.
To test network connectivity, check if the host is listening on the relevant port. For example, log in to one of the hosts and run the following from the command prompt:
netstat -na 1 | find "5985"
or
netstat -na 1 | find "5986"
The result should show that the host is listening on the port.
If the host is not listening on the port, make sure the host actually received the GPO that was previously configured.
From the command line run:
gpresult /r -scope computer
The GPO you created should appear under COMPUTER SETTINGS and the Applied Group Policy Objects.
If the GPO does not appear, make sure that the computer account is in the correct OU. If not, make sure to move the computer account to the correct OU. Regardless if the computer account is in the OU, from the hosts command line run the gpupdate /force command.
The result should show that the computer policy updated successfully.
Keep in mind that port 5985 is for HTTP and port 5986 is for HTTPS. In order to configure HTTPS follow the configuration provided in the Configure GPO section in the Appendix.
XSOAR Troubleshooting#
If when you click Test in the integration settings no network connection is available or the host is not resolved or the username/password permissions are not working, the relevant errors will be displayed. Resolve the issue as needed.
Name Resolution Troubleshooting#
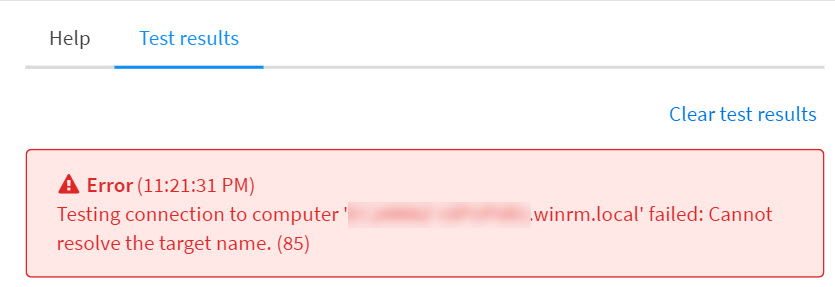
If you receive the following error in the integration test, make sure that you provided a valid DNS server address in the integration settings and that the DNS server has a relevant DNS record for the host you want to resolve.
Also make sure your XSOAR has network access on port 53 to the DNS server.

Network Connectivity Troubleshooting#
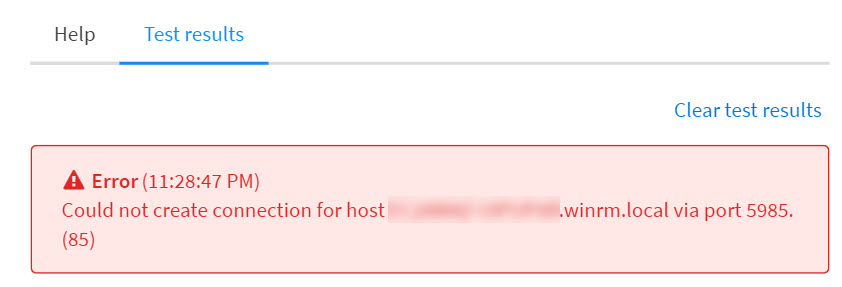
If you receive the following error in the integration test, verify you have network access to the tested host from XSOAR on ports 5985 or 5986 accordingly. Check the network or host firewall logs and adjust the rules accordingly.

Authentication Troubleshooting#
If you receive the following error in the integration test, check the provided username and password by attempting to connect to the tested host locally or via terminal services. Make sure that you are able to login with the provided credentials. If the login fails, verify that the username and password are correct or that the user has sufficient privileges on the host. If the password is wrong, reset it in the Active Directory.

If you are using Basic Authentication, make sure to provide a local user and not a domain user. Another issue could be related to the Powershell remoting settings. Review the Host Troubleshooting section above accordingly.
Incidents Injestions Delays#
You might come across cases where your incidents are pulled into XSOAR with some delay, in such cases we recommend checking that the given username does not include the domain in it, this should solve the delay problems.
WinRM Useful Commands#
The following provides a list of useful WinRM commands. | To... | Command | | --- | --- | | Get the WinRM configuration run on the host. | winrm get winrm/config | | Test the connection status run. | Test-WSMan -ComputerName The host name -Authentication default -Credential The username to connect with | | Perform a connection. | New-PSSession -ComputerName The host name | | Perform a connection with SSL. | New-PSSession -ComputerName The host name> -UseSSL | | Check listener status. | WinRM enumerate winrm/config/listener | | Configure WinRM to use SSL. | winrm quickconfig -transport:https | | Delete HTTP listener. | winrm delete winrm/config/Listener?Address=*+Transport=HTTP | | Delete HTTPS listener. | winrm delete winrm/config/Listener?Address=*+Transport=HTTPS |
Appendix#
Configure WinRM over HTTPS For a Domain Environment#
To enable PowerShell remote over SSL perform the following.
Configure Certificate Services#
- Install a server with the Active Directory Certificate Services role with the Certification Authority sub-role. (This procedure is not covered by this article.)
From your Active Directory Certificate Services server, open the Certification Authority tool.
Right-click Certificate Templates and select Manage.
Right-click Web Server and select Duplicate Template.
In the new template, click the General tab. Type the new template name (for example WinRM) and select the validity period for the certificate.
Click the Subject Name tab and select Build from this Active Directory information. For the Subject name format, select Common Name. Under Include this information in alternate subject name, select DNS name and deselect User principal name (UPN).
Click the Security tab and select the following permissions:
- Read
- Enroll
- Autoenroll
Click OK. Your new template will now be saved.
In the Certification Authority console, click Certificate Templates > New > Certificate Template to Issue.
Select your new template and click OK.
Configure GPO#
Open the GPMC (Group Policy Management Console).
Create and link a new GPO to your relevant OU.
Edit the new GPO and navigate to Computer Configuration > Policies > Windows Settings > Security Settings > Public Key Policies > Certificate Services Client - Auto-Enrollment.
Under Configuration Model, select Enabled and click the checkbox for Update Certificates that use certificate templates.
Click OK.
Review the Certification Authority and make sure a certificate was issued for your host.
On the host on which you want to configure WinRM with HTTPS, open a command prompt as an administrator and type winrm quickconfig -transport:https.
Since Microsoft doesn't currently have a GPO to set up the HTTPS listener, it is possible to create a login script that contains this command. Creation of a login script and deploying it via GPO is not covered in this article.
Configure a Non-CA Environment#
If you do not have a Certificate Authority in your environment it is possible to use self signed certificates. The configuration self signed certificates is not in the scope of this article.