Email Communication
Supported versions
Available on Cortex XSOAR, Cortex XSIAM, and Cortex XPANSE.
The Email Communication content pack enables security teams to interact with end users or third parties using email as part of an incident. The SOC team is able to communicate directly through the Cortex XSOAR platform as part of the remediation process.
Pack Overview#
This content pack includes two options for adding email functionality: the Email Communication incident type and layout, and the Email Threads layout.
Email Communication Incident Type and Layout#
The Email Communication incident type and layout allow Cortex XSOAR to fetch new emails from your mail listener and create new incidents from them if they are not related to an existing case. You can then reply to the original sender and include additional recipients if needed. This incident type and layout are intended for use when the incoming email is the incident trigger, and only one email thread is needed per incident.
Email Threads - Layout#
The Email Threads layout adds email functionality to any incident type where it is needed, including incidents triggered by sources other than incoming email. You can initiate new email conversations from the Email Threads layout and replies will be attached to the same incident. You can also create multiple separate email threads, allowing you to interact with different groups of users and keep conversations separate. This layout is intended for use when the first email on a thread is sent outbound from Cortex XSOAR.
Pack Workflow#
When an email is sent to the email address configured in your email integration, your email listener fetches the incoming email into Cortex XSOAR.
If the email is in response to an existing incident, an 8-digit number will appear next to the subject of the email, for example <93075875> Incident1. The pre-process script searches for incidents that have this 8-digit code in either the emailgeneratedcode or emailgeneratedcodes fields.
If there is no 8-digit number in the subject of the email or if the pre-process rule is unable to locate the 8-digit number, a new Email Communication incident is created and a random 8-digit number is generated for the incident.
If there is an 8-digit number in the subject of the email and the pre-process rule is able to locate the incident associated with the 8-digit number, the email is added to the existing email thread and not as a separate unlinked email. If the related incident is closed, the pre-process script re-opens the incident.
You can view the email thread in the incident layout. You can also reply to the email thread in the incident layout.
In This Pack#
The Email Communication content pack includes several content items.
Automations#
DisplayEmailHtml: Displays the original email in HTML format in the Email Communication incident layout.
DisplayEmailHtmlThread: Displays a complete email chain as a single HTML formatted document in the Email Threads incident layout.
SummarizeEmailThreads: Displays a table summarizing all email threads present on an incident using the Email Threads layout.
PreprocessEmail: Pre-process script for Email Communication layout. This script checks if the incoming email contains an 8-digit number to link the mail to an existing incident, and tags the email as "email-thread".
SendEmailReply: Sends the email reply.
Classifiers#
When you configure an instance of the Gmail integration, EWS V2 integration, MS Graph Mail Single User integration, MS Graph Mail integration, Gmail Single User integration or EWS O365 integration use the following classifiers.
- EWS - Classifier - Email Communication: Classifies EWS and EWS O365 email messages.
- EWS - Incoming Mapper - Email Communication: Maps incoming EWS and EWS O365 email message fields.
- Gmail - Classifier - Email Communication: Classifies Gmail and Gmail Single User email messages.
- Gmail - Incoming Mapper - Email Communication: Maps incoming Gmail and Gmail Single User email message fields.
- MS Graph Mail - Classifier - Email Communication: Classifies MS Graph Mail email messages.
- MS Graph Mail - Incoming Mapper - Email Communication: Maps incoming MS Graph Mail email message fields.
- MS Graph Mail Single User - Classifier - Email Communication: Classifies MS Graph Mail Single user email messages.
- MS Graph Mail Single User - Incoming Mapper - Email Communication: Maps incoming MS Graph Mail Single user email message fields.
Incident Fields#
- Add CC To Email: Add a new CC recipient to the email thread.
- Add BCC To Email: Add a new BCC recipient to the email thread.
- Email Generated Code: Stores a unique 8-digit code to match email to incident. Used in Email Communication incidents.
- Email Generated Codes: Stores a comma-separated list of multiple unique 8-digit codes to match email to incident. Used in incidents using the Email Threads layout.
- Email New Recipients: Field to set email recipients to send new outbound emails to. Used in the Email Threads layout.
- Email New Subject: Field to set email subject for new outbound emails. Used in the Email Threads layout.
- Email New Body: Field to set email body for new outbound emails. Used in the Email Threads layout.
- Email New Attachment: Field to add attachments to outbound email messages (new and replies). Used in the Email Threads layout.
- Email Selected Thread: Specifies an individual email thread to view or reply to.
Incident Types#
Email Communication.
Layout#
- Email Communication: Used in the Email Communication incident type.
- Email Threads: This layout can be added to other incident types to add email functionality to them.
Before You Start#
This pack requires that you have active instances of both a mail listener and mail sender integration in order to send and receive emails, and an active instance of the Core REST API integration. Configure either the Gmail integration or MS Graph Mail Single User integration or the MS Graph Mail integration, or both the EWS Mail Sender and EWS V2 integrations. In addition, configure the Core REST API integration which requires a Demisto API key.
The out-of-the-box classification and mapping (for EWS, Gmail, MS Graph Mail, and MS Graph Mail Single user) in the pack map the incident data to custom incident fields. These custom incident fields are populated with specific values for the Email Communication scripts to execute.
If an EWS, Gmail, MS Graph Mail or MS Graph Mail Single user instance is already configured for other incident types, create a new instance for the email communication type with the associated classification and mapping.
Pack Configurations#
To get up and running with this pack, you must do the following:
- Configure Core REST API Integration
- Create a pre-process rule that will link the emails to an existing incident
- Configure the service_mail and mail_sender_instance parameters
Core REST API Integration#
The scripts in the pack require that you install the Core REST API integration and configure an integration instance.
- In Cortex XSOAR, go to Settings > INTEGRATIONS > API Keys.
- Click the Get Your Key, enter a name for the API key, and click Generate Key.
- (IMPORTANT) Copy and save the API key, you will not be able to access it again.
- Go to Settings > INTEGRATIONS > Servers & Services and search for Core REST API.
- Click Add instance and enter the required information.
- A meaningful name for the integration instance
- Core Server URL
- API key that you generated
- Click the Test button to make sure that that server and API key are reachable and valid.
- Click Done.
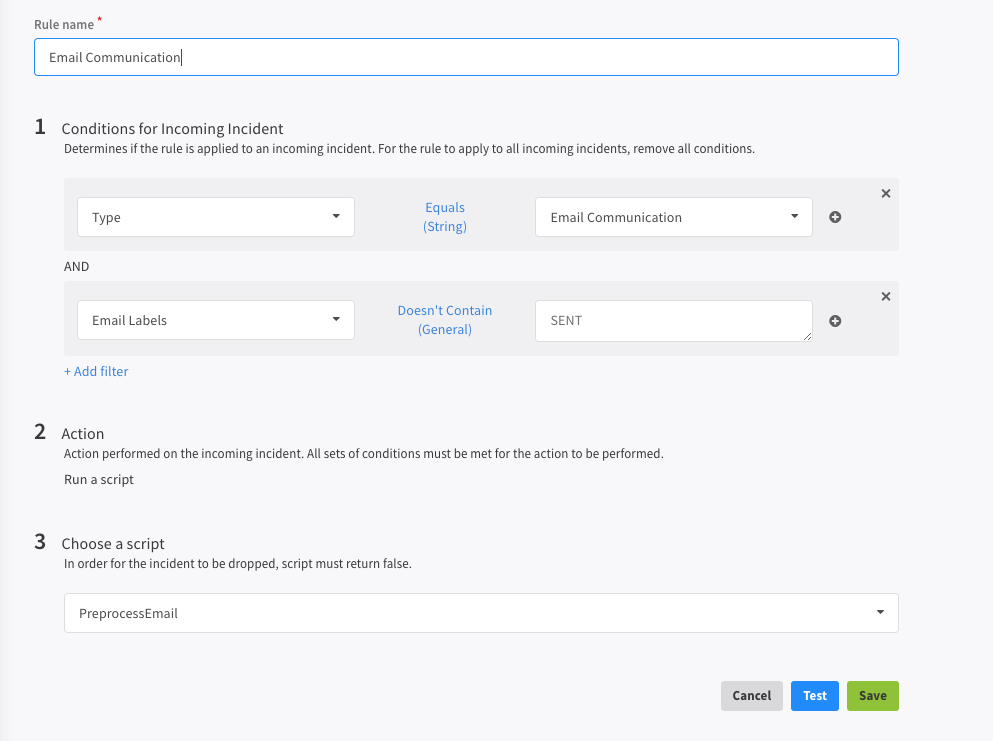
Pre-Process Rule#
This pack requires that you configure a pre-process rule to link the email communications with the incident. (The email reply will be linked to the same incident and will not create a new one). To configure the pre-process rule:
- Navigate to Settings -> Integrations -> Pre-Process Rules.
- Click New Rule.
- Enter a name for the rule.
- In the Conditions for Incoming Incident section, enter the following:
Type - Equals - Email Communication. - If you are using a Gmail instance, you should add another condition:
Email Labels - Doesn't Contain - SENT. - In the Action section, select: Run a script.
- In the Choose a script section, select: PreprocessEmail.
- Click Save.
See pre-processing rules for additional information.
Configure the service_mail and mail_sender_instance Parameters#
The service_mail parameter sets the sender's email address. This parameter is optional when using the Email Communication incident type and layout, but is required to use the Email Threads layout.
The mail_sender_instance parameter sets the specific Integration instance to use to send email messages. This parameter is optional.
The SendEmailReply script runs the reply-mail and send-mail commands and all the supported integrations send the email. If the mail_sender_instance parameter is empty and only one mail sender integration is configured, an email will be sent from the email address configured in the integration. If several integrations that provide the reply-mail and/or send-mail commands are configured this will result in multiple copies of the email being sent, one from each integration instance.
You can configure the service_mail and mail_sender_instance parameters for the following uses:
Send the email from one default email address - If multiple email-sender integrations or instances are configured, you can configure the mail_sender_instance parameter to a specific integration instance.
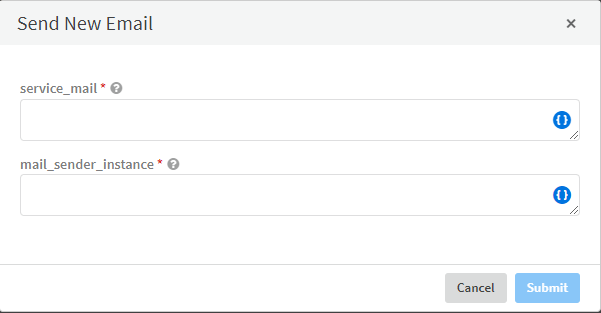
Send the emails from a different sender each time - This is particularly useful for MSSPs when the sender address changes per customer, incident type, and so on. You can configure the parameters to be mandatory, so each time you click send reply (Email Communication layout) or Send New Email / Reply To Thread (Email Threads layout), a pop-up will appear in which you will need to enter the service_mail email address and mail_sender_instance name.
To configure the service_mail and mail_sender_instance parameters#
Navigate to the Automation tab.
Select the SendEmailReply automation and click the three vertical dots and select the Detach Automation option.
Click Detach in the message that appears.
In the Script Setting dialog box, expand the Arguments section.
Expand the service_mail argument and do one of the following:
- To send the email from one default email address: In the Initial value field, enter the email address from which emails are sent.
- To send the email from a different sender each time: Mark the mandatory checkbox and leave the Initial value empty.
Expand the mail_sender_instance argument and do one of the following:
To send the email a specific integration instance: In the Initial value field, enter the name of the integration instance you wish to use.
To enter an integration instance to use each time: Mark the mandatory checkbox and leave the Initial value empty.
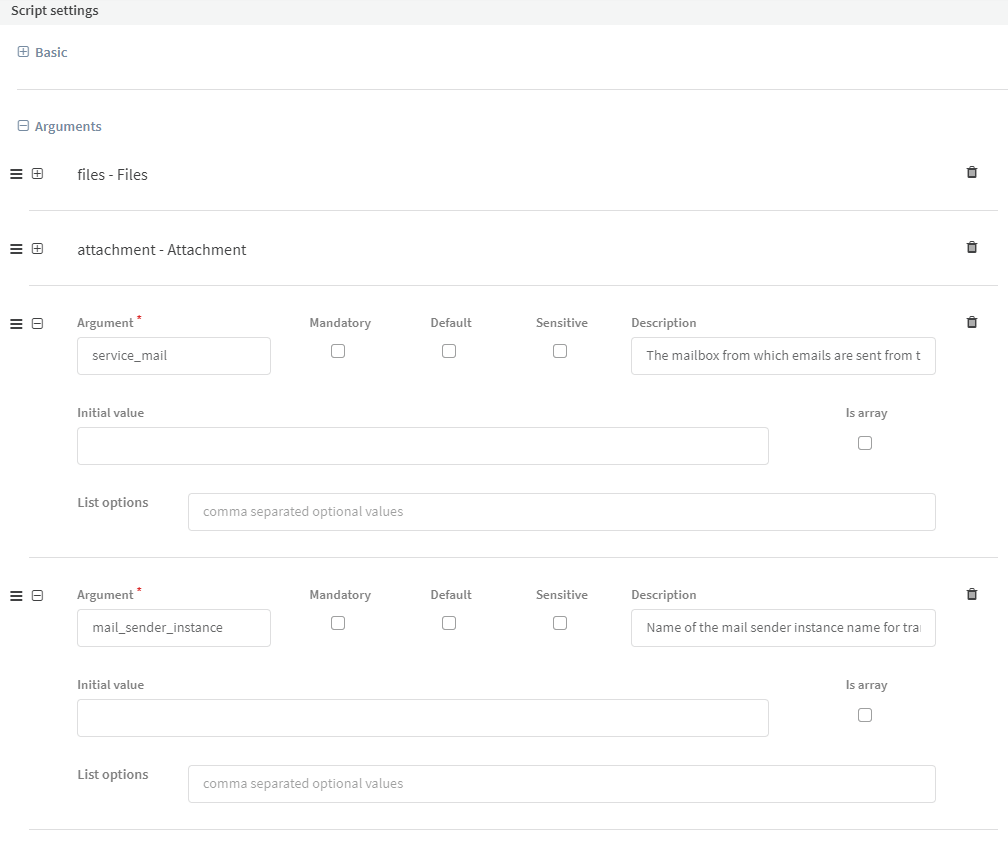
Click Save.
Click the three vertical dots and select the Reattach Automation option.
Add Email Threads Functionality to Custom Incident Types#
The Email Threads layout allows you to add email functionality to any existing incident types and layouts where it is needed using the following procedures.
Note:
It is important to follow these procedures completely, or Email Threads functionality will not work as expected.
Add the Email Threads Tab to an Existing Incident Layout#
- Navigate to Settings -> Objects Setup -> Incidents -> Layouts.
- Check the box next to the desired layout and then click the Edit button.
- Click Tabs in the Library and search for Email Threads.
- Drag the item named Email Threads (Email Threads) to the desired position on your layout.
- Click Save.
Add Required Incident Fields to the Incident Types Where Email Threads will be Used#
- Navigate to Settings -> Objects Setup -> Incidents -> Incident Fields.
- Check the box next to the field named Email New Recipients and then click the Edit button.
- In the editor window that appears, click the Attributes tab.
- Select the new incident type(s) you wish to add email functionality to in the Add to Incident types section.
- Click Save.
- Repeat steps 2 - 5 for each of the following Incident Fields:
- Add BCC To Email
- Add CC To Email
- Email Generated Codes
- Email New Subject
- Email New Body
- Email New Attachment
- Email Selected Thread
Configure Related Incident Query Window (Optional)#
The pre-process script searches for incidents related to incoming emails that contain an 8-digit code to attach the email to. The default time window for this search is the past 60 days. This limit is set to preserve system resources, and should be left at default if possible.
If you need to adjust the query window however, you can do so by creating a new Cortex XSOAR list to store the configuration parameter by following these steps:
- Navigate to Settings -> Advanced -> Lists and click the Add a List button.
- In the List settings, enter the name "XSOAR - Email Communication Days To Query" exactly as it appears here.
- Select Text as the Content Type for the list.
- In the list contents pane, enter the number of days you wish the pre-processing script to search for related incidents. Enter only a number, for example "90". Do not enter any other text into the list.
- Click Save.
Configure Custom Email Signature for New Email Threads (Optional)#
You can create a custom email signature to be automatically appended to new outgoing email messages. This signature can be simple text, or it can include HTML formatting.
Use the following steps to configure a custom signature:
- Navigate to Settings -> Advanced -> Lists and click the Add a List button.
- In the List settings, enter the name "XSOAR - Email Communication Signature" exactly as it appears here.
- Select HTML as the Content Type for the list.
- Enter your signature in the list contents pane.
- Click Save.
Layout Instructions#
Email Communication Layout#
In this layout there are three interactive sections in which you can specify one or more email addresses to add as a CC to the email, create the body of the email, and add attachments. The remaining three sections are for viewing the original email and all the email communications and attachments associated with the incident.
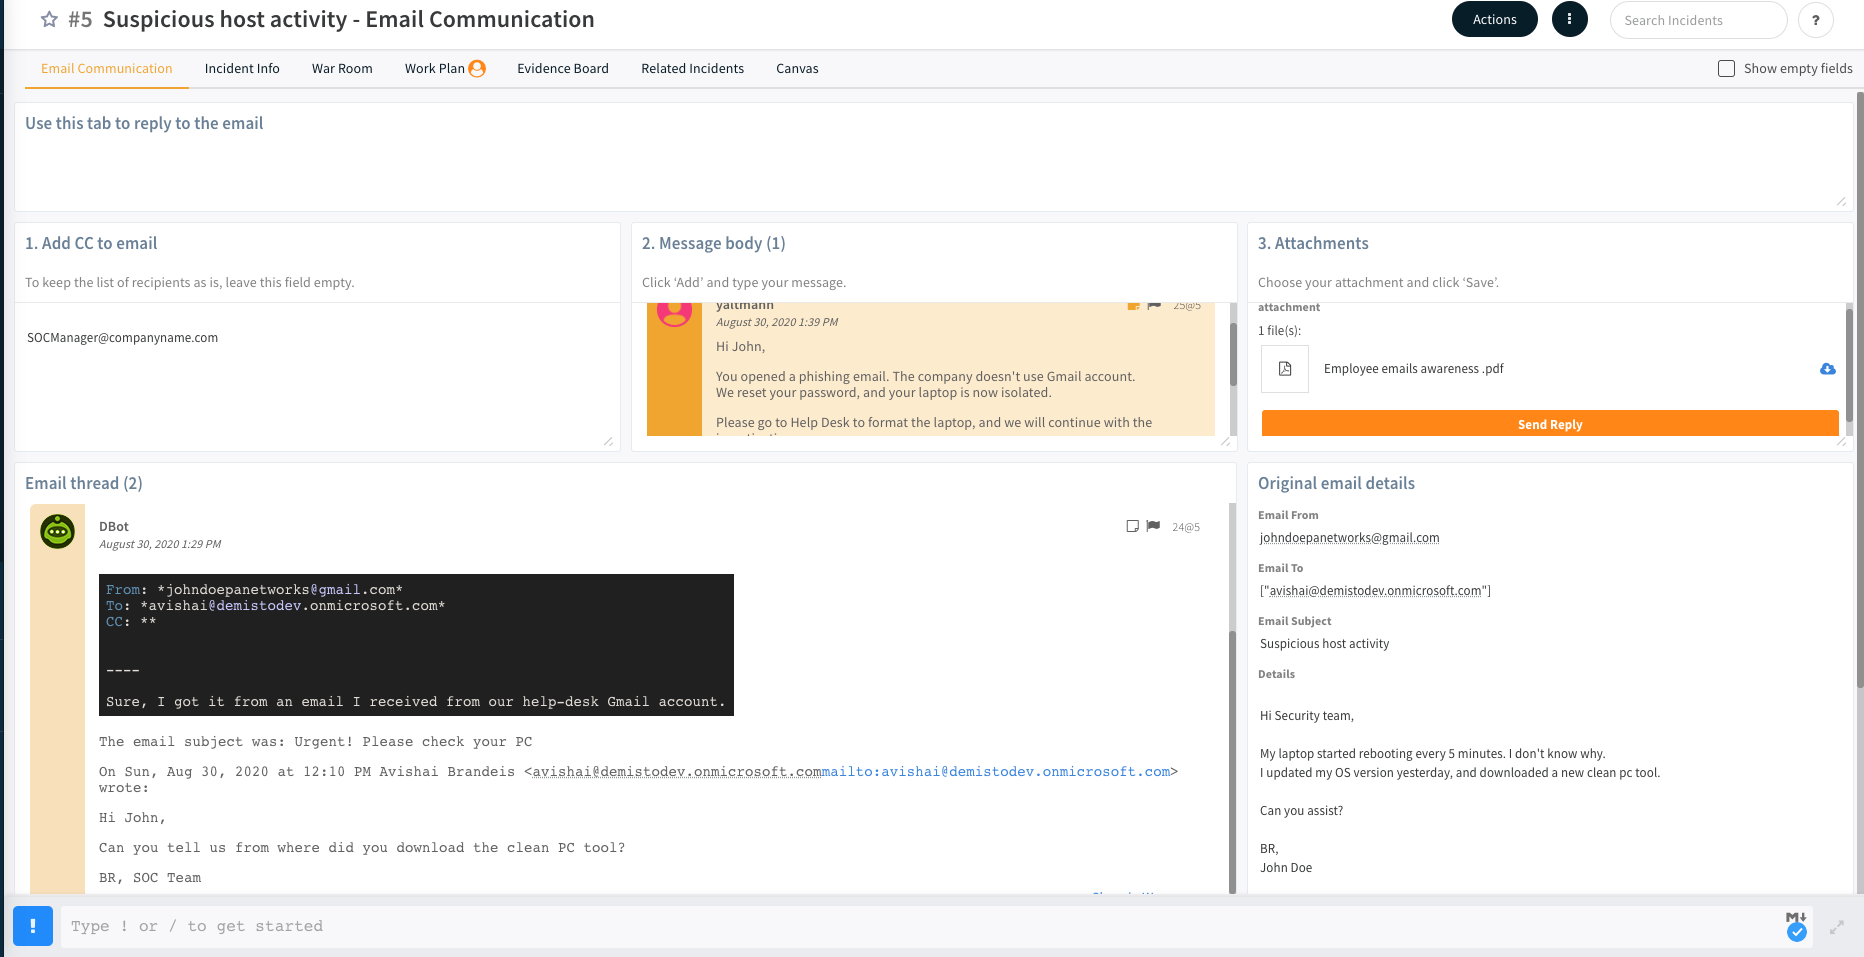
Important:
- To add CC recipients or an attachment to the email reply, you must select the Show empty fields checkbox.
- You must customize the service_mail parameter in the SendEmailReply script with the mailbox from which emails are sent. See Configure the service_mail and mail_sender_instance Parameters .
| Layout Section | Description |
|---|---|
| Add CC to email | Add one or more CC recipients to the email as a comma-separated list of email addresses. |
| Message body | Write the body of the email reply. It is sent as an email and added to the War Room entry. |
| Attachments | Add attachments to the email reply. |
| Email thread | Displays the entire email thread including the original email and all email replies. |
| Original Email HTML | Displays in HTML format the original email that opened the incident. |
| Mail Attachments | Displays the metadata of the email attachments. Contains the Send Reply button. |
Note:
If an email cannot be sent to a specified address, no notification will appear in Cortex XSOAR.
Email Threads Layout#
There are several interactive sections in the Email Threads layout.
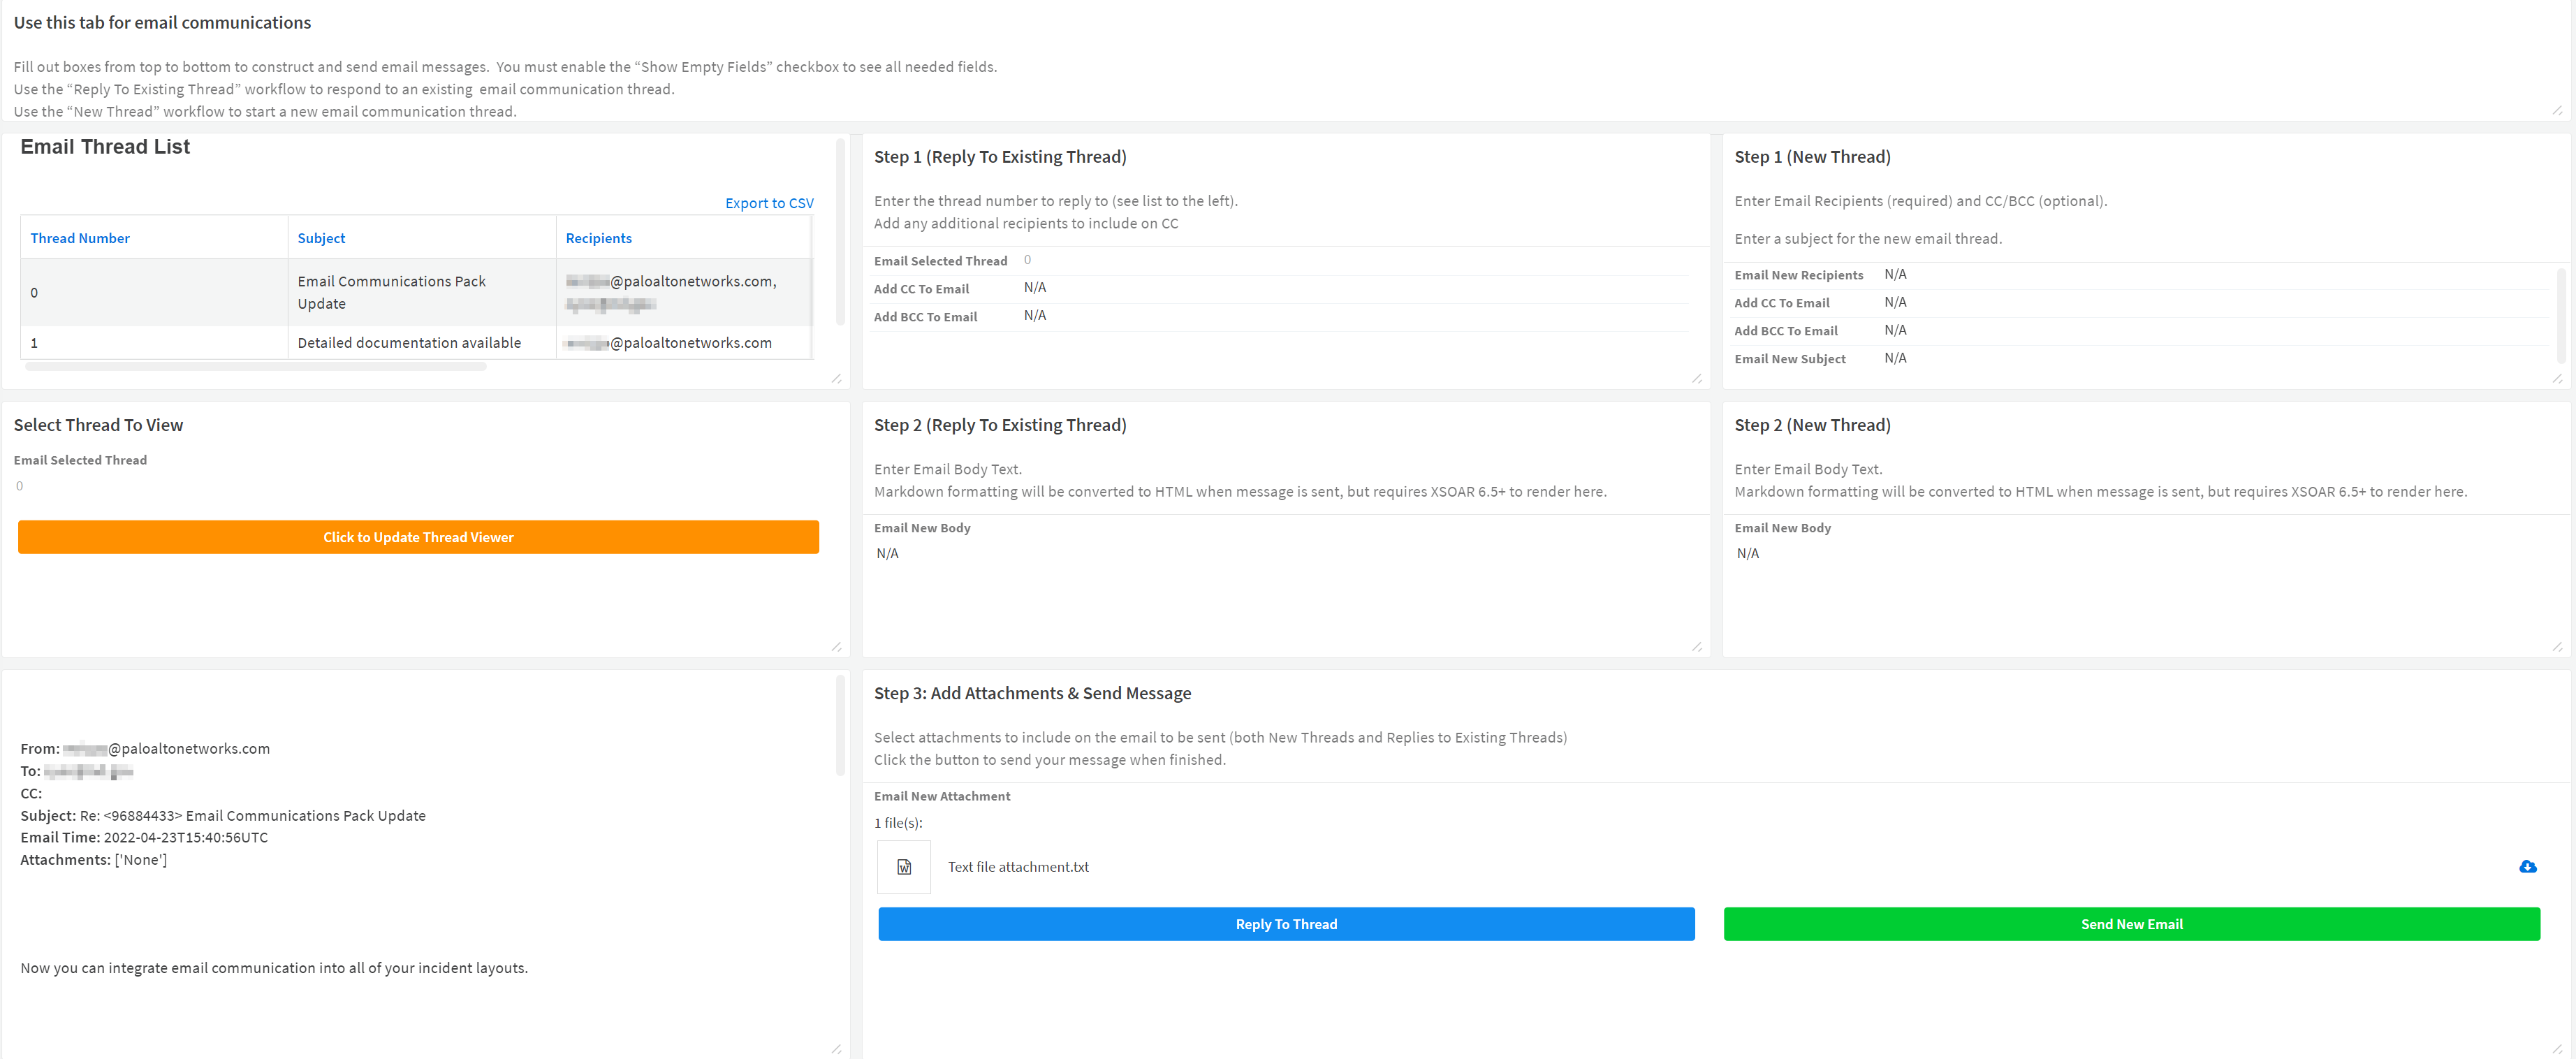
To start a new email thread:
- In the Step 1 (New Thread) section, enter email recipients and an email subject. CC and BCC recipients are optional.
- If either the Email New Recipients or Email New Subject fields are not filled the email will not be sent and an error will be displayed in the War Room.
- In the Step 2 (New Thread) section, enter the body of the email you wish to send. This field supports Markdown for formatting, and in Cortex XSOAR 6.5+ you can use the built-in Markdown editor to assist with creating and preview formatting.
- If the Email New Body field is not filled the email will not be sent and an error will be displayed in the War Room.
- In the Step 3: Add Attachments & Send Message section, you can add attachments (optional) to be included in the outgoing email.
- You must click the Save button on the Email New Attachment field after adding files.
- When ready to send the email, click the Send New Email button.
To reply to an existing email thread:
- In the Step 1 (Reply To Existing Thread) section, set the Email Selected Thread field to the thread number you wish to reply to.
A list of threads and their numbers is shown in the upper left corner of the layout. Reply emails are automatically sent to all recipients already included on the thread, but you can add new CC or BCC recipients in this section if needed. - In the Step 2 (Reply To Existing Thread) section, enter the body of the email you wish to send. This field supports Markdown for formatting, and in Cortex XSOAR 6.5+ you can use the built-in Markdown editor to assist with creating and preview formatting.
- If the Email New Body field is not filled the email will not be sent and an error will be displayed in the War Room.
- In the Step 3: Add Attachments & Send Message section, you can add attachments (optional) to be included in the outgoing email.
- You must click the Save button on the Email New Attachment field after adding files.
- When ready to send the email, click the Reply To Thread button.
To pick a thread number you want to view:
- In the Select Thread To View section, enter a number in the Email Selected Thread field and then click the Click to Update Thread Viewer button to update the display.
The entire email thread will be shown in the lower left section with the newest message at the top.
Testing the Pack#
After you configure the integrations and the pre-process rule, test that the incidents/layouts you wish to use are working correctly.
Email Communication Incident Type and Layout#
- Send an email to the email address configured in your email listener integration.
- Go to the Incidents page and check that an incident was created.
- Click the incident.
- In the Email Communication layout create and send a reply to the email.
- Refresh the page and see that your reply appears in the Email Thread section.
- Reply to the reply email sent from Cortex XSOAR and verify that your reply email was added to the email thread.
Email Threads - Layout#
- Open an incident where you have added the Email Threads layout.
- Create a new outbound email to your own email address, then click the Send New Email button.
- Open the War Room of your incident and confirm that a message appears that your email was sent successfully.
- Find the email in your mailbox and send a reply to it.
- Wait a few minutes for Cortex XSOAR to fetch the reply, then confirm it appears in the thread viewer section in the lower left of the Email Threads tab of your incident. You may need to enter the number of your thread in the Email Selected Thread field and click the button to update the thread viewer to see your new reply.
Integrations#
Although these integrations are not included in the pack, either the Gmail, MS Graph Mail, MS Graph Mail Single User, EWS Mail Sender, or EWS V2 integrations are required for the pack to work.
In addition, you need to configure the Core REST API integration.
- Gmail - (see the documentation)
- EWS Mail Sender - (see the documentation)
- EWS V2 - (see the documentation)
- MS Graph Mail - (see the documentation)
- MS Graph Mail Single User - (see the documentation)
- Core REST API - (see the documentation)