README File
Documentation is a critical step that assists customers who may use your integration/script/playbook by providing insight into how the content entity is supposed to work.
From creating custom playbooks, to providing background information to assist in debugging, it is important to ensure that the documentation explains every aspect of the integration. Documentation is maintained as README.md per integration/automation/playbook and made available for customers as part of the reference docs of the Cortex XSOAR Developer Hub.
note
This document guides you through the generation of the README files from entity YML files. When writing the actual entity descriptions, make sure to follow our Documentation Best Practices.
Documentation must be generated if:#
- If the content entity is new then you are required to create new documentation.
- If the content entity is existing but missing documentation then please create new documentation.
- If the content entity is existing and some of it has changed. For example, a new command was added, context was changed, or anything else; please update the documentation.
note
Creating Documentation#
Use the demisto-sdk generate-docs command to generate documentation for your content entity. Documentation for the command is available here.
Command Examples - Integration Documentation#
To automatically generate example output (human readable and context), you should create a text file containing command examples, one per line. The command examples should appear the same way they would as in the CLI in Cortex XSOAR, for example !url url=8.8.8.8.
Commands will be executed one at a time, in the order in which they appear in the file. If there are duplicates of a command included in the text file, only the output of the command's first execution will be included in the generated documentation output.
Create a command_examples file in the same directory as the Integration. Make sure to check this file in to git, so if needed to regenerate the documentation in the future, the commands are easily available. Example for command_examples file:
A larger example of such a file is available here.
Run demisto-sdk generate-docs#
Make sure to set your environment variables: DEMISTO_BASE_URL and DEMISTO_API_KEY so demisto-sdk will be able to connect to the Server to run the commands. Run the generate-docs command with an input of the content entity's yml file and the command_examples file in case you are documenting an integration. For example:
note
If you are connecting to a Server with a self-signed certificate, make sure to pass the --insecure option to the generate-docs command.
For additional information you can view the full documentation for the command here.
New Versions of Existing Integrations#
In case documentation is being generated for a new version of an existing integration the generate-docs command will ask you to enter the path to the old integration .yml file in order to generate a section detailing the changes made in the current version.
You can either enter the old integration path via a prompt in your terminal while the command is running or supplying to the --old-version flag like so:
Though not advised, if you do not wish to create the version differences section in the documentation you can run the command with the --skip-breaking-changes flag.
Images#
Images can be added to your documentation files. For information, see Images in Documentation Files.
Videos#
A video can provide a great addition to the documentation either as a demo video or tutorial. The preferred video format is mp4.
Videos Stored in GitHub#
Because of their size and in order to keep our main Content repo small, we store large media files in a separate repository.
To add the video file, open a pull request with the video file at content-assets repository. The file should be placed in the directory: Assets/<PackName>/.
All videos should be included with absolute URLs. To obtain a URL to a video from GitHub follow the same steps as detailed for images only now this is being done in the content-assets repository.
Include the video using the HTML <video> tag, such as:
Note: GitHub markdown preview will not display the video (it will show the browser not supported message). Rest assured, the dev docs site will display the video properly as can be seen at the following example.
Large Files (over 50MB)#
For files larger than 50MB, we require using git-lfs to add these files to the content repo (a getting started git-lfs tutorial is available here).
Steps for adding a large file:
- Clone or fork the content-assets repository.
- Make sure you have git-lfs installed. See instructions here.
- Install git-lfs in the repo:
git lfs install. - Copy the video file to the proper directory:
Assets/<PackName>. - Add the video as a tracked file:
git lfs track Assets/<PackName>/<video_file_name>.mp4. - Add the file to git:
git add Assets/<PackName>/<video_file_name>.mp4. - Add the
.gitattributesfile:git add .gitattributes. - Commit and push using:
git commitandgit push. - Open a pull a request.
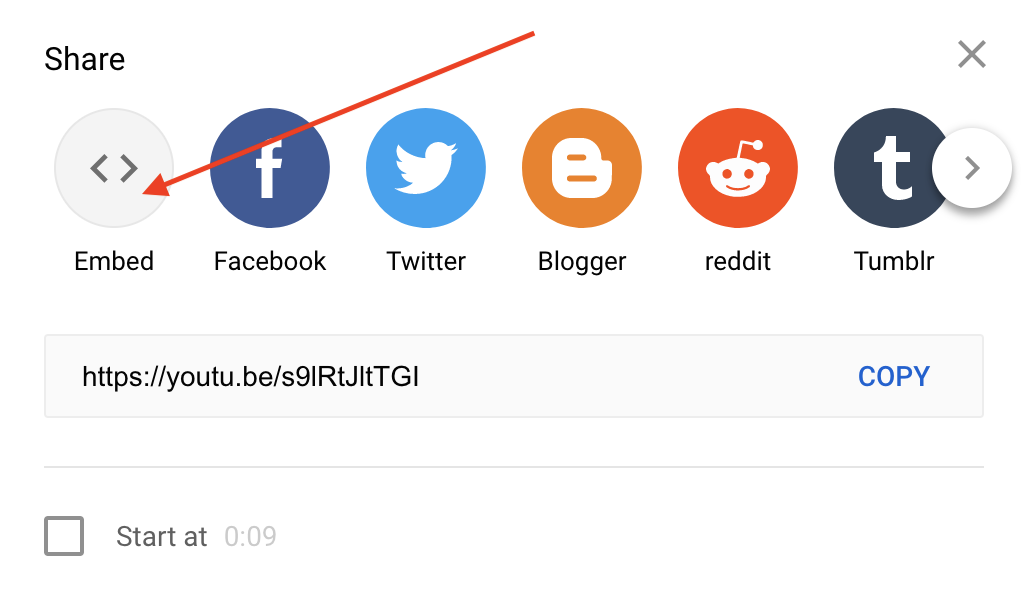
Videos via External Hosting (YouTube)#
You can also embed videos from external services such as YouTube via an iframe. From the external service choose to share the video and choose the Embed option. Then choose to Copy the embed snippet.
Screenshots from YouTube:
Share Dialog:
Embed Dialog:
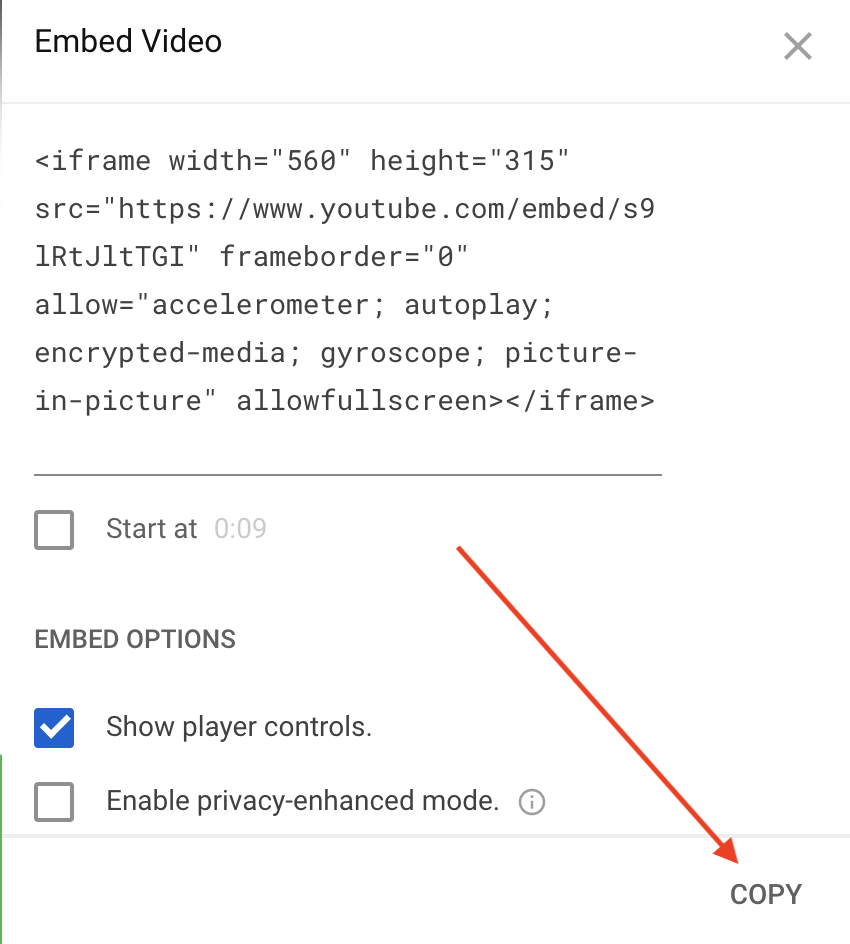
Paste the embed snippet in the README documentation page. Make sure to change the allowfullscreen option to include allowfullscreen="true". For example:
Documentation Examples#
- Azure Sentinel: Shows how the commands and examples should be presented.
- Slack v2: Shows an example of the troubleshooting section.
- Autofocus Query Samples and Sessions Playbook: show an embedded playbook image.
- JSON Feed: Shows use of embedding a video.
- Zoom Feed: Shows use of embedding a YouTube video.
Example Images:
Posting Documentation#
The documentation should be posted in the content entity's directory as a README.md file. If the content entity is not in the Directory Structure, name the documentation file the same as the yml file without the .yml extension and with an ending of: _README.md. For example: integration-mcafeeDam_README.md.
Documentation Deployment#
Once the PR with the documentation README file is merged into master, it will become available as part of the Cortex XSOAR Developer Hub. The site is updated with the latest content on a daily basis. When the deployment is complete, the documentation will be available at the reference docs section. If you wish to preview how the documentation looks at the Developer Hub, before merging to master, you can either run locally the content-docs project to preview the Reference Docs site locally or create a PR at the content-docs repo.
Preview by Generating Reference Docs Locally (recommended)#
Clone or download the content-docs repo. Follow the instructions at the project's README to run the site locally and generate Reference Docs for the content repo you have locally. For example run in the content-docs checkout dir:
Preview by Creating a PR at the Content Docs Repo#
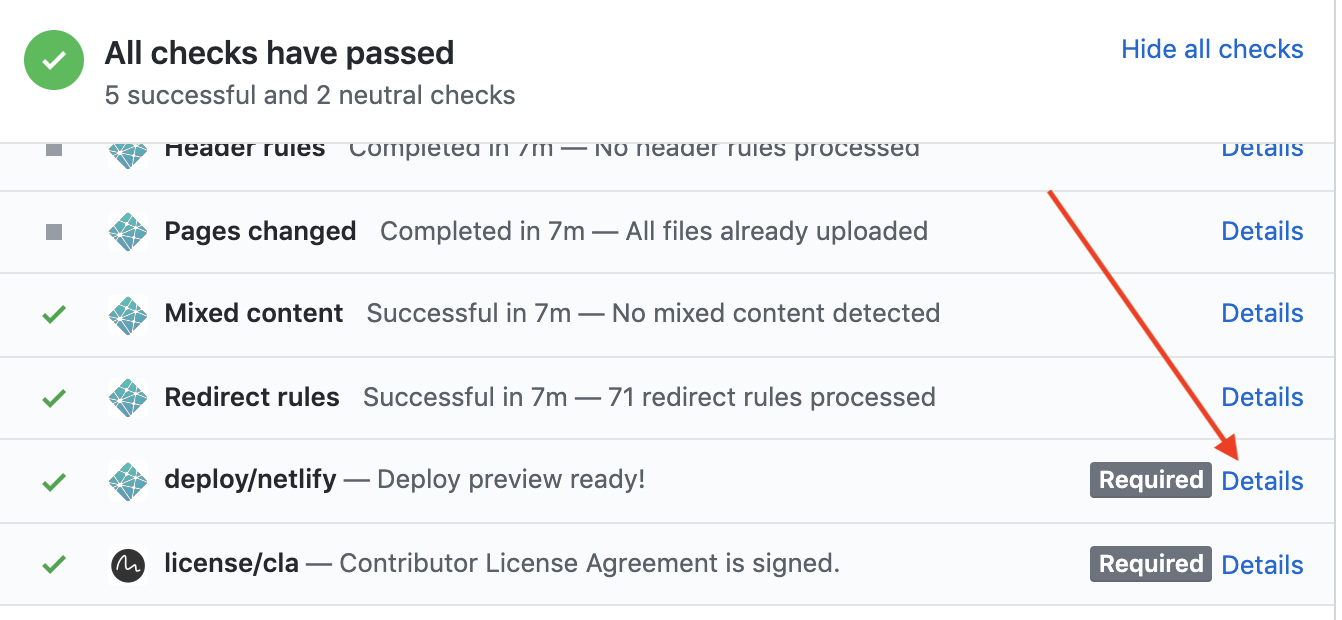
Create a PR at the content-docs repo with the same branch name as the PR you are working on in the content repo. Mention in the PR that it is related to a PR from the content repo. Your PR in the content-docs repo will include a preview link in the GitHub Checks section from deploy/netlify. You can perform a dummy white space change for the PR that will re-trigger the build and create a new preview. Example screenshot for preview link:
Notes#
We use MDX for the Markdown generation. MDX is a superset of standard Markdown, but it requires that any html used in the document must be jsx compliant. Meaning all html tags need to contain a closing tag. For example don't use: <br>, use: <br/>. Additionally, html entities < > not in code blocks, need to be html-encoded. Use < and > to encode. As part of the CircleCI build, the README.md file will be validated for MDX compliance.