Identity Lifecycle Management (ILM)
Supported versions
Available on Cortex XSOAR, Cortex XSIAM, and Cortex XPANSE.
The Identity Lifecycle Management (ILM) pack enables four flows.
- User provisioning - provision users from an HR system (e.g. Workday) into all supported applications used by the organization such as Active Directory and/or Okta by performing management operations like creating, reading, updating, and deleting users.
- Group sync - sync user memberships in groups to applications based on group creations in Okta.
- Group membership update - provides automated provisioning of user permissions derived from Okta groups that the user is assigned to or unassigned from.
- App sync - sync users to applications based on app assignments in Okta. When implementing the App Sync workflow, users are assigned to, or unassigned from, applications in Okta. Additionally, when users are added or removed from Okta groups, the App Sync playbook will create, update, enable, or disable the user in the corresponding Cortex XSOAR instance.
User provisioning can be used by itself, but it is also a prerequisite for the Group Sync, Group Membership Update, and App Sync flows.
Read the instructions for each flow carefully to understand the workflows that each pack executes and how the flow must be implemented.
User Provisioning#
The ILM pack enables you to provision users from Workday into various applications such as Active Directory and/or Okta by performing management operations like creating, reading, updating, and deleting users.
Workday Reports#
The HR team uses Workday to manage operations for employees in the organization. It is standard practice for HR to generate a report for these maintenance operations. For example, Workday can run a weekly report that captures all new and terminated employees, or a daily report that captures updates to existing employee profiles (e.g., new mailing address or phone number).
Cortex XSOAR uses the Workday integration to fetch report updates and create XSOAR incidents that correspond to the management operations in the report. For example, if you run a full report that includes five new employees, three terminated employees, and 10 employee profiles that were updated, a total of 18 unique incidents would be created in Cortex XSOAR.
Each report has a unique URL, which you enter in the Workday Report URL instance parameters. If you want to fetch or run associated playbooks on multiple reports, each report will require its own integration instance.
Before You Start#
The logic of the playbooks in the ILM pack, which controls how they execute, is determined by the employment data ingested from the Workday integration.
To start working with the Workday integration, download the Workday pack from Marketplace and configure the Workday IAM integration.
There are several custom fields that must be populated with specific values in order for the playbooks to execute the correct management operations. If your current Workday instance does not include these fields and values, you will need to add them to the instance.
The following table lists these fields, what they are used for in Cortex XSOAR, and the valid values the fields accept.
| Workday fields | How it is Used | Possible Values |
|---|---|---|
| Email address | A unique identifier for the user. | User's work email address |
| Employment status | Influences the playbook flow that will run on the IAM - Sync User incident. | Active Leave of Absence Terminated |
| Rehired employee | Used in conjunction with the prehire flag to determine whether a user should be rehired. | Yes No |
| Prehire flag | If True, indicates a pre-hire status of the employee (i.e., a future hire or rehire). | True False |
| Hire date | Used to determine when a user will be created for the employee. | Any date format is supported. The format should match the format chosen in the integration parameter. |
| Termination date / Last day of work | Used in conjunction with the prehire flag to determine whether a user should be terminated. | Any date format is supported. The format should match the format chosen in the integration parameter. |
Make sure to obtain the URL where the Workday reports are hosted. Each report has a unique URL, which you enter as one of the integration instance parameters. If you want to fetch multiple reports, each report will require its own integration instance.
Ensure that you have a Mail sender integration for sending email notifications.
Fetch Incidents with Workday IAM Integration#
The Workday IAM integration creates incidents based on information included in the Workday report such as the employee's hire date, termination date (or last day of work), prehire flag and more. Depending on the incident type, the IAM - Sync User, IAM - Activate User In Active Directory, or IAM - Deactivate User In Active Directory playbook runs provisions and manages the employee users in all of the applications used by the organization, respectively.
Use the fetch-incidents command to detect changes in the report identifying the incident type. The fetch-incidents command behaves in one of the following ways:
Fetching Samples#
To create sample incidents from the first five entries in the report, use the Fetch Samples parameter. This option allows you to see how fields are mapped through the IAM Sync User - Workday Incoming Mapper Editor to help with setup or to test the provisioning flow.
Note: Avoid using the Fetch Samples parameter with a report containing real employee information.
First Sync#
To first create all of the User Profile indicators representing the active users in the report and sync them with Cortex XSOAR, use the Sync user profiles on first run parameter. When this parameter is used, the first fetch will create all of the User Profile indicators, but will not trigger any incidents.
Workday Report Processing Cycle#
After the first sync, the fetch command starts the report processing cycle. During the first fetch of the cycle, all of the report entries are collected and stored in the Last Run object. On each subsequent run of the command, a certain number of entries are processed (based on the Fetch Limit and the Percentage of entries to process per fetch parameters), and only the remaining entries are stored for the next runs, until all of the entries in the report are finished being processed. If there are changes in the processed entries, one of the following incident types will be created:
- IAM - New Hire
- IAM - AD User Activation
- IAM - Terminate User
- IAM - AD User Deactivation
- IAM - Rehire User
- IAM - Update User
When there are no more entries left to be processed, the integration checks for orphan users (i.e. active User Profile indicators with no corresponding Workday report entry) by collecting all User Profiles of employees with a non-disabled AD Account Status, from whom there is no record in the Workday report. An IAM - Terminate User incident is triggered for each of those orphan users.
Possible Incident Types in Workday#
IAM - New Hire#
The IAM - New Hire incident type is triggered for an active employee who hasn’t yet been synced to XSOAR. An employee in a Workday report is considered active when all of the following apply:
- The Employment Status is not Terminated.
- The Hire Date is at most X days from today, where X is determined by the Number of days before hire date to sync hires parameter.
- They have a future deactivation date (either Termination Date or Last Day of Work, determined by the Deactivation date field parameter).
Partial Name Match#
When a new hire is detected and its display name is already used by another User Profile, a mergeduserprofile attribute is added to the User Profile and is later used in the IAM - Sync User playbook.
IAM - AD User Activation#
The IAM - AD User Activation incident type is triggered for an active employee synced to XSOAR whose AD Account Status is Pending and who has reached Y days before their hire date. (Y is determined by the Number of days before hire date to enable Active Directory account parameter.)
IAM - Terminate User#
The IAM - Terminate User incident type is triggered for an employee with a Cortex XSOAR User Profile whose AD Account Status is not Disabled, when one of the following changes occurs in the employee’s entry in the Workday report:
- The Employment Status is Terminated and Prehire Flag is False.
- Deactivation date field is a past date.
IAM - AD User Deactivation#
This incident type is triggered when the User Profile of an employee synced to Cortex XSOAR has an AD Account Status field as Enabled, but their actual hire date is in more than Y days. (Y is determined by the Number of days before hire date to enable Active Directory account parameter.) This occurs when a new hire is already activated, but at the last moment, their hire date is postponed.
IAM - Rehire User#
The IAM - Rehire User incident type is triggered for an employee with a Cortex XSOAR User Profile whose AD Account Status is Disabled, when one of the following changes occurs in the employee’s entry in the Workday report:
- The Prehire Flag is True and Rehired Employee is Yes.
- Deactivation date field was either removed from the entry or changed to a future date.
IAM - Update User#
When any other employee information of an active employee who is synced to Cortex XSOAR is changed (surname, manager name, etc.), or when the User Profile’s Force Sync field is changed to True, this incident type is triggered. When the IAM - Update User incident is triggered, the olduserdata attribute is added to the User Profile data and is later used in IAM integrations in order to support username/email changes.
Important User Profile Indicator Fields#
- AD Account Status - can be Enabled, Disabled or Pending (after sync date but before activation date).
- Is Processed - indicates whether there is an active incident for this User Profile. Only report entries of employees whose User Profile’s Is Processed field value is False are processed (unless a new change in the report was detected).
- Is Temporary User - a temporary User Profile can be created by setting the Is Temporary User field to True. A manual action, such as administrator approval, is required to determine whether the User Profile will be kept or removed. Unless there is a new change detected in the report, temporary users are not processed until the manual action is taken.
- Source Priority and Source of Truth fields - for Workday, defaults to 1 and Workday. Whenever there is an additional source of truth, the source with the lower source priority value gets the higher priority.
- Conversion Hire - a boolean field indicating whether this User Profile was originally mastered by another source of truth. When an employee is a conversion hire, even if their AD Account Status is “Enabled” and their hire date is in more than Y days (Y determined by the Number of days before hire date to enable Active Directory account parameter), an AD Deactivation incident is not triggered for them.
Playbooks#
General Info - app-provisioning-settings List#
The playbooks provision user information into different applications. The integration instances used for those applications and the exact action taken when provisioning those users is determined by a Cortex XSOAR list named app-provisioning-settings. You need to create this list before beginning the provisioning process. The list allows you to specify which actions can happen on each instance and whether every new employee should have a new user on that instance or if it’s reserved to a group of select members. The list also allows specifying email addresses that should be notified about users being created, enabled and so on, in a certain instance. The structure of the list should be in JSON format. For example:
IAM - Sync User#
The IAM - Sync User playbook determines the management operations (create, read, update, or delete/disable) that need to be performed according to the data retrieved from the Workday report. For example, if a new employee joins the company, Workday creates an IAM - New Hire incident and the playbook runs a Create operation across the supported IAM integrations. Similarly, if an employee is terminated in Workday, a IAM - Terminate User incident is triggered, and a Disable operation runs in the supported IAM integrations. The IAM - Activate User In Active Directory playbook runs when an IAM - AD User Activation event is created. This incident is created for new or rehired employees, before the hire date or immediately, depending on the days configured in the Workday integration parameters. The IAM - Deactivate User In Active Directory playbook runs when the employee has already been activated, but the hire date was then postponed.
Most changes in the HR system report trigger an event that runs the IAM - Sync User playbook. This playbook creates, updates, enables or disables users in different applications. The playbook starts by searching for previous, duplicate incidents of the same type for the same users, and closes them if any were found. The playbook then searches for a User Profile indicator that corresponds to the data coming from the HR system report. If a User Profile is not found in Cortex XSOAR, then in most cases the playbook proceeds with a new hire flow and creates a new User Profile indicator, as well as provisioning all of the user data from the report into the rest of apps. However, in some cases, the employee name (also called “Display Name”) may already be taken. This can happen naturally, but can also be the result of a human error in the HR report. In that case, the playbook pauses and allows the user to decide what to do with the information from the report - should it provision a new account, should it update the conflicting account with the new information from the report, or should the playbook do nothing while the report is being fixed by HR? Based on the user’s decision, the playbook continues with the provisioning process as described below.
If a User Profile indicator is found in the system, in most cases, the new information is provisioned normally (terminate, update, etc). If, however, the user’s email address is changed, a different approach is required. Since Cortex XSOAR stores all User Profile indicators with the email address as the unique indicator value, in order to change a User Profile’s email address, the system must delete the old User Profile and create a new one with the new email address. These scenarios are handled automatically based on the information coming from the Workday integration. You can set it up so that if an email change is detected, a manual task allows an admin to approve or disapprove the change. Afterwards, the provisioning process continues.
After the above tasks are executed, the provisioning process begins. Typically, the incident type (terminate, update, etc) is detected in Workday. Occasionally, the incident type that is initially detected in Workday is updated to a different incident in Cortex XSOAR (for example, a “new hire” with a partial name match turns out to be an update event for an existing user). In these cases, a corresponding sub-playbook will run. The sub-playbooks are described below.
Finally, the playbook notifies you about any instances that failed in the IAM - Send Failed Instances Notification playbook, and displays the provisioning data in the layout. If any instance has failed, it creates an error and waits for the error to be fixed. Once the error is fixed, the playbook can be re-run safely, as the sub-playbooks can determine which actions have already been executed successfully so as not to repeat them.
IAM - New Hire#
The IAM - New Hire playbook creates a new user using the iam-create-user command for each integration instance that is enabled and configured in the app-provisioning-settings list. This is performed when the following conditions are met:
- The create_user_enabled field for that integration instance in the list is set to true.
- The create_user_group field for that integration instance is set to all.
Additionally, the playbook runs the IAM - Create User In Active Directory sub-playbook to create a new user in Active Directory with more custom steps required specifically for Active Directory.
Finally, the playbook runs the IAM - Send Provisioning Notification Email sub-playbook to notify the users specified in the app-provisioning-settings list about the provisioning process.
IAM - Update User#
The IAM - Update User playbook updates the user using the iam-update-user command when the update_user_enabled field in the app-provisioning-settings list is set to true. This is performed for each integration instance that is enabled and configured in the app-provisioning-settings list.
The playbook then runs the IAM - Send Provisioning Notification Email sub-playbook to notify the users specified in the app-provisioning-settings list about the provisioning process.
IAM - Terminate User#
The IAM - Terminate User playbook first determines the source of the termination based on the incident context generated by the Workday integration. In most cases, a user is simply disabled. However, there are two possible scenarios:
- The user is an “Orphan User” - this happens when the employee record is simply deleted from the HR system report. In this case, a manual task allows an admin to determine whether the user should really be terminated or not.
- The user is terminated involuntarily through the Okta integration, also known as “TUFE”. In this case, the playbook checks whether the user is currently active in Okta. If the user is disabled in Okta, the termination process proceeds normally. However, if the user is enabled in Okta, a manual task allows the admin to decide whether that termination is intentional or not, and if the user should be terminated or kept as is.
In order to enable TUFE detection, you must fetch user.lifecycle.deactivate log events from Okta IAM, using the Fetch Query Filter parameter. In addition, specify a pre-process rule to drop non-TUFE events, e.g., drop all Okta IAM incident of type IAM - Terminate User by the actor who performed the operation.
The termination process proceeds by disabling the the user using the iam-disable-user command when the disable_user_enabled field in the list set to true. This is performed for each integration instance that is enabled and configured in the app-provisioning-settings list.
Finally, the playbook runs the IAM - Send Provisioning Notification Email sub-playbook to notify the users configured in the app-provisioning-settings list about the provisioning process.
IAM - Rehire User#
The IAM - Rehire User playbook enables the user using the iam-update-user command and sets the allow-enable argument to True. This is performed for each integration instance that is enabled and configured in the app-provisioning-settings list when the following conditions are met:
- The enable_user_enabled field in the list is set to true.
- The create_user_group field set to all.
Additionally, the playbook runs the IAM - Create User In Active Directory sub-playbook to create or initialize an existing user in Active Directory. Finally, the playbook runs the IAM - Send Provisioning Notification Email sub-playbook to notify the users configured in the app-provisioning-settings list about the provisioning process.
IAM - Create User In Active Directory#
Based on the current status of the user in Active Directory, the playbook creates and/or initializes the user in Active Directory. Initializing the user consists of generating a password for the user using a password generation script configured in the playbook inputs and then sending an email with the password to IT to prepare the laptop for the user and to the user’s manager to provide that password to the user when their hire date arrives. At the end of the playbook, the User Profile's AD Account Status is set to Enabled if the user is already enabled, or to Pending if the user is pending activation (either immediately or on a future date). When the Workday integration sees this, it may decide whether the user needs to be activated or not.
IAM - Activate User In Active Directory#
Based on whether the user exists in Active Directory or not, the playbook runs the IAM - Create User In Active Directory playbook or continues with the user activation process. The activation process starts by checking whether the hire date of the employee is a past date. If it’s a past date, the playbook allows an administrator to decide whether the user should be activated or not. Otherwise, the playbook continues with the normal flow. If the user should be activated, the playbook enables the user by using the iam-update-user command with the allow-enable argument set to True. Once the user is enabled successfully, a welcome email is sent to them and to their manager (configured in the HR system report), and the User Profile’s AD Account Status is set to Enabled to signify that the user is now enabled in Active Directory.
IAM - Deactivate User In Active Directory#
The IAM - Deactivate user In Active Director playbook disables users in Active Directory. This playbook is used when the user should be disabled in Active Directory, but not go through a full termination process, such as when a user is hired and then has their hire date postponed. The playbook also updates the User Profile indicator's AD Account Status to Pending to ensure that the user will be reactivated.
IAM - Send Provisioning Notification Email#
Use the IAM - Send Provisioning Notification Email to send email notifications using a custom HTML template for every user provisioned successfully. The recipients of the email are configured in the app-provisioning-settings list. This playbook is used in the IAM - New Hire, IAM - Update User, IAM - Terminate User, and IAM - Rehire User playbooks. This playbook is used in a loop to notify the correct stakeholder separately about every instance.
IAM - Send Failed Instances Notification#
The IAM - Send Failed Instances Notificaton playbook sends an email notification to the email configured in the playbook inputs for every integration instance where provisioning fails and needs to be fixed. The playbook uses a preconfigured HTML template for the email. This playbook is used in a loop in the IAM - Sync User playbook to send a separate email for every failed instance.
IAM - Custom User Sync, IAM - Custom Pre-provisioning, IAM - Custom Post-provisioning#
These playbooks are used as placeholders to allow you to create custom steps before, during, or after the provisioning process. This enables you to keep the existing system playbooks locked so that you can continue to receive future updates.
Initial Sync and User Profiles#
Cortex XSOAR stores all employee information as User Profile indicators. User Profiles have many fields out-of-the-box, which hold data about the employee.
Note: The User Profiles are initially created when Workday's fetch-incident command is executed for the first time and the Sync user profiles on first run parameter is checked. The profiles are created without triggering an incident. User Profiles for users that are added to Workday after this initial fetch are created by the IAM - Sync User playbook. This synchronizes all existing employees to Cortex XSOAR without running incidents for them since they are already provisioned in the applications used by the organization.
The User Profiles are constantly being synchronized with Workday. When a change to a user comes from a Workday report, the integration creates an incident, which triggers a change in the rest of the applications used in the organization and updates the User Profile indicator.
Pack Configurations#
Before using this content pack, you must configure the following items in the order listed:
- Playbook configuration (inputs).
- Indicator and Incident fields and mappers. You only need to configure these if you are adding custom fields that you want to store in Cortex XSOAR and/or provision into additional applications.
- Integration configurations.
Playbook inputs#
There are mandatory inputs and optional inputs for each of the playbooks. To view the inputs in each playbook, navigate to the playbook and click Playbook Triggered.
IAM - Sync User#
Configure values for the following mandatory inputs in the IAM - Sync User and IAM - Activate User In Active Directory playbooks:
ITNotificationEmail - Email address used to receive notifications of any errors in the provisioning process.
SecondsToWaitBeforeWelcomeEmail - The number of seconds to wait before sending the welcome email to the user and their manager after activation.
You can choose to configure values for the optional inputs in the playbook.
IAM - Activate User In Active Directory#
Configure values for the following mandatory inputs:
ITNotificationEmail - Email address used to receive notifications of any errors in the provisioning process.
SecondsToWaitBeforeWelcomeEmail - The number of seconds to wait before sending the welcome email to the user and their manager after activation.
You can choose to configure values for the optional inputs in the playbook.
IAM - Create User In Active Directory#
Configure the following inputs:
- ManagerEmailHTMLList - (Optional) The name of a Cortex XSOAR list that contains an HTML template for emails that are sent to user managers when a new Active Directory user is created. If no list is specified, an email with a generic structure will be sent (generated inside the IAMInitADUser script).
- ServiceDeskEmailHTMLList - (Optional) The name of a Cortex XSOAR list that contains an HTML template for emails that are sent to ServiceDesk to prepare user laptops when a new Active Directory user is created. If no list is specified, an email with a generic structure will be sent (generated inside the IAMInitADUser script).
- ADNotificationEmails - A comma-separated list of email addresses to be notified when a user is initialized in Active Directory.
- PasswordGenerationScriptName - The name of the automation script that is used to generate a random password for newly created Active Directory users. The default script used for this is IAMGeneratePassword, but depending on your password complexity policy, you may or may not want to use it.
- ServiceDeskEmail - (Optional) Email address to send the domain user password (from Active directory) of new users so that their equipment can be prepared by IT when they're being hired.
- SendEmail - (Optional) Whether to send an email with the password of the user for newly created users. Can be True or False.
Do not change or delete the CreatedIndicator, indicator, SuccessfulVendors, and sAMAccountName inputs, as they are already configured to work in places where this playbook is used as a sub-playbook.
IAM - Deactivate User In Active Directory#
Configure the ITNotificationEmail playbook input.
IAM - Group Membership Update#
Configure the following inputs:
- UserRoleToAssignForFailures - (Optional) The Cortex XSOAR role from which to assign users to the incident when a CRUD operation fails. This can be left empty to assign users from all roles.
- UserAssignmentMethod - (Optional) Determines the way in which user assignments are decided in Cortex XSOAR for the failed incidents. Can be one of the following: random (default), machine-learning, top-user, less-busy-user, online, current.
- AssignOnlyOnCall - (optional) Determines whether to assign only users that are currently on a shift to failed incidents. Set to true to assign only users that are currently working, or set to "false" or leave empty to assign any user.
- AdminEmail - (Optional) The email address of the admin that approves group membership changes.
IAM - Send Provisioning Notification Email#
Configure the NotificationEmailHTMLList input if you want to use custom HTML templates for notifications of users that are provisioned successfully in the different applications.
Integrations#
Install and configure the Workday IAM integration.
Note: Before running the Workday integration, ensure that you have added the fields in Workday as instructed in Before You Start.
There are additional IAM-compatible integrations. The following are examples of integrations that support execution of the generic ILM management operations.
Note: If you choose to run any of the basic management operations, such as create, delete, etc. manually from the CLI, be sure to include the email and username fields in the User Profile.
Group Sync#
The Group Sync flow allows synchronizing user memberships in groups to applications based on group creations in Okta.
Prerequisites#
Perform the following prerequisites before using the Group Sync flow:
- In Okta IAM Fetch Query Filter parameter, specify the group.user_membership.add and group.user_membership.remove event types, as well as all the relevant Okta group IDs. Example:
- Add the app-group-sync-settings list that is used later in the playbooks to determine which IAM instance should be used for the given Okta group IDs. For example:
- Configure a recurring job for the IAM - App Group Sync Trigger playbook.
When an incident running the IAM - App Group Sync Trigger playbook is triggered, for each instance in the app-group-sync-settings list an incident of type IAM - App Group Sync is created. This incident runs the IAMAppProvisioningSyncGroup automation for every group in order to collect which users were added or removed from the Okta group and accordingly add or remove them from the corresponding group in the application, using the following generic commands:
| Group Command | Description |
|---|---|
| iam-create-group | Creates an empty group. |
| iam-update-group | Updates an existing group resource. |
| iam-delete-group | Permanently removes a group. |
| iam-get-group | Retrieves the group information, including members. |
Supported Integrations#
Group Membership Update#
The Group Membership Update feature provides automated provisioning of user permissions derived from Okta groups that the user is assigned to or unassigned from.
Before You Start#
Before using the Group Membership Update process, you must create and configure a Cortex XSOAR list called app-provisioning-settings, which is used by the playbook. See General Info - app-provisioning-settings List for information.
Group Membership Update Process#
The Group Membership Update process is triggered by the following scenario: A user is added to the “Admins” group of the Smartsheet app in Okta. An IAM - Group Membership Update incident is created. The user then receives the same permissions in the Smartsheet application itself.
When an IAM - Group Membership Update incident is fetched from Okta, the IAM - Group Membership Update playbook runs. The playbook fetches the current app assignments of the user in Okta. Then, in order to determine in which integration instance the user permissions need to be updated, the playbook looks for the instance name that corresponds to the Okta app ID in which the user has had their permissions change. Afterwards, the playbook gets the User Profile indicator of the user and extends it with the additional information of the app. After asking for admin approval via email, the playbook either updates the new user information in the app, or continues without doing anything. If the update fails for any reason, a user is assigned to the incident and an error is raised intentionally to stop the playbook execution and allow the user to fix the issue.
App Sync#
The App Sync feature provides automated app provisioning in applications (such as ServiceNow, GitHub, and Slack) for users created in Okta. App Sync consists of two main features:
- Create/Enable/Disable users in apps they are assigned to or unassigned from through Okta.
- Update users in apps when their information changes, either directly through Okta, or indirectly through a change in Workday which in turn updates the information in Okta and then in the rest of the apps.
Before You Start#
Before using the App Sync feature with Okta, you must perform the initial synchronization of users from Workday into XSOAR User Profiles.
App Sync Process#
The App Sync process starts when one of the following scenarios happens:
- A user is assigned/unassigned to an application in Okta.
- A user is part of a group that was assigned/unassigned to an application in Okta.
- The user's information changed in Okta, directly or indirectly (through an IAM - Update User incident).
The Okta IAM integration fetches the following Okta log event types and proceeds with the applicable flow:
The application.user_membership.add / application.user_membership.remove Okta events result in IAM - App Add / IAM - App Remove incidents respectively. These run the IAM - App Sync playbook. The playbook uses the integration context of the Okta instance (which is transparent to the user), which maps Okta app IDs to integration instances in Cortex XSOAR, in order to determine to which instance to sync the user. It then runs either the iam-update-user command with the allow-enable argument set to True, or the iam-disable-user command, depending on the detected incident type.
Note: The behavior for when a user account does not exist in the app is configurable through the relevant integration configuration. For example, if the user does not exist in the app to which they are assigned and the integration's create if not exists parameter is unchecked, then the command will be skipped. If the parameter is checked,- the account will be created.
The user.account.update_profile Okta event results in IAM - App Update incidents which run the IAM - App Update playbook. The playbook checks which apps the user is assigned to and maps it to integration instances in Cortex XSOAR in which the user will be updated. The mapping is done using the integration context of the Okta instance (which is transparent to the user), which maps Okta app IDs to integration instances in Cortex XSOAR, in order to determine which instance to update the user in. It then runs the iam-update-user command in all of the available instances of the apps to which the user is currently assigned.
Both the IAM - App Sync and IAM - App Update playbooks also update the applications that the user is assigned to in the User Profile indicator. To properly update the field and avoid race conditions, the playbooks use the Demisto Lock integration, which gets a lock before updating the field and releases the lock afterwards. This is used to allow only one incident to update the field at a time.
Pack Configurations#
To trigger the App Sync IAM - App Add, IAM - App Remove and IAM - App Update incident types, you need to configure an Okta IAM integration to fetch incidents. Before enabling the integration, create an IAM Configuration incident from which to make connections between Okta applications and IAM integration instances. When a user is added to or removed from a connected Okta application, Cortex XSOAR calls the relevant management command from its connected IAM instance in Cortex XSOAR.
Okta IAM Integration#
Configure the following information in your Okta IAM integration instance.
| Field | Value | Notes |
|---|---|---|
| Classifier | Okta IAM - App Sync | Select this from the drop-down list and not the textbox configuration, where “User Profile - Okta (Incoming)” and “User Profile - Okta (Outgoing)” should be. |
| Mapper | Okta IAM - App Sync | Select this from the drop-down list and not the textbox configuration, where “User Profile - Okta (Incoming)” and “User Profile - Okta (Outgoing)” should be. |
| Query only application events configured in IAM Configuration | Checked/Unchecked | Select this option to let the integration fetch all supported event types. Unselect this only if you are sure you don't want to fetch specific Okta events. |
| Fetch Query Filter | “eventType eq "application.user_membership.add" or eventType eq "application.user_membership.remove" or eventType eq "user.account.update_profile" | Only configure this if the Query only application events configured in IAM Configuration parameter is unchecked. This allows you to manually specify which Okta event types to fetch. |
| Fetches incidents | Select this option. | |
| Automatically creates a user if not found in the update command | Select this option |
IAM Configuration#
The App Sync process requires that you have a mapping of Okta app IDs to Cortex XSOAR integration instance names. This mapping allows you to decide what app assignments trigger the creation or removal of users in which instance.
For example, you may have an Okta App ID “0oau408dvkn96MwHc0h3” and want to map it to the ServiceNow_Users_Instance1 integration so that every time a user is assigned to an app that has this App ID, a user will be created in ServiceNow using the generic IAM commands in Cortex XSOAR.
Configuring the App Sync settings is a one-time configuration that you can do using an out-of-the-box dedicated incident type. Create an incident of type IAM - Configuration, choose your Okta instance, and enter the Okta App names and your Cortex XSOAR integration instance names in the relevant fields.
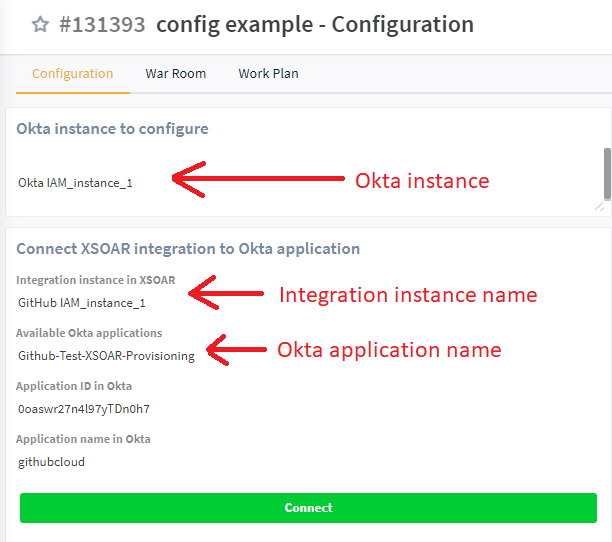
You can obtain the app integration instance name from the integration page in Cortex XSOAR:

By creating this incident and entering the app and instance information, a configuration is saved in the integration context. This is transparent to the user. Once the configuration is set, the playbooks use it automatically. Additionally, you can use the okta-iam-get-configuration command to view the configuration at any time. If you ever decide to run the okta-iam-get-configuration command manually, make sure to use the using parameter with the correct instance name of Okta in which you made the configuration to receive the configuration that you're expecting.
IAM - App Sync & IAM - App Update playbooks#
The IAM - App Sync and IAM - APP Update playbooks contain error handling tasks where a user is assigned to review the incident if App Sync fails for any reason. You can assign a user to the incident using the playbook inputs. You can configure the UserRoleToAssignForFailures, UserAssignmentMethod, and AssignOnlyOnCall playbook inputs according to your needs. If left unconfigured, a user will be randomly assigned.
Integrations#
Okta IAM - (see the documentation)
Advanced#
Playbooks#
Throughout the playbooks, different advanced mechanisms are used to deal with edge cases and to reflect certain data to the Workday integration, which prevents excessive incidents from being generated. For example, when incidents fail or wait for user input, Workday detects that the User Profile was not fully synced. It then attempts to sync the data again, as the HR system report shows different information from that of the User Profile indicator. Although the Workday integration has a deduplication mechanism, some cases are still not covered in it and require the playbooks to make some adjustments. Another example is Orphan Users where the incident fails for any reason in the middle of the termination process. Since the HR system report holds no record for that user, its normal deduplication mechanism of not creating additional users that had no new changes in the report does not work.
Is Processed Indicator Field#
Generally, incidents from the User Provisioning flow begin by setting the User Profile indicator’s Is Processed field to True - to signify that no new incidents should be created for that user unless something else changes in the HR system report. For example, when an email/username change is detected, admin approval is required. During that time, Workday detects that the existing User Profile was not updated yet. To overcome this issue, a temporary User Profile indicator is created with the Is Processed field set to True, and holds the new data from the Workday report. Towards the end of the provisioning process, the User Profile’s Is Processed field is set to False.
Temporary User Profiles#
As mentioned previously, in email/username change scenario, a temporary User Profile is created. Temporary User Profiles are User Profiles for which a decision whether to keep them or delete them has not yet been determined, so they do not necessarily represent a real user in the system. If the admin decides to proceed with the change, the existing User Profile indicator has to be deleted, and a temporary User Profile becomes the new one (because the unique indicator value is the employee’s email address). At the end of the provisioning process, the User Profile is set to appear as non-temporary.
Merged User Profile#
When a partial name match is detected in the Workday integration, the IAM - Sync User playbook detects that the ${incident.userprofile} key in the context, which is the key that holds the new data to provision both to the User Profile indicator and to the rest of the apps, contains a mergeduserprofile key. That key holds data that combines the detected User Profile with the new information from the HR system report. If the admin decision was to overwrite the existing account then in order to ensure that the existing user is updated, the playbook takes the email and username from the mergeduserprofile key, and sets them in the email and username incident fields respectively, which are later used to search for the existing, conflicting User Profile in XSOAR and then to update that user. Also, according to the AD Account Status of the existing user, the incident type is changed.
AD Account Status#
The AD Account Status generally represents the current status of the account in Active Directory. In addition to being Enabled or Disabled, there are cases where the AD Account Status is also empty, which means that the status has not yet been determined. For example, if a playbook started execution and has not yet determined the new status, resetting the AD Account Status is a measure taken to ensure that the Workday integration performs the wrong operation (activation/deactivation) of the user, as it is already being handled. Also, it’s important to note that when a user is terminated (gone through the IAM - Terminate User flow) then the AD Account Status is shown as Disabled. However, if the user was hired and had their hire date postponed, the user will simply go through an AD Deactivation flow (rather than full termination flow), and their AD Account Status will be changed to Pending, as they are actually pending a new activation, and are not really terminated.
Fields and Mappers#
The mappers that are provided out-of-the-box work with the assumption that you did not add any fields.
The following provides a general idea of how to include additional information in the User Profile indicator, and provision it to your available IAM applications. The Example below provides detailed instructions for adding a field to work with the ILM content pack.
Add the field to the mappers for Workday, Okta, Active Directory, and for any other IAM integration you have configured.
Note: To change the mappers, you will need to duplicate both the incoming and outgoing mappers.
Ensure that you are adding the fields to the relevant incident types within each mapper.
For the Workday incoming mapper, add the field to the IAM - Sync User incident type.
For Okta and Active Directory, add the field to the UserProfile incident type in both the incoming and outgoing mappers.
Note: As part of the configuration of the Active Directory mapper, you must map a value to the OU (organizational unit) required field. To do this, create a transformer that maps a user attribute of your choice to an OU value.
For GitHub, the relevant mappers are in the IAM-SCIM pack and can be used in any integrations that uses SCIM.
Reconfigure each integration to use the duplicated mappers you created.
Example#
The following is an example of the flow when adding a field to work with the ILM content pack. This example does not presume to cover all possible scenarios.
Add an incident field.
- Navigate to Settings > OBJECTS SETUP > Incidents > Incident Fields and click New Field.
- Enter the name for the field and click the Attributes tab.
- Clear the Add to all incident types checkbox.
- In the Add to incident types drop-down, select the following:
User Profile
- IAM - Sync User
You can also add the following incident types if you would like to display the new field in the incident layout (the new fields will be shown regardless in the User Profile indicator).
- IAM - New Hire
- IAM - Update User
- IAM - Terminate User
- IAM - Rehire User
Click Save.

Add an indicator field.
Change the field type to Indicator.

Click New Field.
Give the same name as you entered for the Incident field. In this example, we have used Sample-Field-IAM.
Click the Attributes tab.
Clear the Add to all incident types checkbox.
In the Add to incident types drop-down, select the User Profile indicator type.
Click Save.

Add the fields to the respective layouts.
- Navigate to Settings > OBJECTS SETUP > Incidents > Layouts.
- Select the incident layout to which you want to add the field, for example, User Profile, and click Duplicate.
- Click the User Profile_copy layout.
- In the Library, click Fields and Buttons, and drag the field you added above to the section in the layout in which you want it to appear. In this example, we have added the field to the Personal and Contact Information section.
- Save the layout.
- Repeat this process for each of the other layouts in which you want the field to appear.
- Go to Indicator Types, select the User Profile indicator type, click Edit and then change the layout to the new layout you have just created.

Map the new field in all of the mappers.
- Navigate to Settings > OBJECTS SETUP > Incidents > Classification & Mapping.
- Select the mapper to which you want to add the field, for example, IAM Sync User - Workday, and click Duplicate.
- Click IAM Sync User - Workday_copy.
- For the incoming mapper:
- In the Playground, run the !get-mapping-fields command.
- Locate the results for you integration.
- Click View full JSON in a new tab.
- Click Download as a file. The file will be downloaded to your Downloads folder.
- Copy only the attributes/values of the User Profile field of the downloaded JSON file, and save it in a separate JSON file.
- Under Get data, select Upload JSON and upload the saved JSON file.
- For the outgoing mapper:
- Under Get data, select the source from which you want to retrieve the sample data for mapping.
- Under Select Instance, select the instance of the selected source.
- Under Incident Type, select the relevant incident type.
- for the Workday incoming mapper, add the field to the IAM - Sync User, IAM - New Hire, IAM - Rehire User, IAM - Update User and IAM - Terminate User incident types.
- for Okta, Active Directory, ServiceNow, GitHub and the rest of the IAM integrations, add the field to the UserProfile incident type in both the incoming and outgoing mappers.
- Map the new field you have created to the field in the schema. For purposes of this example, we have mapped the Sample-Field-IAM field to the employee number.
- Repeat this process for each additional field and save the mapper.
- Repeat this process for all of the mappers. For example:

Configure the integration instances to use the new mappers.
- Navigate to Settings > INTEGRATIONS > Instances and select one of the integration instances for this pack. In our example, we are using Workday.
- In both Mapper (incoming) fields (one located under the Incident type field and one located under the Use system proxy settings checkbox) select the copy mapper that you created above. In our example, that would be IAM Sync User - Workday_copy.

Demo Video#
Troubleshooting#
Why are my new fields not shown in the layout?#
Make sure of the following:
- You've created an incident field and an indicator field with the exact same name.
- The incident fields are associated to the IAM incident types, and the indicator fields are associated to the User Profile indicator type, as described in the Fields and Mappers section.
- The fields are mapped in the Workday mapper under all the relevant incident types.
- The mapper configured in the Workday integration is the correct one.
- The fields were added to the layout where you want them to appear.
- The incident types were configured to use the new layout that you've created.
Why are incidents not being created from Workday?#
There could be several reasons for incidents not being created from Workday:
- The integration is being run for the first time, at which point only the initial user sync is run - which is when the User Profile indicators are created as described in the Initial Sync and User Profiles section.
- You keep resetting the last run timestamp in the Workday integration while Sync user profiles on first run option in the Workday integration configuration is checked. You should not reset the last run timestamp or you should uncheck that option if you've already performed the initial sync.
- Your Workday report is missing required fields. Refer to the table in the Before You Start section and make sure that the report holds all of those fields for every employee.
- Nothing has changed in the Workday report since the initial sync, so there is nothing to provision.
Why are duplicate incidents being created?#
There could be several reasons for duplicate incidents being created:
- There were changes to an employee in the Workday report, but the employee's incident in Cortex XSOAR failed before updating the User Profile indicator of that employee. As long as there is a discrepancy between the Workday report and the User Profile indicator, the Workday integration will keep trying to update it. Search for the incident of the employee and fix the cause of error. Once the discrepancy is fixed, the next incident should complete and there should no longer be any duplicate incidents.
- The field is missing in one of the incident types in the Workday mapper.
Why does user creation fail in Active Directory?#
There could be several reasons for user creation failing in Active Directory. Inspect the error message in the Process Details tab to understand why the creation failed. If you cannot determine the cause of the error, make sure that:
- You've added a transformer script which determines the Organizational Unit (OU) where the user will be created in the Active Directory outgoing mapper and in the User Profile incident type and schema type, under the "ou" field.
- You're using LDAPS in the Active Directory (port 636) integration.
- You've specified a password generation script in the IAM - Activate User In Active Directory playbook inputs, under the PasswordGenerationScriptName, and that script complies with your domain's password complexity policy.
Why am I getting unwanted IAM - App Update incidents?#
You may have rules configured in Okta which automatically update user information for every new user. If you want to have those updates provisioned to the rest of the apps, you will need to follow the process of adding additional fields under the Advanced section.