Microsoft Integrations - Authentication
Supported versions
Available on Cortex XSOAR, Cortex XSIAM, and Cortex XPANSE.
This document includes the following sections to help you understand, set up, and use the integration effectively:
- Cortex XSOAR Application
- Self Deployed Application
- Using National Cloud
- Authentication Flows
- Azure Managed Identities Authentication
- How to find Azure Integrations Parameters
- Troubleshooting
Microsoft integrations (Graph and Azure) in Cortex XSOAR/XSIAM use Azure Active Directory (Azure AD) applications to securely authenticate with Microsoft APIs. These applications act as the bridge between XSOAR/XSIAM and Microsoft services, defining which API requests can be performed and what level of access is granted. The permissions and roles configured in the Azure application determine what data and actions the integration is authorized to access within your tenant.
Usually, you need to create your own application via Azure Portal and to set the API permissions, this is a self-deployed application. Alternatively, XSOAR/XSIAM suggests another solution where you can use the application XSOAR/XSIAM builds for you, this is the Cortex XSOAR application. In addition, for environments running within Azure, you can authenticate using Azure Managed Identities, which allow XSOAR/XSIAM to access Azure resources securely without managing credentials manually.
Therefore, three application authentication methods are available:
You must use one of these authentication methods.
Cortex XSOAR Application#
In this method, you grant consent for the Cortex XSOAR multi-tenant application to access your data. The application is maintained by Cortex XSOAR. Depending on the integration, this requires either admin consent to access data without a user or user consent to access data on behalf of a user.
Note: This method requires that you give consent to all permissions requested by the application.
To start the authentication process, go to the integration's detailed instructions:
Navigate to Settings > Integration > Servers & Services.
Search for wanted Microsoft integration, e.g.
O365 Outlook Mail (Using Graph API).Click Add instance.
Click the Link that appears in the Help section:.
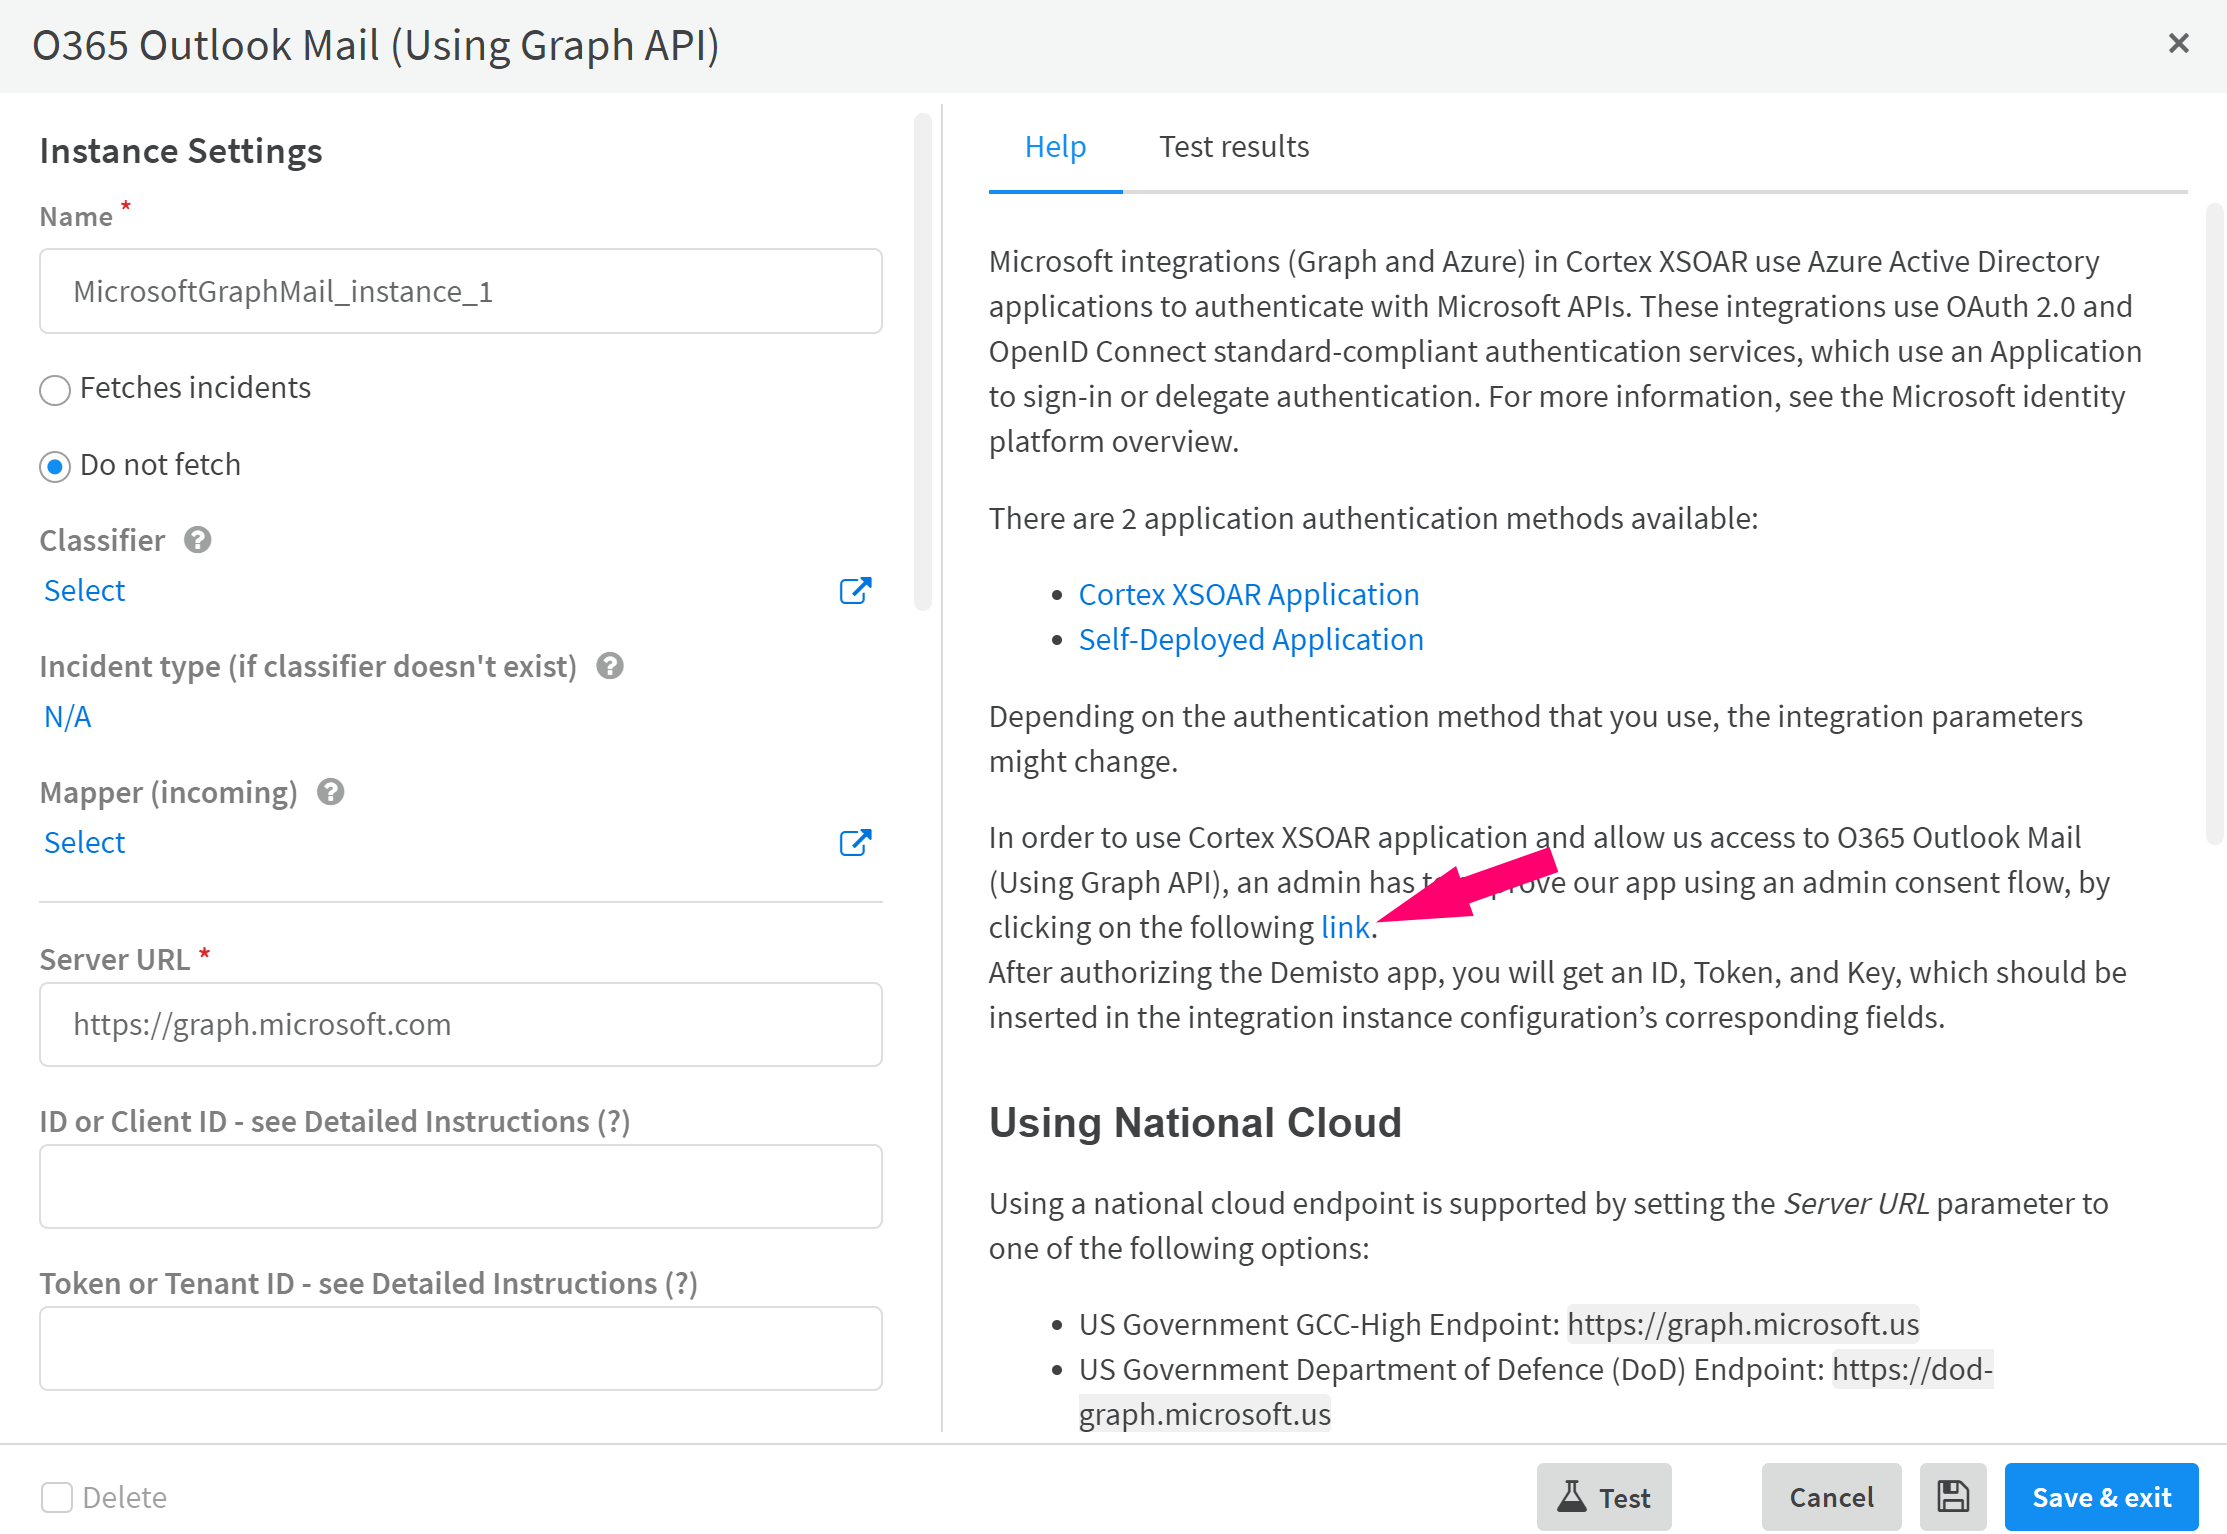
In the XSOAR Web Page that appears, click Start Authorization Process to initiate the authorization flow. You will receive your ID, token, and key. Go back to the instance configuration and copy: ID -> App/client ID, token -> Tenant ID, key -> Client Secret. Click "Test". The instance should be configured successfully.
Self Deployed Application#
To use a self-configured Azure application, add a new Azure App Registration in the Azure Portal. For instructions on adding the registration, see the Microsoft documentation
The application must have the required permissions and roles for the relevant APIs, as documented in the integration documentation. For example, see Microsoft Defender Advanced Threat Protection required permissions.
The authentication flow you choose depends on the integration’s purpose and the target it acts on:
- Client Credentials Flow: Used on behalf of the application. The integration authenticates as the application itself, not a user, allowing it to perform API requests at the tenant or organization level.
- Authoriztion Code Flow: Used on behalf of a signed-in user through an interactive login. This flow grants access based on the user’s permissions and is ideal for integrations that require user consent or need to act under a specific user’s identity.
- Device Code Flow: When configured using this flow, the integration operates under the user’s context, similar to the authorization code flow, but it is designed for devices or environments where a browser-based login is not available.
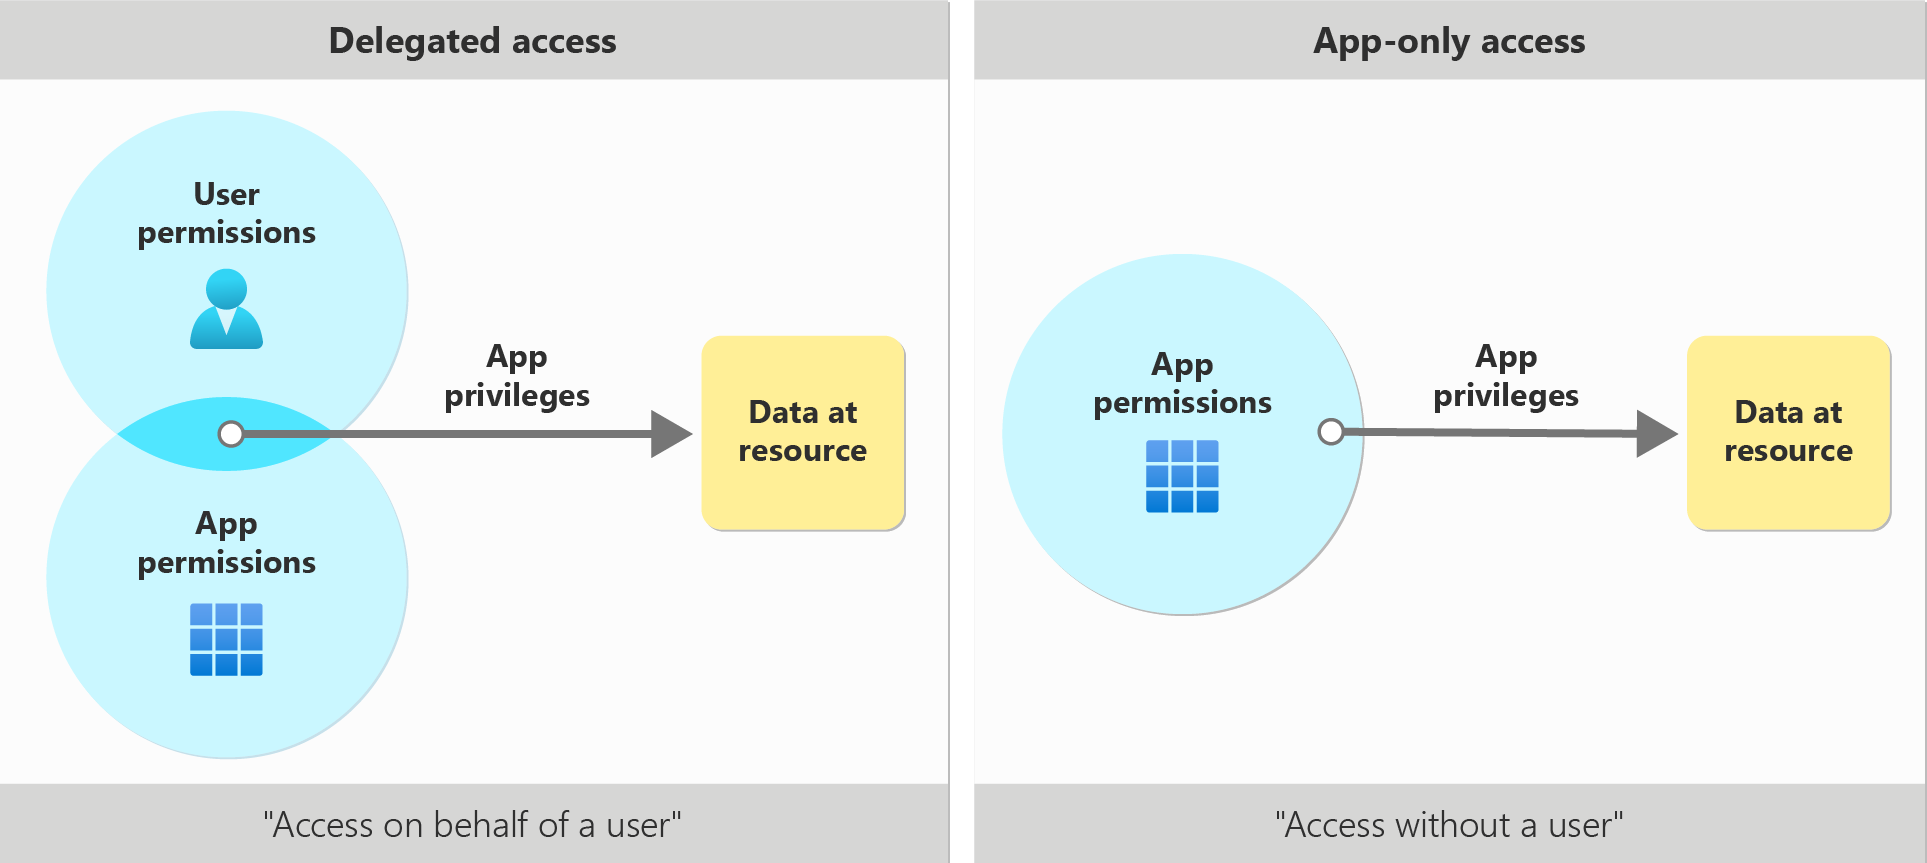
Permission Types and Flows#
- Delegated permissions are used when the integration acts on behalf of a signed-in user. These permissions require either the Authorization Code Flow or Device Code Flow.
- Application permissions are used when the integration acts as the application itself, without a user. These permissions require the Client Credentials Flow.
You can read more about each flow in the relevant sections below.
Note: When adding a new permission to the application, you must run the !<integration command prefix>-auth-reset command for the permission to take effect. If you are using the device code flow or authorization code flow, you must also reconnect and create a new authorization code. The new token used in the integration, will the include the new permission.
Using National Cloud#
To see which integrations support natively National Clouds,See the table below.
- For Microsoft Azure integrations, select the appropriate cloud using the Azure Cloud parameter.
- For Microsoft Defender, select the appropriate cloud using the Endpoint Type parameter.
- To use the self-deployment option, select Custom and follow the instructions below.
Some Cortex XSOAR/XSIAM Microsoft integrations support the deployment of national clouds through the self-deployed authorization flow. For more information about Microsoft National Clouds, see the Microsoft documentation. To use a national cloud, change the Server URL parameter to the corresponding address of the national cloud you are using.
Authentication Flows#
Security Awareness: Device Code Authorization
It is recommended to use the Client Credentials or User Authorization flows for integrations whenever possible. The Device Code Authorization flow provides limited protection against sophisticated phishing campaigns.
Under no circumstances will emails or other forms of communication be sent to the customer asking them to enter a security code or follow a link. All generated links and codes are displayed in the War Room by running the official integration commands.
For more information, see Device Code flow - Evolved phishing
Client Credentials Flow#
Some Cortex XSOAR/XSIAM Microsoft integrations use the Client Credentials Flow. When configured using this flow, the integration operates at the organization (tenant) level, allowing actions to be performed across the entire tenant. This flow typically uses application permissions, which must be defined in the Azure application configuration within the Azure Portal. These permissions determine that all XSOAR/XSIAM commands executed through this authentication method act within the organization or tenant scope.
For this flow, the Tenant ID, Client ID, and Client Secret are required for the integration. You can get those values from the Azure Portal under the application information. Follow these steps:
- Sign in to the Azure Portal.
- Search for you application using your application name or ID. You can find it under the "App registrations" or use the search bar.
- When you locate the application, click it and go to the Overview section.
- Copy the "Application (client) ID" and paste it in the App/Client ID parameter field in the XSOAR/XSIAM instance configuration.
- Copy the "Directory (tenant) ID" and paste it in the Token/Tenant ID parameter field in the XSOAR/XSIAM instance configuration.
- In the application configuration, go to "Certificates & secrets", click "New client secret", then click "Add". Copy the secret value and paste it into the Client Secret parameter field in the XSOAR/XSIAM instance configuration.
- In the instance configuration, select the Use a self-deployed Azure Application checkbox.
- Test and Save the instance.
Note: Make sure the necessary permissions and roles are applied to the application.
Certificate Thumbprint and Private Key#
Alternatively, instead of providing the Client Secret, you can authenticate using certificate credentials by providing:
- Certificate Thumbprint - The thumbprint of the certificate as it appears when registering the certificate to the application.
- Private Key - The private key of the registered certificate
For more information, see Microsoft Documentations. Follow the steps below for Mac/Linux operating systems:
Run the following commands:
You receive results similar to the following:
Remove the colons, this is your certificate thumbprint. For example:
Next, run the following command:
You receive results similar to the following:
This is your private key, include the headers.
Go to Azure Portal → App registrations → select your app → Certificates & secrets → Certificates. Click “Upload certificate”.
Select your public certificate file named MyXSOARApp.crt (do not select the .key file) and click "Add".
Paste the private key and the certificate thumbprint into the instance configuration in XSOAR/XSIAM, then click "Test".
Authorization Code flow#
Some Cortex XSOAR/XSIAM Microsoft integrations (e.g., Microsoft Graph Mail Single User) require authorization on behalf of a user (not admin consent). For more information about this flow, see the authorization code flow. When configured using this flow, the integration operates under the user’s context, allowing actions based on the signed-in user’s permissions. This flow uses delegated permissions, which are defined in the Azure application configuration in the Azure Portal. The user who authenticates must have the same roles and permissions as those granted to the application. These permissions determine which actions the user can perform through XSOAR/XSIAM commands according to their privileges within the organization or tenant.
For this flow, the Tenant ID, Client ID, Client secret and Redirect URI are required for the integration. You can get those values from the Azure Portal under the application information. Follow these steps:
In your app, click Authentication > Platform configurations > Add a platform. Choose Web and add a Redirect URI. The Redirect URI is the address where Azure AD sends the login response. If you are not sure what to set, you can use
https://localhost.Enter your redirect URI in the Redirect URI parameter field in the instance configuration in XSOAR/XSIAM.
Go to "Overview" section. Copy the "Application (client) ID" and paste it in the App/Client ID parameter field in the instance configuration in XSOAR/XSIAM.
Copy the "Directory (tenant) ID" and paste it in the Token/Tenant ID parameter field in the instance configuration in XSOAR/XSIAM.
In the application configuration go to "Certificates & secrets", click "New client secret", then "Add". Copy the secret value and paste it under the Client Secret parameter field in the XSOAR/XSIAM instance configuration.
Select the Use a self-deployed Azure Application checkbox in the integration instance configuration.
Save the instance.
Run the
!<integration command prefix>-generate-login-urlcommand in the War Room and follow these instructions:- Click the login URL to sign in and grant Cortex XSOAR/XSIAM permissions to access your Azure Service Management.
You will be automatically redirected to a link with the following structure:
REDIRECT_URI?code=AUTH_CODE&session_state=SESSION_STATE - Copy the
AUTH_CODE(between thecode=prefix and thesession_stateprefix) and paste it in your instance configuration under the Authorization code parameter. - For any issues, see Authorization Code flow Troubleshooting.
- Click the login URL to sign in and grant Cortex XSOAR/XSIAM permissions to access your Azure Service Management.
You will be automatically redirected to a link with the following structure:
Save the instance.
Run the
!<integration command prefix>-auth-testcommand. The War Room prints a 'Success' message if the integration is configured correctly.
Note: Make sure the neccessary permissions and roles are applied to the application and the user.
Example: configuring the Microsoft Graph User integration using a self-deployed and authorization code flow#
In Microsoft Azure portal, create a new app registration:
a. Select App registrations -> New registration.
b. In the Redirect URI (optional) field select Web and type a name (you can enter an arbitrary name). In this example we use https<nolink>://xsoar.
c. Click Register.
d. Copy the following information that apear under the "Overview" section, and save it for later:
- Application (client) ID
- Directory (tenant) ID
Go to API permissions -> Add a permission -> Microsoft Graph -> Delegated permission. Search for
Directory.AccessAsUser.All.Click Add permissions.
Repeat step 3 for the following permissions:
- Directory.Read.All - Delegated
- User.ReadWrite.All - Application
- User.Read - Delegated
Next, create a new instance for the integration.
Enter your redirect URI in the Redirect URI parameter field in the instance configuration in XSOAR/XSIAM.
Paste the "Application (client) ID" under the App/Client ID parameter field in the instance configuration in XSOAR/XSIAM.
Paste "Directory (tenant) ID" under the Token/Tenant ID parameter field in the instance configuration in XSOAR/XSIAM.
In the application cofiguration go to "Certificates & secrets" and click on "New client secret", click on "Add" and copy the secret value. Paste it under the Client Secret parameter field in the instance configuration in XSOAR/XSIAM.
Click the Use a self-deployed Azure application checkbox.
Click on Save and Exit.
Get the authorization code by following the next steps:
a. Run the msgraph-user-generate-login-url command in order to generate the url and follow the instructions. b. Copy the
AUTH_CODE(between thecode=prefix and thesession_stateprefix). This value need to be used in instance configuration under the Authorization Code field.Under the Authorization code (for Self Deployed - Authorization Code Flow), field in the instance configuration, paste the code from the previous step.
Save the instance and test the setup by running the !msgraph-user-test command from the Cortex XSOAR/XSIAM CLI.
Device Code Flow#
Some Cortex XSOAR/XSIAM-Microsoft integrations use the device code flow. When configured using this flow, the integration operates under the user’s context, similar to the Authorization Code Flow, but it is designed for devices or environments where a browser-based login is not available. This flow also uses delegated permissions, which must be defined in the Azure application configuration in the Azure Portal. The user authenticating via the device code must have the same roles and permissions as those granted to the application. These permissions determine which actions the user can perform through XSOAR/XSIAM commands within the organization or tenant scope.
During authentication, the user is provided with a code and a URL. They must enter the code at the URL using a browser on any device to complete the sign-in process.
For this flow, the Redirect URI is required for the integration. You can get those values from the Azure Portal under the application information. Follow these steps:
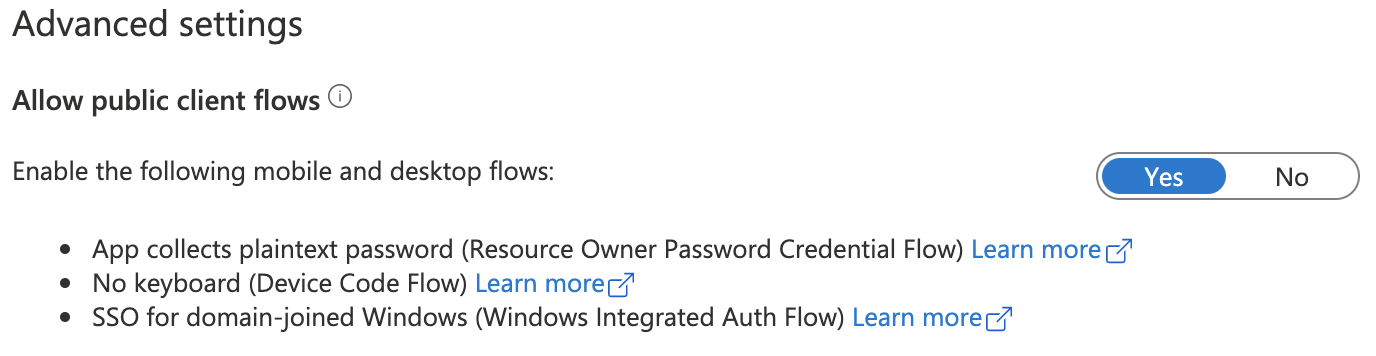
In your app, click Authentication > Platform configurations > Add a platform. Choose Web and add Redirect URI. The Redirect URI is the address where Azure AD sends the login response. If you are not sure what to set, you can use
https://localhost.In the app registration, navigate to Authentication. Under Supported account types, select Accounts in any organizational directory (Any Azure AD directory - Multi-tenant). On the same page, under the Advanced Settings section, enable the mobile and desktop flows.
Next, click Overview, copy the "Application (client) ID" and paste it under the App/Client ID parameter field in the instance configuration in XSOAR/XSIAM.
Click "Save and Exit".
Run the
!<integration command prefix>-auth-startcommand - you will be prompted to open the page https://microsoft.com/devicelogin and enter the generated code.Run the
!<integration command prefix>-auth-completecommand.Run the
!<integration command prefix>-auth-testcommand to ensure connectivity to Microsoft.
Note: Make sure the neccessary permissions and roles are applied to the application and the user.
Azure Managed Identities Authentication#
Applicable only when the integration runs on an Azure VM#
Some Cortex XSOAR/XSIAM Microsoft integrations support Azure Managed Identities Authentication.
Azure provides two types of Managed Identities:
- System-assigned: Automatically created and tied to a specific Azure resource; deleted when the resource is deleted.
- User-assigned: A standalone identity that can be assigned to one or more Azure resources and exists independently of them.
For more details, you can also watch the video in Microsoft documentations.
Important: Either the integration or XSOAR/XSIAM must be running on an Azure VM; otherwise, the connection will not work. For XSOAR 8 and above, the integration must run on an engine to connect with Azure.
Once the integration is running on an Azure VM, follow the steps below to configure authentication using Azure Managed Identities:
Using System Assigned Managed Identity#
Select Azure Managed Identities from the Authentication Type drop down or select the Use Azure Managed Identities checkbox and leave the Azure Managed Identities Client ID field empty.
Using User Assigned Managed Identity#
- Go to Azure Portal -> Managed Identities.
- Select your User Assigned Managed Identity -> copy the Client ID -> paste it in the Azure Managed Identities Client ID field in the instance settings.
- Select Azure Managed Identities from the Authentication Type drop down or select the Use Azure Managed Identities checkbox.
Revoke Consent#
In order to revoke consent to a Cortex XSOAR Microsoft application, refer to the Microsoft documentation.
How to find Azure Integrations Parameters#
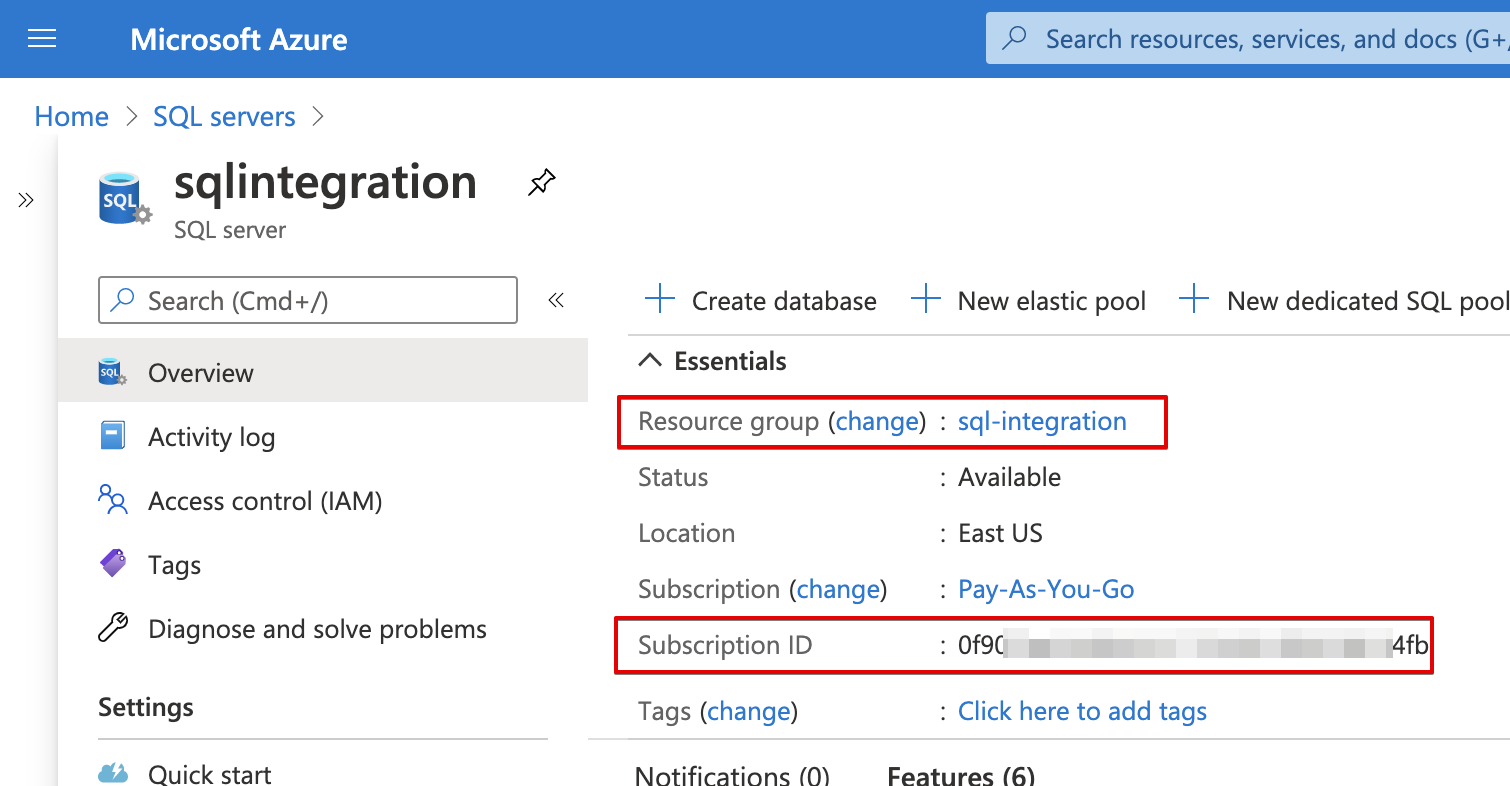
To use the Cortex XSOAR/XSIAM Azure application, provide your Subscription ID and Resource Group Name, which can be found in the Azure Portal.
Log in to the Azure Portal Home Page using your Azure credentials.
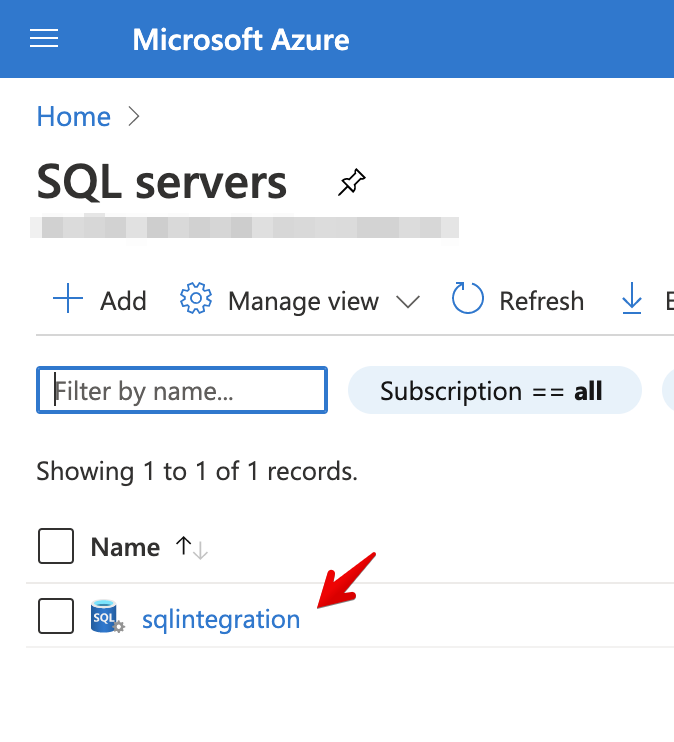
Search for your Azure product, for example SQL Servers:
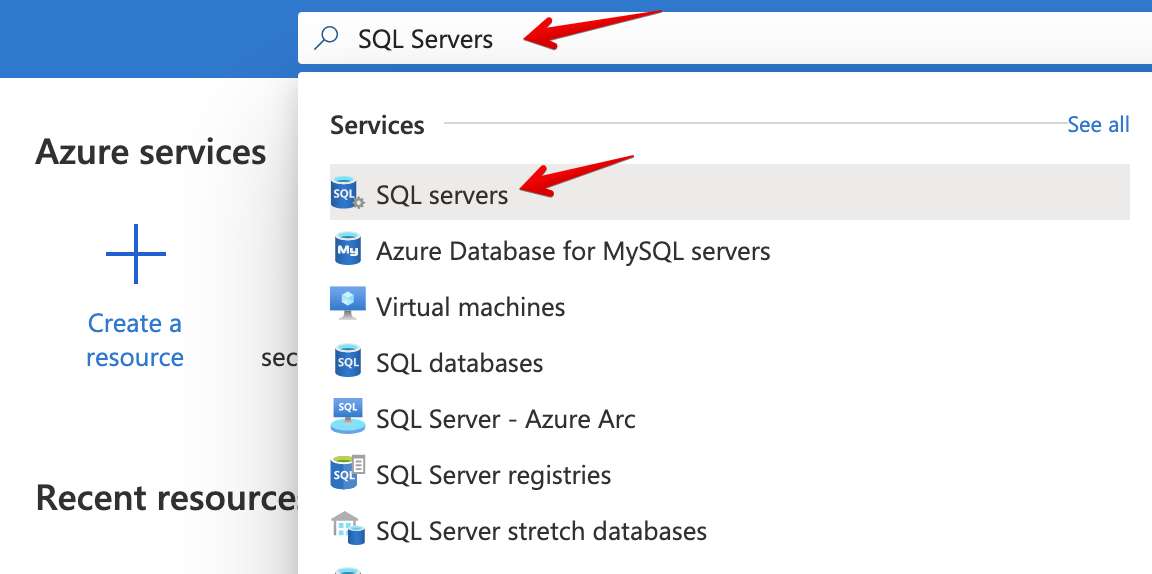
Click on your resource:
After you a redirected to the next page, in the Overview tab you will find your Resource group and Subscription ID:
Supported Authentication Flows for Microsoft integrations#
| Integration Name | XSOAR Application | Client Credentials | Device Code | Auth code (redirect URI) | Azure Managed Identities | Supports National Clouds |
|---|---|---|---|---|---|---|
| Azure Compute v2 | yes | yes | no | no | no | no |
| Azure Data Explorer | yes - device | yes | yes | yes | no | no |
| AzureDevOps | yes | yes | yes | yes | no | no |
| Azure Firewall | yes | yes | yes | no | yes | no |
| Azure Key Vault | no | yes | no | no | yes | yes |
| Azure Kubernetes Services | yes | yes | yes | yes | yes | yes |
| Azure Log Analytics | yes | yes | no | yes | yes | yes |
| Azure Network Security Groups | yes | yes | yes | yes | yes | no |
| Azure Risky Users | yes | yes | yes | no | yes | no |
| Azure Security Center v2 | yes | yes | no | no | yes | no |
| Microsoft Defender for Cloud Event Collector | no | yes | no | no | no | no |
| Azure Sentinel | no | yes | no | no | yes | yes |
| Azure SQL Management | yes | yes | yes | yes | yes | no |
| Azure Storage | yes | yes | yes | yes | yes | no |
| Azure Storage Container | no | no | no | no | yes | no |
| Azure Storage FileShare | no | no | no | no | no | no |
| Azure Storage Queue | no | no | no | no | yes | no |
| Azure Storage Table | no | no | no | no | yes | no |
| Azure Web Application Firewall | yes | yes | yes | yes | yes | no |
| Microsoft 365 Defender | yes | yes | yes | no | yes | no |
| Microsoft 365 Defender Event Collector - XSIAM | no | yes | no | no | no - saas | no |
| Microsoft Defender for Cloud Apps | no | yes | yes | no | no | yes |
| Microsoft Defender for Endpoint (Defender ATP) | yes | yes | no | yes | yes | yes |
| Microsoft Graph API | yes | yes | yes | yes | yes | yes |
| Azure Active Directory Applications | yes - device | yes | yes | no | yes | no |
| O365 Outlook Calendar | yes | yes | no | no | yes | no |
| Microsoft Graph Device Management | yes | yes | no | no | yes | yes |
| O365 File Management | yes | yes | no | yes | yes | no |
| Microsoft Graph Groups | yes | yes | no | yes | yes | no |
| Azure Active Directory Identity And Access | yes | yes | yes | no | yes | no |
| Microsoft Graph Mail Single User | yes | no | no | yes | yes | no |
| O365 Outlook Mail | yes | yes | no | no | yes | yes |
| Microsoft Graph Security | yes | yes | no | yes | yes | yes |
| Microsoft Graph User | yes | yes | no | yes | yes | no |
| Microsoft Management Activity API (O365 Azure Events) | yes | no | no | yes | yes | no |
| Microsoft Teams | no | yes | no | yes | no | no |
| Microsoft Teams Management | yes | yes | yes | no | yes | no |
Troubleshooting#
- If you encounter any issues while configuring your self-deployed application, please ensure that the 'self-deploy' checkbox is selected.
- If you have added permissions to your self-deployed application but still encounter a permission error, make sure to run the
!<integration command prefix>-auth-resetcommand. If you are using device code flow or authorization code flow, you must also reconnect and generate a new authorization code. After this, the new token used by the integration will include the updated permissions. - If you expect command results at the organization or tenant level but are receiving results at the user level, ensure that your permissions are set as application permissions and that you are using the client credentials flow.
Reset authentication#
In case of errors in the authentication process, such as a token revoked/expired or in case you generate new credentials,
you can use the !<integration command prefix>-auth-reset command in the War Room in order to rerun the authentication process,
instead of recreating a new integration instance.
After running the command, click Test to verify the connectivity of the instance.
For example, when using the "self-deployed Azure app" for Microsoft Graph Mail Single User, in case of an expired/revoked token error:
- Run !msgraph-mail-auth-reset.
- Validate that all the credentials you entered are correct (Client ID, Client Secret, Tenant ID, Application redirect URI).
- Run !msgraph-mail-generate-login-url to generate a new Authorization code. See Authorization Code flow Troubleshooting.
- Run !msgraph-mail-test to test the connectivity of the email.
Note: If encountering an "Insufficient privileges to complete the operation" error, ensure the necessary permissions were added according to the integration documentation. Subsequently, reset the authentication and initiate the authentication process again.
Authorization Code flow Troubleshooting#
If you encounter issues with the User consent, such as a "Missing scope permissions on the request. API requires one of..." error after generating a new authorization code using the generate-login-url command, even though you have provided all the mentioned permissions, it may indicate that you need to trigger the consent process again.
To do this, copy the login URL, add &prompt=consent to the end of the URL, and then log in.
For details, see Microsoft's documentation on Request an authorization code.