Microsoft Teams
This Integration is part of the Microsoft Teams Pack.#
Supported versions
Available on Cortex XSOAR and Cortex XSIAM.
Use the Microsoft Teams integration to send messages, notifications, and create meetings. This integration was tested with version 1.0 of Microsoft Teams.
This document includes the following sections to help you understand, set up, and use the integration effectively:
- Integration Architecture
- Setup and Configuration
- Setup Examples
- Important Information
- Known Limitations
- Troubleshooting
- Download Demisto Bot
- Commands
Integration Architecture#
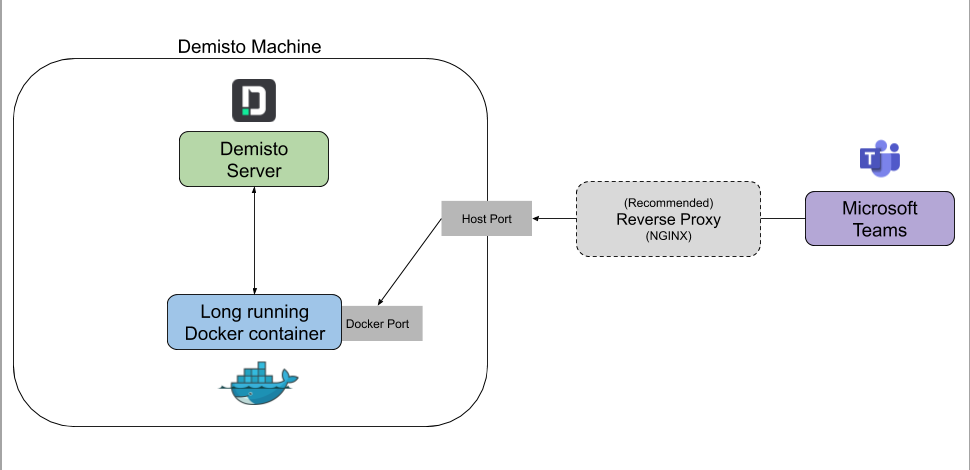
Data is exchanged between Microsoft Teams and Cortex XSOAR/XSIAM through a bot that you configure in Teams. A webhook (that you will configure) receives the data from Teams and passes it to the messaging endpoint. The web server on which the integration runs in Cortex XSOAR/XSIAM listens to the messaging endpoint and processes the data from Teams. You can use an engine for communication between Teams and the Cortex XSOAR/XSIAM tenant. To mirror messages from Teams into Cortex XSOAR, the bot must be explicitly mentioned in the message using the '@' symbol. The web server for the integration runs within a long-running Docker container. Cortex XSOAR/XSIAM maps the Docker port to which the server listens, to the host port (to which Teams posts messages). For more information, see long-running integrations documentation and Docker documentation.
Protocol Diagram#
Setup and Configuration#
Note: The information in this video is for Cortex XSOAR 6 but mostly still applies to Cortex XSOAR 8/XSIAM. Refer to the Prerequisites section for the latest instructions.
Prerequisites#
- Create the Demisto Bot in Microsoft Azure Portal
- Grant the Demisto Bot Permissions
- Configure Microsoft Teams on Cortex XSOAR/XSIAM
- Add the Demisto Bot to a Team
1. Create the Demisto Bot in Microsoft Teams#
Creating the Demisto Bot using Microsoft Azure Portal:
Navigate to the Create an Azure Bot page.
In the Bot Handle field, type Demisto Bot.
Fill in the required Subscription and Resource Group, relevant links: Subscription, Resource Groups.
For Type of App, select Single Tenant.
- Note ⚠️: The Multi Tenant App type was deprecated by Microsoft. Existing apps remain functional and do no require any changes. You can change existing apps to a Single Tenant in the Azure portal's bot configuration, but it is not required.
For Creation type, select Create new Microsoft App ID for Creation Type if you don't already have an app registration, otherwise, select Use existing app registration, and fill in you App ID.
- Note ⚠️: if you choose Use existing app registration, make sure to delete the previous created bot with the same app id, remove it from the team it was added to as well.
Click Review + Create, and wait for the validation to pass.
Click Create if the validation has passed, and wait for the deployment to finish.
Under Next Steps, click Go to resource.
This step can be skipped for now, return to it after configuring the Microsoft Teams instance in Cortex XSOAR/XSIAM.
Navigate to Settings -> Configuration on the left bar, and fill in the Messaging Endpoint.
- Note ⚠️: To get the correct messaging endpoint based on the server URL, the server version, and the instance configurations, use the
microsoft-teams-create-messaging-endpointcommand. Using this command requires an active integration instance. This step can be done after completing the instance configuration section.
- Note ⚠️: To get the correct messaging endpoint based on the server URL, the server version, and the instance configurations, use the
Store the Microsoft App ID value for the next steps, and navigate to Manage next to it.
Click New Client Secret, fill in the Description and Expires fields as desired. Then click Add.
Copy the client secret from the value field and store it for the next steps.
Go back to the previous page, and navigate to Channels in the left bar.
Click Microsoft Teams under Available Channels, click the checkbox, click Agree, then click Apply.
2. Grant the Demisto Bot Permissions in Microsoft Graph#
In order to connect to Microsoft Teams use one of the following authentication methods:
- Client Credentials Flow
- Authorization Code Flow (Supports the chat commands)
Perform the following steps to add the needed permissions:
- Go to your Microsoft Azure portal, and from the left navigation pane select Entra ID > App registrations.
- Search for and click Demisto Bot.
- Click API permissions > Add a permission > Microsoft Graph > Application/Delegated permissions.
- For each of the next permissions listed below, search for the permission, select the checkbox, and click Add permissions.
Note ⚠️: The microsoft-teams-ring-user command requires authenticating with Client Credentials due to a limitation in Microsoft's permissions system. (Calling this command will perform the authentication seemlessly)
For Client Credentials Flow add the following#
Application Permissions:
User.Read.AllGroupMember.Read.AllChannel.ReadBasic.AllChannelMember.ReadWrite.AllChannel.CreateChannel.Delete.AllOnlineMeetings.ReadWrite.AllCalls.Initiate.All
For Authorization Code Flow add the following#
Delegated Permissions:
User.Read.AllGroupMember.Read.AllChannel.ReadBasic.AllChannelMember.ReadWrite.AllChannel.CreateChannel.Delete.AllChannelMessage.SendOnlineMeetings.ReadWrite.AllChat.ReadWriteAppCatalog.Read.AllTeamsAppInstallation.ReadWriteSelfForChat
Application permissions: (For microsoft-teams-ring-user)
User.Read.AllCalls.Initiate.All
Alternatively, you can check each relevant command section below for the minimum permissions it requires.
Verify that all permissions were added, and click Grant admin consent.
When prompted to verify granting permissions, click Yes, and verify that permissions were successfully added.
Click Authentication > Platform configurations > Add a platform. Choose Web and add Redirect URIs: https://oproxy.demisto.ninja/authcode
3. Configure Microsoft Teams on Cortex XSOAR/XSIAM#
There are two flows to configure the integration (mentioned before):
Please note that you need to use the flow to which you have added permissions.
- Client Credentials
- Authorization Code (Support The chat commands)
For more detailed instructions, refer to the relevant authentication flow section.
To configure the integration, do the following:
- Search for Microsoft Teams integration after you have installed it from the Marketplace.
- Click Add instance to create and configure a new integration instance by using one of the flows. Instructions below.
| Parameter | Description | Required |
|---|---|---|
| Bot ID | False | |
| Bot Password | False | |
| Authentication Type | When switching from the 'Client Credentials Flow' to the 'Authorization Code Flow' do as follow: Save the instance, run the 'microsoft-teams-generate-login-url' command and follow the instructions mentioned there. Once done, test the validity of your instance by running the 'microsoft-teams-auth-test' command. When switching from the 'Authorization Code Flow' to the 'Client Credentials Flow', test the validity of the instance by clicking the 'Test' button. | False |
| Application redirect URI (for Authorization Code mode) | False | |
| Authorization code | False | |
| Default team | True | |
| Notifications channel | True | |
| Certificate (Required for HTTPS) | False | |
| Private Key (Required for HTTPS) | False | |
| Bot Type Converted to Single-Tenant | Select this option if the bot was originally created as multi-tenant and later converted to single-tenant. The system will detect the bot type automatically in all other standard cases. | False |
| Minimum incident severity to send notifications to Teams by | False | |
| Disable Automatic Notifications | Whether to disable automatic notifications to the configured notifications channel. | False |
| Allow external users to create incidents via direct message | False | |
| The header of an external form hyperlink. | False | |
| Trust any certificate (not secure) | Do not check for Cortex XSOAR version 8 | False |
| Use system proxy settings | False | |
| Custom New Incident Welcome Message | Optional - Welcome message when creating new incidents using the bot. If left empty (default option) the current default welcome message will be used, i.e., "Successfully created incident <incident_name>. View it on: <incident_link>". If the parameter is set to "no_welcome_message" value, no message will be displayed. Any non-empty string value set will be used as the custom new incident welcome message. | False |
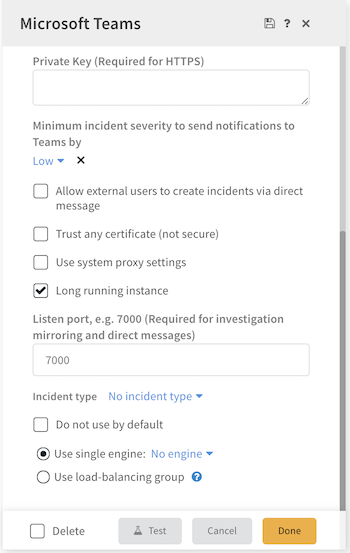
| Long running instance | False | |
| Listen port | E.g., 7000 (Required for investigation mirroring and direct messages). | False |
| Incident type | False |
Authentication Using the Client Credentials Flow#
Note ⚠️: The chat commands are only supported when using the Authorization Code flow.
- Choose the 'Client Credentials' option in the Authentication Type parameter.
- Enter your Client/Application ID in the Bot ID parameter.
- Enter your Client Secret in the Bot Password parameter.
- Set the Default team and the Notifications channel parameters.
- Set the Long running instance parameter to 'True'.
- Save the instance.
- Click Test to validate the URLs, token, and connection.
- Configure the messaging endpoint if you haven't done so already (Step #9 in the Bot Creation section).
- Add the Demisto Bot to a Team.
Authentication Using the Authorization Code Flow#
Note ⚠️: The microsoft-teams-ring-user command requires authenticating with Client Credentials.
- Choose the 'Authorization Code' option in the Authentication Type parameter.
- Enter your Client/Application ID in the Bot ID parameter.
- Enter your Client Secret in the Bot Password parameter.
- Enter your Application redirect URI in the Application redirect URI parameter (Step #7 in the Grant Permissions section).
- Set the Default team and the Notifications channel parameters.
- Set the Long running instance parameter to 'True'.
- Save the instance.
- Configure the messaging endpoint if you haven't done so already (Step #9 in the Bot Creation section).
- Add the Demisto Bot to a Team
- Run the !microsoft-teams-generate-login-url command in the Playground and follow the on-screen instructions.
- Save the instance.
- Run the !microsoft-teams-auth-test command. A 'Success' message should be printed to the War Room.
If you encounter any issue or error — especially a message saying "Tenant ID is not found" — please refer to the Troubleshooting section.
4. Add the Demisto Bot to a Team#
According to Microsoft it usually takes up to 3-5 business days for the app to reflect in the "built for your org" section.
After configuring the integration on Cortex XSOAR/XSIAM (the previous step), do the following:
Download the ZIP file located at the Download Demisto Bot section.
Uncompress the ZIP file. You should see 3 files (
manifest.json,color.pngandoutline.png).Open the
manifest.jsonfile that was extracted from the ZIP file.Update the following values to use the Bot ID from step 5 of the Create the Demisto Bot in Microsoft Teams section:
- The
idfield. - The
BotIdattribute in thebotslist. - The
idattribute in thewebApplicationInfofield.
- The
Compress the 3 files (the modified
manifest.jsonfile,color.pngandoutline.png).Navigate to Manage Apps in the Microsoft Teams admin center.
Click Actions and then + Upload new app.
In the pop-up window, click Upload.
Browse for the ZIP file you created in step 7, open it, and wait a few seconds until it loads.
Search for Demisto Bot.
In the line where
Demisto Botshows under Name, click the checkbox on the left.Click Add to team.
In the search box, type the name of the team to which you want to add the bot.
Click Add for the wanted team and then click Apply.
Migration from Cortex XSOAR 6 to Cortex XSOAR 8 and Cortex XSIAM#
Using Cortex XSOAR or Cortex XSIAM rerouting#
When migrating from Cortex XSOAR 6 to Cortex XSOAR 8 or Cortex XSIAM, follow these steps to ensure your Microsoft Teams integration continues to work as expected:
For this step you can use the
microsoft-teams-create-messaging-endpointcommand to generate the messaging endpoint automatically. Update the messaging endpoint in the Azure bot configuration:- For Cortex XSOAR 8, set the messaging endpoint in the Azure bot to be
https://ext-<CORTEX-XSOAR-SERVER-ADDRESSS>/xsoar/instance/execute/<INTEGRATION-INSTANCE-NAME>, e.g.,https://ext-my.demisto.live/xsoar/instance/execute/teams. - For Cortex XSIAM, set the messaging endpoint in the Azure bot to be
https://ext-<CORTEX-XSIAM-SERVER-ADDRESSS>/xsoar/instance/execute/<INTEGRATION-INSTANCE-NAME>, and replace the xdr in the URL to crtx.
- For Cortex XSOAR 8, set the messaging endpoint in the Azure bot to be
Ensure the long-running instance parameter is enabled in the integration instance configuration.
Set the port parameter under the Connect section of the integration instance.
If you're reusing the same bot from your XSOAR 6 instance, remove the bot from the Microsoft Teams team and add it back:
In Microsoft Teams, go to your team.
Click the three dots next to the team name.
Go to Manage team > Apps.
Find your bot, click the three dots next to it.
Select Remove.
Add the bot to the team again.
Setup Examples#
1. Using Cortex XSOAR or Cortex XSIAM rerouting#
In this configuration, we will use Cortex XSOAR/Cortex XSIAM functionality, which reroutes HTTPS requests that hit the default port (443) to the web server that the integration spins up.
The messaging endpoint needs to be:
For Cortex XSOAR version 6.x: <CORTEX-XSOAR-URL>/instance/execute/<INTEGRATION-INSTANCE-NAME>, e.g., https://my.demisto.live/instance/execute/teams.
For Cortex XSOAR version 8 and Cortex XSIAM: https://ext-<CORTEX-XSOAR-SERVER-ADDRESSS>/xsoar/instance/execute/<INTEGRATION-INSTANCE-NAME>, e.g., https://ext-my.demisto.live/xsoar/instance/execute/teams.
The integration instance name, teams in this example, needs to be configured in the Configure Microsoft Teams on Cortex XSOAR/XSIAM step. Make sure to set the instance name in all lowercase letters and as one word.
- Note ⚠️: You can use the
microsoft-teams-create-messaging-endpointcommand to generate the messaging endpoint, based on the server URL, the server version, and the instance configurations. For more information, see -microsoft-teams-create-messaging-endpoint documentation.
The port to be configured in Configure Microsoft Teams on Cortex XSOAR/XSIAM step should be any available port that is not used by another service.
In addition, make sure Instance execute external is enabled (for Cortex XSOAR 6.x).
- In Cortex XSOAR, go to Settings > About > Troubleshooting.
- In the Server Configuration section, verify that the instance.execute.external.\<INTEGRATION-INSTANCE-NAME> (
instance.execute.external.teamsin this example) key is set to true. If this key does not exist, click + Add Server Configuration and add the instance.execute.external.\<INTEGRATION-INSTANCE-NAME> and set the value to true. See the following reference article for further information.
2. Using NGINX as reverse proxy#
In this configuration, the inbound connection, from Microsoft Teams to Cortex XSOAR/Cortex XSIAM, goes through a reverse proxy (e.g., NGINX) which relays the HTTPS requests posted from Microsoft Teams to the Cortex XSOAR/Cortex XSIAM server on HTTP.
On NGINX, configure the following:
- SSL certificate under
ssl_certificateandssl_certificate_key - The Cortex XSOAR server (including the port) under
proxy_pass, e.g.http://mydemistoinstance.com:7000
Follow Configuring Upstream Servers NGINX guide for more details.
The port (7000 in this example), to which the reverse proxy should forward the traffic on HTTP, should be the same port you specify in the integration instance configuration, as the web server the integration spins up, listens on that port.

3. Using Apache reverse proxy and Cortex XSOAR/XSIAM engine#
In this configuration, the inbound connection, from Microsoft Teams to Cortex XSOAR/XSIAM, goes through a reverse proxy (e.g., Apache) and possibly a load balancer, which relays the HTTPS requests posted from Microsoft Teams to a Cortex XSOAR/XSIAM engine, which can be put in a DMZ, on HTTP.
The port (7000 in this example), to which the reverse proxy should forward the traffic on HTTP, should be the same port you specify in the integration instance configuration, as the web server the integration spins up, listens on that port.

4. Using Cloudflare#
In this configuration, we will use Cloudflare proxy.
The messaging endpoint should be the Cortex XSOAR/XSIAM URL, which needs to be hosted on Cloudflare, with the port to which Cloudflare proxy directs the HTTPS traffic, e.g., https://mysite.com:8443
In the Configure Microsoft Teams on Cortex XSOAR/XSIAM step, the following need to be configured:
- The port selected above.
- A certificate and key for configuring HTTPS web server. This certificate can be self-signed.
The proxy intercepts HTTPS traffic, presents a public CA certificate, then proxies it to the web server.
All HTTPS traffic that will hit the selected messaging endpoint will be directed to the HTTPS web server the integration spins up, and will then be processed.
Important Information#
This integration is supported in Cortex XSOAR 8 and up and Cortex XSIAM without using an engine.
The integration has the ability to run built-in Cortex XSOAR/XSIAM commands, through a mirrored channel. Make sure to pass the command in the chat exactly as typed in the CORTEX XSOAR CLI. For example:
!DeleteContext all=yes. Use the commandmirror-investigationto mirror/create a mirrored channel.For use cases where it is only needed to send messages to a specific channel, we recommend checking the Microsoft Teams via Webhook Integration, which has a simpler setup.
The messaging endpoint must be one of the following:
- The URL of the Cortex XSOAR/XSIAM server, including the configured port
- The Cortex XSOAR/XSIAM rerouting URL that you've defined for your Microsoft Teams instance (see the Using Cortex XSOAR or Cortex XSIAM rerouting section for more details)
- A proxy that redirects the messages received from Teams to the Cortex XSOAR/XSIAM server (see the Using NGINX as reverse proxy section for more details)
Microsoft Teams sends events to the messaging endpoints via an HTTPS request, so the messaging endpoint must be accessible for Microsoft Teams to reach it. As a result, the messaging endpoint cannot contain a private IP address or any DNS that will block the request from Microsoft Teams.
To verify that the messaging endpoint is open as expected, from a browser, go to the messaging endpoint in an environment that is disconnected from the Cortex XSOAR/XSIAM environment.
It's important that the port is opened for outside communication and that the port is not being used, meaning that no service is listening on it. Therefore, the default port, 443, should not be used.
For additional security, we recommend placing the Teams integration web server behind a reverse proxy (such as NGINX).
By default, the web server that the integration starts provides services in HTTP. For communication to be in HTTPS you need to provide a certificate and private key in the following format:
You must not set a certificate and/or private key if you are using the Cortex XSOAR/XSIAM rerouting setup.
Microsoft does not support self-signed certificates and requires a chain-trusted certificate issued by a trusted CA.
In order to verify which certificate is used, run the following (replace {MESSAGING-ENDPOINT} with the messaging endpoint):
Make sure the output does not contain the following:
- The following domains are used by this integration:
- microsoft.com
- botframework.com
- microsoftonline.com When installing the bot in Microsoft Teams, according to Microsoft, it usually takes up to 3-5 business days for the app to reflect in the "built for your org" section.
Known Limitations#
- The microsoft-teams-ring-user command requires using the
Client Credentialsauthentication due to a limitation in Microsoft's permissions system. As such, when usingAuthorization Code flowand calling this command, the integration will internally authenticate using theClient Credentials flow. - The chat commands are only supported when using the
Authorization Code flow. - Posting a message or adaptive card to a private/shared channel is currently not supported in the send-notification command. Thus, also the mirror_investigation command does not support private/shared channels. For more information, see Microsoft General known issues and limitations.
- The send-notification command currently supports only adaptive cards without user responses. To collect user responses from adaptive cards, please use the MicrosoftTeamsAsk command.
- In case of multiple chats/users sharing the same name, only one will be used.
- If a non-Cortex XSOAR/XSIAM user ran the
new incidentcommand in the chat with the bot, the owner of the created incident would be the logged in Cortex XSOAR/XSIAM user, not the external user who ran the command. - See Microsoft documentation for Limits and specifications for Microsoft Teams.
Troubleshooting#
The integration works by spinning up a web server that listens to events and data posted to it from Microsoft Teams. If you see the error message
Tenant ID is missing, please make sure that the messaging endpoint is configured correctly, and the bot is added to a team., then it means that the tenant ID was never posted to the web server, which should happen for the first time when the bot is added to the configured team.This probably means that there is a connection issue, and the web server does not intercept the HTTPS queries from Microsoft Teams.
To troubleshoot:
Verify that the messaging endpoint is configured correctly. Use the
microsoft-teams-create-messaging-endpointcommand (microsoft-teams-create-messaging-endpoint documentation) to get the correct messaging endpoint based on the server URL, the server version, and the instance configurations.In some cases, a connection is not created between Teams and the messaging endpoint when adding a bot to the team. You can work around this problem by adding any member to the team the bot was added to (the bot should be already added to the team). This will trigger a connection and solve the issue. You can then remove the member that was added.
If the previous step did not work, remove the bot from the team, go to the Microsoft Teams admin center > Manage apps and hard refresh the page!(cmd+ shift + R), then add the bot to the team again.
The integration stores in cache metadata about the teams, members and channels. Starting from Cortex XSOAR version 6.1.0, you can clear the integration cache in the integration instance config:
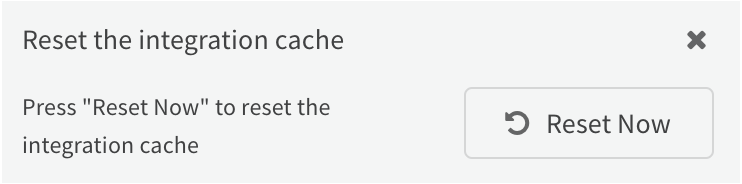
First, make sure to remove the bot from the team (only via the Teams app), before clearing the integration cache, and add it back after done. If the bot belongs to multiple teams, make sure to remove it from all the teams it was added to, and then clear the cache.
Verify the Docker container is up and running and publish the configured port to the outside world:
From the Cortex XSOAR/XSIAM engine machine run:
docker ps | grep teamsYou should see the following, assuming port 7000 is used:
988fdf341127 demisto/teams:1.0.0.6483 "python /tmp/pyrunne…" 6 seconds ago Up 4 seconds 0.0.0.0:7000->7000/tcp demistoserver_pyexecLongRunning-b60c04f9-754e-4b68-87ed-8f8113419fdb-demistoteams1.0.0.6483--26If the Docker container is up and running, try running cURL queries to verify the web server is up and running and listens on the configured URL:
- To the messaging endpoint from a separate box.
- From the Cortex XSOAR machine to localhost.
- Note ⚠️: The web server supports only POST method queries.
If the cURL queries were sent successfully, you should see the following line in Cortex XSOAR logs:
Finished processing Microsoft Teams activity successfully.If you're working with secured communication (HTTPS), make sure that you provided a valid certificate. (Not for Cortex XSOAR/Cortex XSIAM Rerouting ).
- Run
openssl s_client -connect <domain.com>:443. - Verify that the returned value of the
Verify return codefield is0 (ok), otherwise, it's not a valid certificate.
- Run
If you see the following error message:
Error in API call to Microsoft Teams: [403] - UnknownError, it means the AAD application has insufficient permissions.To retrieve the API permission associated with the used graph access token you can run the
microsoft-teams-token-permissions-listcommand (microsoft-teams-token-permissions-list documentation).Compare the permissions list obtained for the token with the permissions required for the command you wish to execute (can be found in the command documentation).
If there are missing API permissions, add them to your application, and then run the
microsoft-teams-auth-resetcommand (as described here - microsoft-teams-auth-reset documentation).If your authentication type is the
Authorization Code Flow, after running themicrosoft-teams-auth-resetcommand you will need to regenerate the Authorization code parameter by running the microsoft-teams-generate-login-url command, and to verify the authentication by running the !microsoft-teams-auth-test command.
Since the integration works based on Docker port mapping, it can't function if the Docker is set to run with the host networking (
--network=host). For more details, refer to the Docker documentation.If you are receiving repeated
Connection reset by peererrors, the requests might be getting blocked temporarily by Azure due to repeated permission errors. Ensure you are not missing any permissions that might cause constant failures and eventually leading to server timeouts.If you encounter the following error:
And the bot's application type was converted from Multi-tenant to Single-tenant, the integration may fail to recognize the change, leading to the denial of authorization.
To resolve this:
Navigate to your instance configuration settings.
Select the Bot Type Converted to Single-Tenant parameter in the advanced settings of the Connect section.
Run the command !microsoft-teams-auth-reset in the War Room.
Your bot should now be properly authorized and functional.
If you see the following error message:
Forbidden: Failed to get license information for the user. Ensure user has a valid Office365 license assigned to them., it indicates that the user who approved the authentication URL likely does not have a valid Office 365 license assigned.To resolve this, please follow these steps:
Re-authorize: Re-run the command
!microsoft-teams-generate-login-urland open the URL that is returned. This time, approve the authorization using a different user who has a valid Office 365 license.Update Instance: Copy the new Authorization Code that is generated and paste it into the Authorization code parameter in the instance settings.
Reset Token: Run the command
!microsoft-teams-auth-resetin the Playground.
Download Demisto Bot#
Running commands from Microsoft Teams#
You can run Cortex XSOAR/XSIAM commands, according to the user permissions, from Microsoft Teams in a mirrored investigation channel. For Microsoft Teams integration commands to be sent to Cortex XSOAR/XSIAM, you need to have role/access to Cortex XSOAR/XSIAM and your Teams email needs to match the email/user in Cortex XSOAR/XSIAM. External users can create incidents if the flag is set in the integration, but the rest of the commands require a valid Cortex XSOAR/XSIAM user and role.
Direct messages commands#
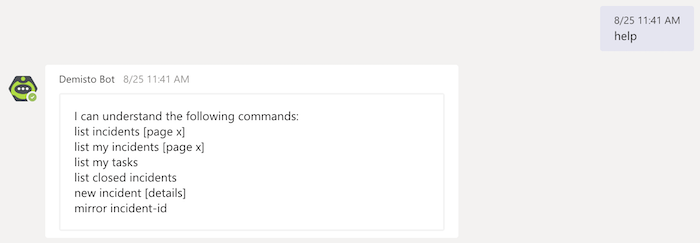
You can chat with the bot in direct messages in order to retrieve data (list incidents and tasks) and run operations (create incident and mirror an investigation) related to Cortex XSOAR.
You can send the message help in order to see the supported commands:
Note ⚠️: To enrich an incident created via the Demisto BOT (new incident command) with extra information received with the request, as in regular fetch-incidents process users may create custom mappers and map the desired values.
Commands#
You can execute these commands from the Cortex XSOAR/XSIAM CLI, as part of an automation, or in a playbook. After you successfully execute a command, a DBot message appears in the War Room with the command details.
send-notification#
Sends a message to the specified teams. To mention a user in the message, add a semicolon ";" at the end of the user mention. For example: @Bruce Willis;.
If sending a reply to a message, the message ID must be provided and the reply will be sent via the Graph API which means the message will appear from the account used to authorize the integration instance and not the bot. Setting the account's name and picture to match the bot will make it appear to be from the same source.
Base Command#
send-notification
Required Permissions#
GroupMember.Read.All - Application (Client Credentials) / Delegated (Authorization Code)
Channel.ReadBasic.All - Application (Client Credentials) / Delegated (Authorization Code)
ChannelMessage.Send - Delegated (Authorization Code) - Only needed for sending replies to messages
Input#
| Argument Name | Description | Required |
|---|---|---|
| channel | The channel to which to send messages. Supports only standard channels. | Optional |
| message | The message to send to the channel or team member. | Optional |
| team_member | Display name or email address of the team member to send the message to. | Optional |
| team | The team in which the specified channel exists. The team must already exist, and this value will override the default channel configured in the integration parameters. | Optional |
| message_id | ID of the message to send the notification to as a reply when sending to a channel. | Optional |
| adaptive_card | The Microsoft Teams adaptive card to send. | Optional |
| to | The team member to which to send the message. | Optional |
| external_form_url_header | The header of an external form hyperlink. Default is Microsoft Teams Form. | Optional |
Context Output#
| Path | Type | Description |
|---|---|---|
| MicrosoftTeams.Message.ID | String | ID of the message sent. |
Command Example#
!send-notification channel=General message="hello world!" team=DemistoTeam
Human Readable Output#
Message was sent successfully.
mirror-investigation#
Mirrors the Cortex XSOAR/Cortex XSIAM investigation to the specified Microsoft Teams channel. Supports only standard channels.
Note: Mirrored channels could be used to run Cortex XSOAR/Cortex XSIAM built-in commands.
Base Command#
mirror-investigation
Required Permissions#
GroupMember.Read.All - Application (Client Credentials) / Delegated (Authorization Code)
Channel.ReadBasic.All - Application (Client Credentials) / Delegated (Authorization Code)
Channel.Create - Application (Client Credentials) / Delegated (Authorization Code)
Channel.Delete.All - Application (Client Credentials) / Delegated (Authorization Code)
Input#
| Argument Name | Description | Required |
|---|---|---|
| mirror_type | The mirroring type. Can be "all", which mirrors everything, "chat", which mirrors only chats (not commands), or "none", which stops all mirroring. Possible values are: all, chat, none. Default is all. | Optional |
| autoclose | Whether to auto-close the channel when the incident is closed in Cortex XSOAR. If "true", the channel will be auto-closed. Possible values are: true, false. Default is true. | Optional |
| direction | The mirroring direction. Possible values are: Both, FromDemisto, ToDemisto. Default is both. | Optional |
| team | The team in which to mirror the Cortex XSOAR investigation. If not specified, the default team configured in the integration parameters will be used. | Optional |
| channel_name | The name of the channel. The default is "incident-INCIDENTID". | Optional |
Context Output#
There is no context output for this command.
Command Example#
!mirror-investigation mirror_type=all autoclose=true direction=Both
Human Readable Output#
Investigation mirrored successfully in channel incident-100.
close-channel#
Deletes the specified Microsoft Teams channel.
Base Command#
close-channel
Required Permissions#
GroupMember.Read.All - Application (Client Credentials) / Delegated (Authorization Code)
Channel.ReadBasic.All - Application (Client Credentials) / Delegated (Authorization Code)
Channel.Delete.All - Application (Client Credentials) / Delegated (Authorization Code)
Input#
| Argument Name | Description | Required |
|---|---|---|
| channel | The name of the channel to close. | Optional |
| team | The channel's team. | Optional |
Context Output#
There is no context output for this command.
Command Example#
!close-channel channel="example channel"
Human Readable Output#
Channel was successfully closed.
microsoft-teams-integration-health#
Returns real-time and historical data on the integration status.
Base Command#
microsoft-teams-integration-health
Input#
There are no input arguments for this command.
Context Output#
There is no context output for this command.
Command Example#
!microsoft-teams-integration-health
Human Readable Output#
Microsoft API Health#
Bot Framework API Health Graph API Health Operational Operational No mirrored channels.
microsoft-teams-ring-user#
Rings a user's Teams account. Note: This is a ring only! no media will play in case the generated call is answered.
Base Command#
microsoft-teams-ring-user
Required Permissions#
User.Read.All - Application
Calls.Initiate.All - Application
Input#
| Argument Name | Description | Required |
|---|---|---|
| username | The display name of the member to call. | Required |
Context Output#
There is no context output for this command.
Command Example#
!microsoft-teams-ring-user username="Avishai Brandeis"
Human Readable Output#
Calling Avishai Brandeis
microsoft-teams-add-user-to-channel#
Adds a member (user) to a private/shared channel. For a comparison of Teams features for each channel type, see the Microsoft documentation: Channel feature comparison.
Base Command#
microsoft-teams-add-user-to-channel
Required Permissions#
User.Read.All - Application (Client Credentials) / Delegated (Authorization Code)
ChannelMember.ReadWrite.All - Application (Client Credentials) / Delegated (Authorization Code)
Channel.ReadBasic.All - Application (Client Credentials) / Delegated (Authorization Code)
GroupMember.Read.All - Application (Client Credentials) / Delegated (Authorization Code)
Input#
| Argument Name | Description | Required |
|---|---|---|
| channel | The channel to which to add the member. | Required |
| team | The channel's team. | Required |
| member | The display name of the member to add to the channel. | Required |
| owner | Whether to add the member with the owner role. Default is 'false' | Optional |
Context Output#
There is no context output for this command.
Command Example#
!microsoft-teams-add-user-to-channel channel="example channel" member=itayadmin team=DemistoTeam
Human Readable Output#
The User "itayadmin" has been added to channel "example channel" successfully.
microsoft-teams-create-channel#
Creates a new channel in a Microsoft Teams team. For more information about the channels types, see the Microsoft documentation: standard, private, or shared channels See also Channel feature comparison.
Base Command#
microsoft-teams-create-channel
Required Permissions#
User.Read.All - Application (Client Credentials) / Delegated (Authorization Code)
GroupMember.Read.All - Application (Client Credentials) / Delegated (Authorization Code)
Channel.Create - Application (Client Credentials) / Delegated (Authorization Code)
Input#
| Argument Name | Description | Required |
|---|---|---|
| channel_name | The name of the channel. | Required |
| description | The description of the channel. | Optional |
| team | The team in which to create the channel. | Required |
| membership_type | The type of the channel. Possible values are: private, standard, shared. Default is standard. | Optional |
| owner_user | The channel owner (Display name/mail/UPN) | Optional |
Context Output#
There is no context output for this command.
Command Example#
!microsoft-teams-create-channel channel_name="example channel" team=DemistoTeam description="this is my new channel"
Human Readable Output#
The channel "example channel" was created successfully
microsoft-teams-create-meeting#
Creates a new meeting in Microsoft Teams.
Base Command#
microsoft-teams-create-meeting
Required Permissions#
OnlineMeetings.ReadWrite.All - Application (Client Credentials)
OnlineMeetings.ReadWrite - Delegated (Authorization Code)
When using Client Credentials Flow:
Besides setting up this permission, in order to create a meeting, the Azure admin needs to configure application access policy
and grant users permissions to create meetings.
The script ConfigureAzureApplicationAccessPolicy was created to support the needed commands.
For more information:
Allow applications to access online meetings on behalf of a user
When using Authorization Code Flow:
The authentication process is conducted on behalf of the specific user who initiated the login request. Therefore, the given member must be the same user.
Input#
| Argument Name | Description | Required |
|---|---|---|
| start_time | The meeting start time in ISO 8601 format e.g., "2019-07-12T14:30:34.2444915-07:00". | Optional |
| end_time | The meeting end time in ISO 8601 format e.g., "2019-07-12T14:30:34.2444915-07:00". | Optional |
| subject | The meeting subject. | Required |
| member | Display name/mail/UPN of user who created the meeting, e.g., Adam Testman. | Required |
Context Output#
| Path | Type | Description |
|---|---|---|
| MicrosoftTeams.CreateMeeting.creationDateTime | Date | Meeting creation time. |
| MicrosoftTeams.CreateMeeting.threadId | String | Meeting thread ID. |
| MicrosoftTeams.CreateMeeting.messageId | String | Meeting message ID. |
| MicrosoftTeams.CreateMeeting.id | String | Meeting ID. |
| MicrosoftTeams.CreateMeeting.joinWebUrl | String | The URL to join the meeting. |
| MicrosoftTeams.CreateMeeting.participantId | String | The meeting participants. |
| MicrosoftTeams.CreateMeeting.participantDisplayName | String | The display name of the participants. |
Command Example#
!microsoft-teams-create-meeting member="example user" subject="Important meeting"
Human Readable Output#
The meeting "Important meeting" was created successfully
microsoft-teams-user-remove-from-channel#
Removes a member (user) from a private/shared channel.
Base Command#
microsoft-teams-user-remove-from-channel
Required Permissions#
GroupMember.Read.All - Application (Client Credentials) / Delegated (Authorization Code)
Channel.ReadBasic.All - Application (Client Credentials) / Delegated (Authorization Code)
ChannelMember.ReadWrite.All - Application (Client Credentials) / Delegated (Authorization Code)
Input#
| Argument Name | Description | Required |
|---|---|---|
| channel_name | The name of the channel. | Required |
| team | The name of the channel's team. | Required |
| member | The display name of the member to remove from the channel. | Required |
Context Output#
There is no context output for this command.
Command Example#
!microsoft-teams-user-remove-from-channel channel_name="example channel" member=itayadmin team=DemistoTeam
Human Readable Output#
The User "itayadmin" has been removed from channel "example channel" successfully.
microsoft-teams-channel-user-list#
Retrieves a list of members from a channel.
Base Command#
microsoft-teams-channel-user-list
Required Permissions#
GroupMember.Read.All - Application (Client Credentials) / Delegated (Authorization Code)
Channel.ReadBasic.All - Application (Client Credentials) / Delegated (Authorization Code)
ChannelMember.Read.All - Application (Client Credentials) / Delegated (Authorization Code)
Input#
| Argument Name | Description | Required |
|---|---|---|
| channel_name | The name of the channel. | Required |
| team | The name of the channel's team. | Required |
Context Output#
| Path | Type | Description |
|---|---|---|
| MicrosoftTeams.ChannelList.channelId | String | The channel ID. |
| MicrosoftTeams.ChannelList.channelName | String | The name of the channel. |
| MicrosoftTeams.ChannelList.members.displayName | String | The display name of the members. |
| MicrosoftTeams.ChannelList.members.email | String | The email of the members. |
| MicrosoftTeams.ChannelList.members.id | String | The ID of the members. |
| MicrosoftTeams.ChannelList.members.roles | String | The roles of the members. |
| MicrosoftTeams.ChannelList.members.tenantId | String | The tenant ID of the members. |
| MicrosoftTeams.ChannelList.members.userId | String | The user ID of the members. |
| MicrosoftTeams.ChannelList.members.visibleHistoryStartDateTime | String | The timestamp denoting how far back a conversation's history is shared with the conversation member. |
Command Example#
!microsoft-teams-channel-user-list channel_name="example channel" team=DemistoTeam
Human Readable Output#
Channel 'example channel' Members List#
| User Id | Tenant Id | Membership id | User roles | Display Name | Start DateTime | |
|---|---|---|---|---|---|---|
| 359d2c3c-162b-414c-b2eq-386461e5l050 | test@gmail.com | pbae9ao6-01ql-249o-5me3-4738p3e1m941 | MmFiOWM3OTYtMjkwMi00NWY4LWI3MTItN2M1YTYzY2Y0MWM0IyNlZWY5Y2IzNi0wNmRlLTQ2OWItODdjZC03MGY0Y2JlMzJkMTQ= | owner | itayadmin | 0001-01-01T00:00:00Z |
Chat Commands#
microsoft-teams-chat-create#
Creates a new chat.
Notes:
- Only one oneOnOne chat can exist between two members. If a oneOnOne chat already exists, it will be returned.
- This command works with the consent user, not with the bot. Which means, the chat is created between the consent user and the user provided in the command's argument.
- This command may fail if the bot app has not yet appeared in the "built for your org" section in teams.
Base Command#
microsoft-teams-chat-create
Required Permissions#
User.Read.All - Delegated
Chat.Create - Delegated
AppCatalog.Read.All - Delegated
TeamsAppInstallation.ReadWriteSelfForChat - Delegated
Input#
| Argument Name | Description | Required |
|---|---|---|
| chat_type | Specifies the type of chat. Possible values are: group, oneOnOne. Default is group. | Required |
| member | Display name/mail/UPN of user that should be added to the chat. Can be an array. | Optional |
| chat_name | The title of the chat. The chat title can be provided only if the chat is of group type. | Optional |
Context Output#
| Path | Type | Description |
|---|---|---|
| MicrosoftTeams.ChatList.chatId | String | The chat's unique identifier. |
| MicrosoftTeams.ChatList.topic | String | Subject or topic for the chat. Only available for group chats. |
| MicrosoftTeams.ChatList.createdDateTime | String | Date and time at which the chat was created. |
| MicrosoftTeams.ChatList.lastUpdatedDateTime | String | Date and time at which the chat was renamed or list of members were last changed. |
| MicrosoftTeams.ChatList.chatType | String | Specifies the type of chat. |
| MicrosoftTeams.ChatList.webUrl | String | The URL for the chat in Microsoft Teams. The URL should be treated as an opaque blob, and not parsed. |
| MicrosoftTeams.ChatList.tenantId | String | The identifier of the tenant in which the chat was created. |
| MicrosoftTeams.ChatList.viewpoint | String | Represents caller-specific information about the chat, such as last message read date and time. |
| MicrosoftTeams.ChatList.onlineMeetingInfo | String | Represents details about an online meeting. If the chat isn't associated with an online meeting, the property is empty. |
Command Example#
!microsoft-teams-chat-create chat_type=group member="itayadmin, Bruce Willis" chat_name="example chat"
Human Readable Output#
The chat 'example chat' was created successfully#
| Chat Id | Chat name | Created Date Time | Last Updated Date Time | webUrl | Tenant Id |
|---|---|---|---|---|---|
| 19:2da4c29f6d7041eca70b638b43d45437@thread.v2 | example chat | 2023-01-08T07:51:53.07Z | 2023-01-08T07:51:53.07Z | webUrl | pbae9ao6-01ql-249o-5me3-4738p3e1m941 |
microsoft-teams-message-send-to-chat#
Sends a new chat message in the specified chat.
Notes:
- This command works with the consent user, not with the bot. Which means, the message is sent to the given chat by the consent user, not the bot.
- This command will fail if the consent user is not a member of the destination chat.
- This command may fail if the bot app has not yet appeared in the "built for your org" section in teams.
- This command can only send messages from type 'message'
Base Command#
microsoft-teams-message-send-to-chat
Required Permissions#
User.Read.All - Delegated
Chat.ReadBasic - Delegated
Chat.Create - Delegated
ChatMessage.Send - Delegated
AppCatalog.Read.All - Delegated
TeamsAppInstallation.ReadWriteSelfForChat - Delegated
Note: Chat.Create is needed only when sending to one-on-one chats.
Input#
| Argument Name | Description | Required |
|---|---|---|
| chat | The chat ID / group chat name (topic) / oneOnOne member (Display name/mail/UPN). Note - the consent user must be a member of the chat. | Required |
| content | The content of the chat message. | Required |
| content_type | The message content type. Possible values are: text, html. Default is text. | Optional |
Context Output#
| Path | Type | Description |
|---|---|---|
| MicrosoftTeams.ChatList.chatId | String | The chat's unique identifier. |
| MicrosoftTeams.ChatList.messages.id | String | Unique ID of the message. |
| MicrosoftTeams.ChatList.messages.replyToId | String | ID of the parent chat message or root chat message of the thread. |
| MicrosoftTeams.ChatList.messages.etag | String | Version number of the chat message. |
| MicrosoftTeams.ChatList.messages.messageType | String | The type of chat message. |
| MicrosoftTeams.ChatList.messages.createdDateTime | String | Timestamp of when the chat message was created. |
| MicrosoftTeams.ChatList.messages.lastModifiedDateTime | String | Timestamp when the chat message is created (initial setting) or modified, including when a reaction is added or removed. |
| MicrosoftTeams.ChatList.messages.lastEditedDateTime | String | Timestamp when edits to the chat message were made. Triggers an "Edited" flag in the Teams UI. If no edits are made the value is null. |
| MicrosoftTeams.ChatList.messages.deletedDateTime | String | Timestamp at which the chat message was deleted, or null if not deleted. |
| MicrosoftTeams.ChatList.messages.subject | String | The subject of the chat message, in plaintext. |
| MicrosoftTeams.ChatList.messages.summary | String | Summary text of the chat message that could be used for push notifications and summary views or fall back views. |
| MicrosoftTeams.ChatList.messages.chatId | String | If the message was sent in a chat, represents the identity of the chat. |
| MicrosoftTeams.ChatList.messages.importance | String | The importance of the chat message. |
| MicrosoftTeams.ChatList.messages.locale | String | Locale of the chat message set by the client. |
| MicrosoftTeams.ChatList.messages.webUrl | String | Link to the message in Microsoft Teams. |
| MicrosoftTeams.ChatList.messages.channelIdentity | String | If the message was sent in a channel, represents identity of the channel. |
| MicrosoftTeams.ChatList.messages.policyViolation | String | Defines the properties of a policy violation set by a data loss prevention (DLP) application. |
| MicrosoftTeams.ChatList.messages.eventDetail | String | If present, represents details of an event that happened in a chat, a channel, or a team, for example, adding new members. |
| MicrosoftTeams.ChatList.messages.from | String | Details of the sender of the chat message. |
| MicrosoftTeams.ChatList.messages.body | String | Plaintext/HTML representation of the content of the chat message. Representation is specified by the contentType inside the body. |
| MicrosoftTeams.ChatList.messages.attachments | String | References to attached objects like files, tabs, meetings etc. |
| MicrosoftTeams.ChatList.messages.mentions | String | List of entities mentioned in the chat message. |
| MicrosoftTeams.ChatList.messages.reactions | String | Reactions for this chat message (for example, Like). |
Command Example#
!microsoft-teams-message-send-to-chat chat="example chat" content="Hello World"
Human Readable Output#
Message was sent successfully in the 'example chat' chat#
Chat Id Created DateTime Etag From user From user id From user userIdentityType Importance Message Content Message Type Message contentType Message id lastModified DateTime 19:2da4c29f6d7041eca70b638b43d45437@thread.v2 2021-03-29T04:17:43.15Z 1616991463150 itayadmin 8ea0e38b-efb3-4757-924a-5f94061cf8c2 aadUser normal Hello World message text 1616991463150 2021-03-29T04:17:43.15Z
microsoft-teams-chat-add-user#
Adds a member (user) to a group chat.
Notes:
- This command works with the consent user, not with the bot. Which means, the member will be added to the given chat by the consent user, not the bot.
- This command will fail if the consent user is not a member of the destination chat.
Base Command#
microsoft-teams-chat-add-user
Required Permissions#
Chat.ReadBasic - Delegated
ChatMember.ReadWrite - Delegated
Input#
| Argument Name | Description | Required |
|---|---|---|
| chat | The chat ID or group chat name (topic) to which to add the member. Note - the consent user must be a member of the chat. | Required |
| member | Display name/mail/UPN of user that should be added to the chat. Can be an array. | Required |
| share_history | Whether to share the whole history of the chat. Possible values are: true, false. Default is True. | Optional |
Context Output#
There is no context output for this command.
Command Example#
!microsoft-teams-chat-add-user chat="example chat" member="Bruce Willis" share_history=false
Human Readable Output#
The User "Bruce Willis" has been added to chat "example chat" successfully.
microsoft-teams-chat-member-list#
Retrieves a list of members from a chat.
Notes:
- This command works with the consent user, not with the bot. Which means, that the chat must include the consent user.
Base Command#
microsoft-teams-chat-member-list
Required Permissions#
User.Read.All - Delegated
Chat.ReadBasic - Delegated
Input#
| Argument Name | Description | Required |
|---|---|---|
| chat | The chat ID / group chat name (topic) / oneOnOne Member (Display name/mail/UPN). Note - the consent user must be a member of the chat. | Required |
Context Output#
| Path | Type | Description |
|---|---|---|
| MicrosoftTeams.ChatList.chatId | String | The chat's unique identifier. |
| MicrosoftTeams.ChatList.members.displayName | String | The display name of the members. |
| MicrosoftTeams.ChatList.members.email | String | The email of the members. |
| MicrosoftTeams.ChatList.members.id | String | The ID of the members. |
| MicrosoftTeams.ChatList.members.roles | String | The roles of the members. |
| MicrosoftTeams.ChatList.members.tenantId | String | The tenant ID of the members. |
| MicrosoftTeams.ChatList.members.userId | String | The user ID of the members. |
| MicrosoftTeams.ChatList.members.visibleHistoryStartDateTime | String | The timestamp denoting how far back a conversation's history is shared with the conversation member. |
Command Example#
!microsoft-teams-chat-member-list chat="example chat"
Human Readable Output#
Chat "example chat" Members List#
User Id User roles Name Tenant Id 359d2c3c-162b-414c-b2eq-386461e5l050 owner itayadmin test@gmail.com dcd219dd-bc68-4b9b-bf0b-4a33a796be35 48d31887-5fad-4d73-a9f5-3c356e68a038 owner Bruce Willis test@gmail.com dcd219dd-bc68-4b9b-bf0b-4a33a796be35
microsoft-teams-chat-list#
Retrieves a list of chats that the consent user is a member of. If 'chat' is specified - retrieves this chat only.
Base Command#
microsoft-teams-chat-list
Required Permissions#
User.Read.All - Delegated
Chat.ReadBasic - Delegated
Input#
| Argument Name | Description | Required |
|---|---|---|
| chat | The chat ID / group chat name (topic) / oneOnOne member (Display name/mail/UPN). Note - the consent user must be a member of the chat. | Optional |
| filter | Filters results. For example: topic eq 'testing'. For more query examples, see https://learn.microsoft.com/en-us/graph/filter-query-parameter?tabs=http. | Optional |
| expand | Expands the results to include members or lastMessagePreview properties. Possible values are: members, lastMessagePreview. | Optional |
| limit | The number of results to retrieve. Default is 50. | Optional |
| next_link | A link that specifies a starting point to use for subsequent calls. | Optional |
| page_size | Number of results to return per page. Default is 50. | Optional |
Context Output#
| Path | Type | Description |
|---|---|---|
| MicrosoftTeams.ChatList.chatId | String | The chat's unique identifier. |
| MicrosoftTeams.ChatList.topic | String | Subject or topic for the chat. Only available for group chats. |
| MicrosoftTeams.ChatList.createdDateTime | String | Date and time at which the chat was created. |
| MicrosoftTeams.ChatList.lastUpdatedDateTime | String | Date and time at which the chat was renamed or list of members were last changed. |
| MicrosoftTeams.ChatList.chatType | String | Specifies the type of chat. |
| MicrosoftTeams.ChatList.webUrl | String | The URL for the chat in Microsoft Teams. The URL should be treated as an opaque blob, and not parsed. |
| MicrosoftTeams.ChatList.tenantId | String | The identifier of the tenant in which the chat was created. |
| MicrosoftTeams.ChatList.viewpoint | String | Represents caller-specific information about the chat, such as last message read date and time. |
| MicrosoftTeams.ChatList.onlineMeetingInfo | String | Represents details about an online meeting. If the chat isn't associated with an online meeting, the property is empty. |
| MicrosoftTeams.ChatListNextLink | String | Used if an operation returns partial results. If a response contains a NextLink element, its value specifies a starting point to use for subsequent calls. |
Command Example#
!microsoft-teams-chat-list filter="topic eq 'testing'"
Human Readable Output#
Chats List#
Chat Id Chat name Created Date Time Last Updated Date Time Chat Type webUrl Tenant Id Last Message Read Date Time 19:561082c0f3f847a58069deb8eb300807@thread.v2 testing 2023-01-08T14:15:45.412Z 2023-01-08T14:15:45.412Z group webUrl tenantId 2023-01-08T14:16:48.662Z 19:2da4c29f6d7041eca70b638b43d45437@thread.v2 testing 2022-12-29T11:10:49.173Z 2022-12-29T11:10:49.173Z group webUrl tenantId 2022-12-29T12:00:07.317Z
microsoft-teams-chat-message-list#
Retrieves a list of messages in a chat.
Notes:
- This command works with the consent user, not with the bot. Which means, that the chat must include the consent user.
Base Command#
microsoft-teams-chat-message-list
Required Permissions#
User.Read.All - Delegated
Chat.Read - Delegated
Input#
| Argument Name | Description | Required |
|---|---|---|
| chat | The chat ID / group chat name (topic) / oneOnOne member (Display name/mail/UPN). Note - the consent user must be a member of the chat. | Required |
| limit | The number of results to retrieve. Default is 50. | Optional |
| order_by | Orders results by lastModifiedDateTime (default) or createdDateTime in descending order. Possible values are: lastModifiedDateTime, createdDateTime. Default is lastModifiedDateTime. | Optional |
| next_link | A link that specifies a starting point to use for subsequent calls. | Optional |
| page_size | Number of results to return per page. Default is 50. | Optional |
Context Output#
| Path | Type | Description |
|---|---|---|
| MicrosoftTeams.ChatList.chatId | String | The chat's unique identifier. |
| MicrosoftTeams.ChatList.messages.id | String | Unique ID of the message. |
| MicrosoftTeams.ChatList.messages.replyToId | String | ID of the parent chat message or root chat message of the thread. |
| MicrosoftTeams.ChatList.messages.etag | String | Version number of the chat message. |
| MicrosoftTeams.ChatList.messages.messageType | String | The type of chat message. |
| MicrosoftTeams.ChatList.messages.createdDateTime | String | Timestamp of when the chat message was created. |
| MicrosoftTeams.ChatList.messages.lastModifiedDateTime | String | Timestamp when the chat message is created (initial setting) or modified, including when a reaction is added or removed. |
| MicrosoftTeams.ChatList.messages.lastEditedDateTime | String | Timestamp when edits to the chat message were made. Triggers an "Edited" flag in the Teams UI. If no edits are made the value is null. |
| MicrosoftTeams.ChatList.messages.deletedDateTime | String | Timestamp at which the chat message was deleted, or null if not deleted. |
| MicrosoftTeams.ChatList.messages.subject | String | The subject of the chat message, in plaintext. |
| MicrosoftTeams.ChatList.messages.summary | String | Summary text of the chat message that could be used for push notifications and summary views or fall back views. |
| MicrosoftTeams.ChatList.messages.chatId | String | If the message was sent in a chat, represents the identity of the chat. |
| MicrosoftTeams.ChatList.messages.importance | String | The importance of the chat message. |
| MicrosoftTeams.ChatList.messages.locale | String | Locale of the chat message set by the client. |
| MicrosoftTeams.ChatList.messages.webUrl | String | Link to the message in Microsoft Teams. |
| MicrosoftTeams.ChatList.messages.channelIdentity | String | If the message was sent in a channel, represents identity of the channel. |
| MicrosoftTeams.ChatList.messages.policyViolation | String | Defines the properties of a policy violation set by a data loss prevention (DLP) application. |
| MicrosoftTeams.ChatList.messages.eventDetail | String | If present, represents details of an event that happened in a chat, a channel, or a team, for example, adding new members. |
| MicrosoftTeams.ChatList.messages.from | String | Details of the sender of the chat message. |
| MicrosoftTeams.ChatList.messages.body | String | Plaintext/HTML representation of the content of the chat message. Representation is specified by the contentType inside the body. |
| MicrosoftTeams.ChatList.messages.attachments | String | References to attached objects like files, tabs, meetings etc. |
| MicrosoftTeams.ChatList.messages.mentions | String | List of entities mentioned in the chat message. |
| MicrosoftTeams.ChatList.messages.reactions | String | Reactions for this chat message (for example, Like). |
| MicrosoftTeams.MessageListNextLink | String | Used if an operation returns partial results. If a response contains a NextLink element, its value specifies a starting point to use for subsequent calls. |
Command Example#
!!microsoft-teams-chat-message-list chat="example chat" order_by=createdDateTime
Human Readable Output#
Messages list in "example chat" chat#
Chat Id Created DateTime Etag From user From user id From user userIdentityType Importance Message Content Message Type Message contentType Message id lastModified DateTime 19:2da4c29f6d7041eca70b638b43d45437@thread.v2 2021-03-29T04:17:43.15Z 1616991463150 itayadmin 8ea0e38b-efb3-4757-924a-5f94061cf8c2 aadUser normal Hello World message text 1616991463150 2021-03-29T04:17:43.15Z
microsoft-teams-chat-update#
Updates the chat name. It can only be set for group chats.
Notes:
- This command works with the consent user, not with the bot. Which means, that the chat must include the consent user.
Base Command#
microsoft-teams-chat-update
Required Permissions#
User.Read.All - Delegated
Chat.ReadWrite - Delegated
Input#
| Argument Name | Description | Required |
|---|---|---|
| chat | The chat ID / group chat name (topic). Note - the consent user must be a member of the chat. | Required |
| chat_name | The new chat name. Maximum length is 250 characters. Use of ':' is not allowed. | Required |
Context Output#
There is no context output for this command.
Command Example#
!microsoft-teams-chat-update chat="example chat" chat_name="update chat_name"
Human Readable Output#
The name of chat 'example chat' has been successfully changed to 'update chat_name'.
microsoft-teams-auth-test#
Tests the connectivity to MicrosoftTeams.
Base Command#
microsoft-teams-auth-test
Input#
There are no input arguments for this command.
Context Output#
There is no context output for this command.
Command Example#
!microsoft-teams-auth-test
Human Readable Output#
✅ Success!
microsoft-teams-generate-login-url#
Generate the login url used for Authorization code flow.
Note: Authorization codes are short-lived. Typically, they expire after about 10 minutes.
Base Command#
microsoft-teams-generate-login-url
Input#
There are no input arguments for this command.
Context Output#
There is no context output for this command.
Command example#
!microsoft-teams-generate-login-url
Human Readable Output#
Authorization instructions#
- Click on the login URL to sign in and grant Cortex XSOAR permissions for your Azure Service Management. You will be automatically redirected to a link with the following structure:
REDIRECT_URI?code=AUTH_CODE&session_state=SESSION_STATE- Copy the
AUTH_CODE(without thecode=prefix, and thesession_stateparameter) and paste it in your instance configuration under the Authorization code parameter.
microsoft-teams-auth-reset#
Run this command if for some reason you need to rerun the graph authentication process. Notes:
- After making changes to permissions in the Azure Portal, reset the authentication to ensure that the token reflects the updated permissions.
- This command is triggered automatically when an authentication flow type switch is detected. The auto resetting ensures the integration uses the appropriate token.
- When switching the authentication type to the
Authorization Code Flow, this command will be triggered automatically. Then you will need to regenerate the Authorization code parameter by running the microsoft-teams-generate-login-url command, and to verify the authentication by running the !microsoft-teams-auth-test command.
Base Command#
microsoft-teams-auth-reset
Input#
There are no input arguments for this command.
Context Output#
There is no context output for this command.
microsoft-teams-token-permissions-list#
Retrieves the API permissions associated with the used graph access token.
Use this command if you encounter insufficient permissions error when attempting to execute an integration command. Compare the permissions list obtained for the token with the permissions required for the desired command (can be found in the integration documentation). If there are missing API permissions, add them to your application, and then run the microsoft-teams-auth-reset command (as described here - microsoft-teams-auth-reset docs).
Base Command#
microsoft-teams-token-permissions-list
Input#
There are no input arguments for this command.
Context Output#
There is no context output for this command.
Command Example#
!microsoft-teams-token-permissions-list
Human Readable Output#
The API permissions obtained for the used graph access token are#
Permission Group.ReadWrite.All User.Read.All Channel.Create
microsoft-teams-create-messaging-endpoint#
Generates the messaging endpoint, based on the server URL, the server version, and the instance configurations.
The messaging endpoint should be added to the Demisto bot configuration in Microsoft Teams as part of the prerequisites of the integration's setup. For more information see - Integration Documentation.
Base Command#
microsoft-teams-create-messaging-endpoint
Input#
| Argument Name | Description | Required |
|---|---|---|
| engine_url | If your instance configuration involves a Cortex XSOAR engine, provide the engine's IP (or DNS name) and the port in use in the following format - https://IP:port or http://IP:port. For example - https://my-engine.name:443, http://1.1.1.1:443. | Optional |
Context Output#
There is no context output for this command.
Command Example#
!microsoft-teams-create-messaging-endpoint
Human Readable Output#
The messaging endpoint is#
|
https://ext-viso-test.crtx-qa-uat.us.paloaltonetworks.com/xsoar/instance/execute/teams-instanceThe messaging endpoint should be added to the Demisto bot configuration in Microsoft Teams as part of the prerequisites of the integration's setup. For more information see: Integration Documentation."
microsoft-teams-message-update#
Updates a message.
Base Command#
microsoft-teams-message-update
Input#
| Argument Name | Description | Required |
|---|---|---|
| message_id | ID of the message to update. Also referred to as Activity ID. | Required |
| team | The team in which the specified message exists. | Optional |
| channel | The channel in which the specified message exists. | Optional |
| message | The new message content. | Optional |
| team_member | The message recipient. Accepts the team member's email address or username. | Optional |
| format_as_card | Whether or not an adaptive card is being updated. | Optional |
Context Output#
| Path | Type | Description |
|---|---|---|
| MicrosoftTeams.Message.ID | String | ID of the message sent. |
Command Example#
!microsoft-teams-message-update message_id=1737151779 team=MyTeam channel=General message="New message"
Human Readable Output#
Message was sent successfully.
microsoft-teams-list-messages#
Retrieves a list of messages in a chat or channel.
Notes:
- When retrieving messages from a chat, this command works with the consent user, not with the bot. Which means, that the chat must include the consent user.
Base Command#
microsoft-teams-list-messages
Input#
| Argument Name | Description | Required |
|---|---|---|
| conversation_id | The chat ID / group chat name (topic) / oneOnOne member (Display name/mail/UPN) / channel name. Note - the consent user must be a member of the chat. | Required |
| team_name | The channel's team. Required if specifying a channel name in the conversation_id argument. | Optional |
| limit | The number of results to retrieve. Default is 50. | Optional |
| order_by | Orders results by lastModifiedDateTime (default) or createdDateTime in descending order. Possible values are: lastModifiedDateTime, createdDateTime. Default is lastModifiedDateTime. | Optional |
| next_link | A link that specifies a starting point to use for subsequent calls. | Optional |
| message_id | Id of a message to retrieve its replies. Supported only for channels. | Optional |
Context Output#
| Path | Type | Description |
|---|---|---|
| MicrosoftTeams.MessagesList.conversationId | String | The conversation's unique identifier. |
| MicrosoftTeams.MessagesList.messages.id | String | Unique ID of the message. |
| MicrosoftTeams.MessagesList.messages.replyToId | String | ID of the parent message or root message of the thread. |
| MicrosoftTeams.MessagesList.messages.etag | String | Version number of the message. |
| MicrosoftTeams.MessagesList.messages.messageType | String | The type of message. |
| MicrosoftTeams.MessagesList.messages.createdDateTime | String | Timestamp of when the message was created. |
| MicrosoftTeams.MessagesList.messages.lastModifiedDateTime | String | Timestamp when the message is created (initial setting) or modified, including when a reaction is added or removed. |
| MicrosoftTeams.MessagesList.messages.lastEditedDateTime | String | Timestamp when edits to the message were made. Triggers an "Edited" flag in the Teams UI. If no edits are made the value is null. |
| MicrosoftTeams.MessagesList.messages.deletedDateTime | String | Timestamp when the message was deleted, or null if not deleted. |
| MicrosoftTeams.MessagesList.messages.subject | String | The subject of the message, in plaintext. |
| MicrosoftTeams.MessagesList.messages.summary | String | Summary text of the message that could be used for push notifications and summary views or fall back views. |
| MicrosoftTeams.MessagesList.messages.chatId | String | If the message was sent in a chat, represents the identity of the chat. |
| MicrosoftTeams.MessagesList.messages.importance | String | The importance of the message. |
| MicrosoftTeams.MessagesList.messages.locale | String | Locale of the message set by the client. |
| MicrosoftTeams.MessagesList.messages.webUrl | String | Link to the message in Microsoft Teams. |
| MicrosoftTeams.MessagesList.messages.channelIdentity | String | If the message was sent in a channel, represents the identity of the channel. |
| MicrosoftTeams.MessagesList.messages.policyViolation | String | Defines the properties of a policy violation set by a data loss prevention (DLP) application. |
| MicrosoftTeams.MessagesList.messages.eventDetail | String | If present, represents details of an event that happened in a chat, a channel, or a team, for example, adding new members. |
| MicrosoftTeams.MessagesList.messages.from | String | Details of the sender of the message. |
| MicrosoftTeams.MessagesList.messages.body.content | String | The content of the message. |
| MicrosoftTeams.MessagesList.messages.body.contentType | String | Plaintext/HTML representation of the content of the message. |
| MicrosoftTeams.MessagesList.messages.attachments | String | References to attached objects like files, tabs, meetings, etc. |
| MicrosoftTeams.MessagesList.messages.attachments.content | String | The content of the attachments. |
| MicrosoftTeams.MessagesList.messages.mentions | String | List of entities mentioned in the message. |
| MicrosoftTeams.MessagesList.messages.reactions | String | Reactions for this message (for example, Like). |
| MicrosoftTeams.MessagesListNextLink | String | Used if an operation returns partial results. If a response contains a NextLink element, its value specifies a starting point to use for subsequent calls. |
| MicrosoftTeams.MessagesListMetadata.returned_count | Number | The actual number of messages returned in this specific execution. |
| MicrosoftTeams.MessagesListMetadata.filtered_count | Number | The total number of messages in the system that match the specified filter criteria. |
microsoft-teams-send-proactive-message#
Sends a proactive message to any Microsoft Teams user across the organization.
This command enables direct communication with users without requiring them to be in a specific team or channel.
Base Command#
microsoft-teams-send-proactive-message
Required Permissions#
User.Read.All- Application and Delegated
Input#
| Argument Name | Description | Required |
|---|---|---|
| user_id | The user to send the message to. Accepts any of the following identifiers: - Email address (e.g., "john.doe@example.com") - User Principal Name (e.g., "john.doe@domain.onmicrosoft.com") - Display name (e.g., "John Doe") - User GUID (e.g., "3fa9f28b-eb0e-463a-ba7b-8089fe9991e2") The command will automatically resolve the identifier to the user's ID using Microsoft Graph API. | Required |
| message | The text message to send to the user. | Optional |
| adaptive_card | The Microsoft Teams adaptive card to send (in JSON format). | Optional |
Note: Either message or adaptive_card must be provided, but not both.
Context Output#
| Path | Type | Description |
|---|---|---|
| MicrosoftTeams.Conversation.ConversationId | String | The ID of the conversation created or used. |
| MicrosoftTeams.Conversation.UserId | String | The resolved user ID. |
| MicrosoftTeams.Conversation.ActivityId | String | The ID of the sent message activity. |
| MicrosoftTeams.Conversation.UserIdentifier | String | The original user identifier provided. |
Command Example#
!microsoft-teams-send-proactive-message user_id="user@example.com" message="Your file has been quarantined due to security concerns."
Human Readable Output#
Message was sent successfully.