Migrating MineMeld to Cortex XSOAR
This article explains how to implement the functionality of MineMeld nodes in Cortex XSOAR using a series of integrations. After you complete the tutorial, you’ll be able to perform core MineMeld functions in Cortex XSOAR.
Conceptual Introduction#
In MineMeld, the product revolves around the concept of nodes. There are three types of nodes: "miner", "processor", and "outbound". Together, these three node types represent the entire functionality of MineMeld. Simply put, MineMeld can be broken down into a data flow composed of three steps, data ingestion, data processing, and exporting data, which correspond to the node types "miner", "processor", and "outbound" respectively.
| Node Type | Step |
|---|---|
| miner | 1. Data Ingestion: ingest data from a variety of sources or feeds |
| processor | 2. Data Processing: process the data in some fashion, for example - aggregate data from different sources, filter data by type, tag the data, etc. |
| outbound | 3. Data Export: make processed data available for external consumption |
Data Flow in Cortex XSOAR#
In Cortex XSOAR the data flow is based on two integration types: feed integrations and outbound integrations. Cortex XSOAR provides dedicated out-of-the-box feed integrations for many feed sources, as well as generic feed integrations that you can configure to work with many feed sources. In MineMeld, the outputs of a miner node (the indicators fetched from a feed source) need to be specified as the input of other node(s). However, in Cortex XSOAR, all indicators fetched from feed integrations flow into the Cortex XSOAR instance's indicator store. Since the Cortex XSOAR indicator store already supports the mechanism of searching and filtering indicators, we are able to condense what in MineMeld was the flow of indicators into a processor node and then an output node. We do this by configuring a single instance of the Export Indicators Service integration. When configuring an instance of the Export Indicators Service integration, we can enter an indicator query (using the query syntax you would use to search and filter indicators in the Indicators page of the Cortex XSOAR platform), which determines the indicators that will be made available from this integration instance for external consumption.
MineMeld Prototype to Cortex XSOAR Integration Mapping#
The Parameter Configuration displays any configuration parameters that need to be specified for the corresponding integration in order for the integration instance to fetch indicators from the same source as the related prototype. The required configuration parameters will be presented as a list of keys and values where the key is the name of the configuration parameter and the value is what the user needs to enter or select. If no parameters are listed, this means that the user does not need to specify any parameter values for that integration instance.
| Prototype | Integration | Parameter Configuration |
|---|---|---|
| alienvault.reputation | Alienvault Reputation Feed | |
| aws.<service> | AWS Feed | Services: <service> |
| azure.cloudIPs | Azure Feed | |
| bambenekconsulting.<service> | Bambenek Consulting Feed | Services: <service-url> |
| blocklist_de.<service> | Blocklist_de Feed | Services: <service> |
| bruteforceblocker.blist | BruteForceBlocker Feed | |
| cloudflare.<service> | Cloudflare Feed | Services: <service-url> |
| dshield.block | DShield Feed | |
| fastly.ipv4 | Fastly Feed | |
| feodotracker.badips | Feodo Tracker IP Blocklist Feed | Feed Source: Last 30 Days |
| feodotracker.ipblocklist | Feodo Tracker IP Blocklist Feed | Feed Source: Currently Active |
| feodotracker.hashes | Feodo Tracker Hashes Feed | |
| malwaredomainlist.ip | Malware Domain List Active IPs Feed | |
| o365-api.<region>-<service> | Office 365 Feed | Regions: <region> Services: <service> |
| phishme.Intelligence | Cofense Feed | Username: <your-cofense-username> Password: <your-cofense-password> |
| proofpoint.EmergingThreatsDomains | Proofpoint Feed | Authorization Code: <key-from-proofpoint-used-to-access-the-api> Indicator Reputation: <what-reputation-to-assign-indicators-fetched-from-this-feed> Indicator Type: domain |
| proofpoint.EmergingThreatsIPs | Proofpoint Feed | Authorization Code: <key-from-proofpoint-used-to-access-the-api> Indicator Reputation: <what-reputation-to-assign-indicators-fetched-from-this-feed> Indicator Type: ip |
| recordedfuture.MasterRiskList | Recorded Future RiskList Feed | Indicator Type: <the-type-of-indicator-to-fetch-from-this-feed> API token: <your-recorded-future-api-token> |
| spamhaus.<service> | Spamhaus Feed | Services: <service-url> |
| sslabusech.ipblacklist | abuse.ch SSL Blacklist Feed | Services: https://sslbl.abuse.ch/blacklist/sslipblacklist.csv |
| tor.exit_addresses | Tor Exit Addresses Feed |
AWS Feed Example#
Let's look at a specific example to better understand how to migrate a given MineMeld node. We can migrate the AWS feed shown in the following MineMeld configuration file.
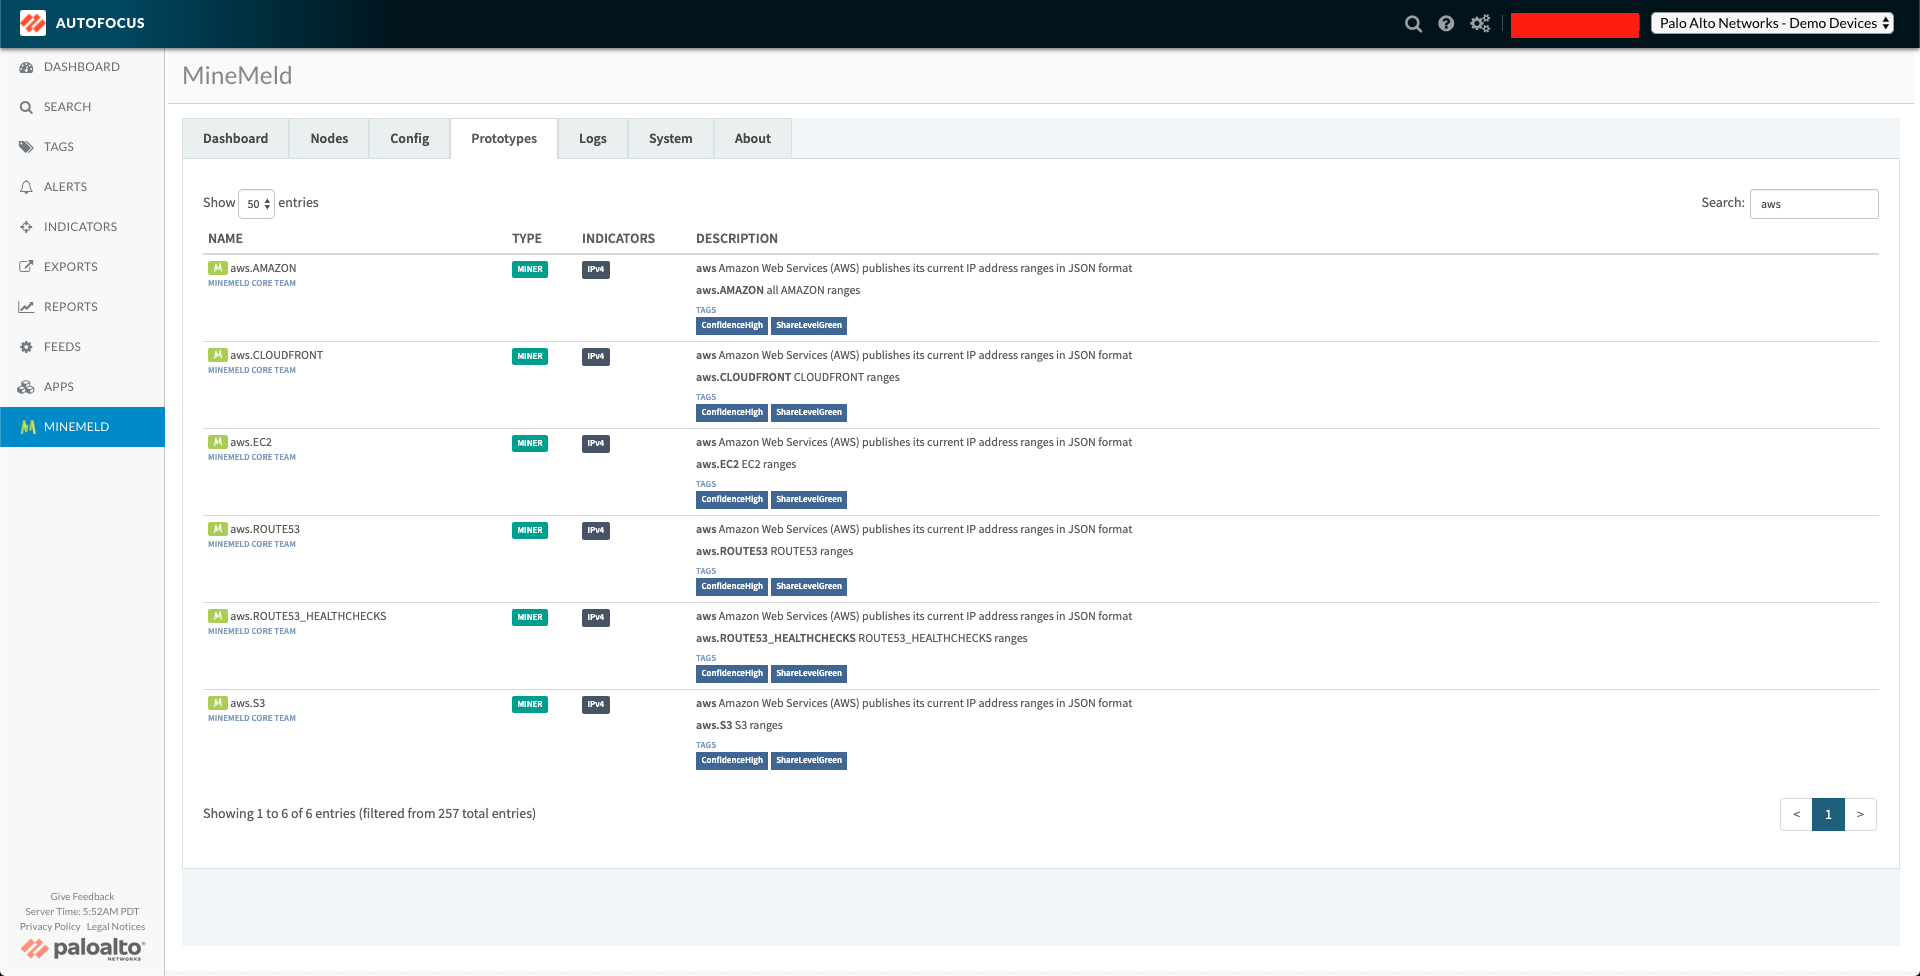
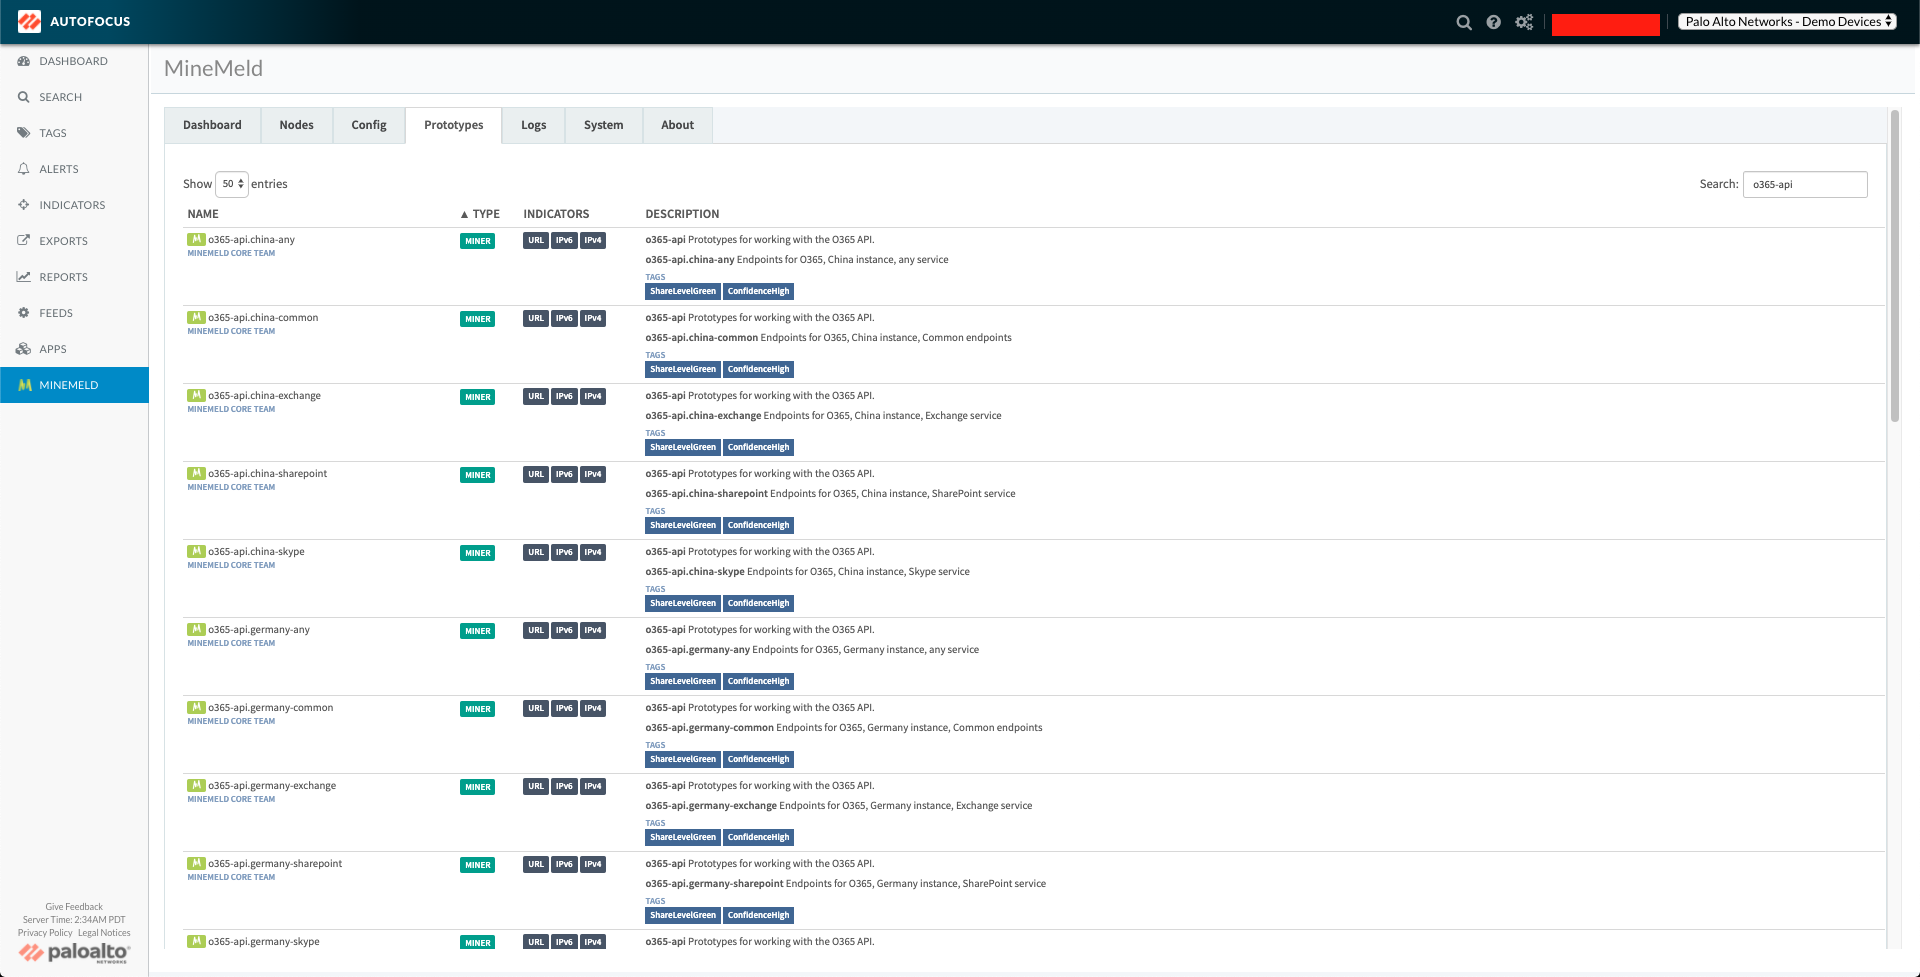
There is a node named allow-ip_aws_cloudfront which uses the prototype aws.CLOUDFRONT. The aws prototypes appear in the AutoFocus-hosted MineMeld UI as in the following screenshot.
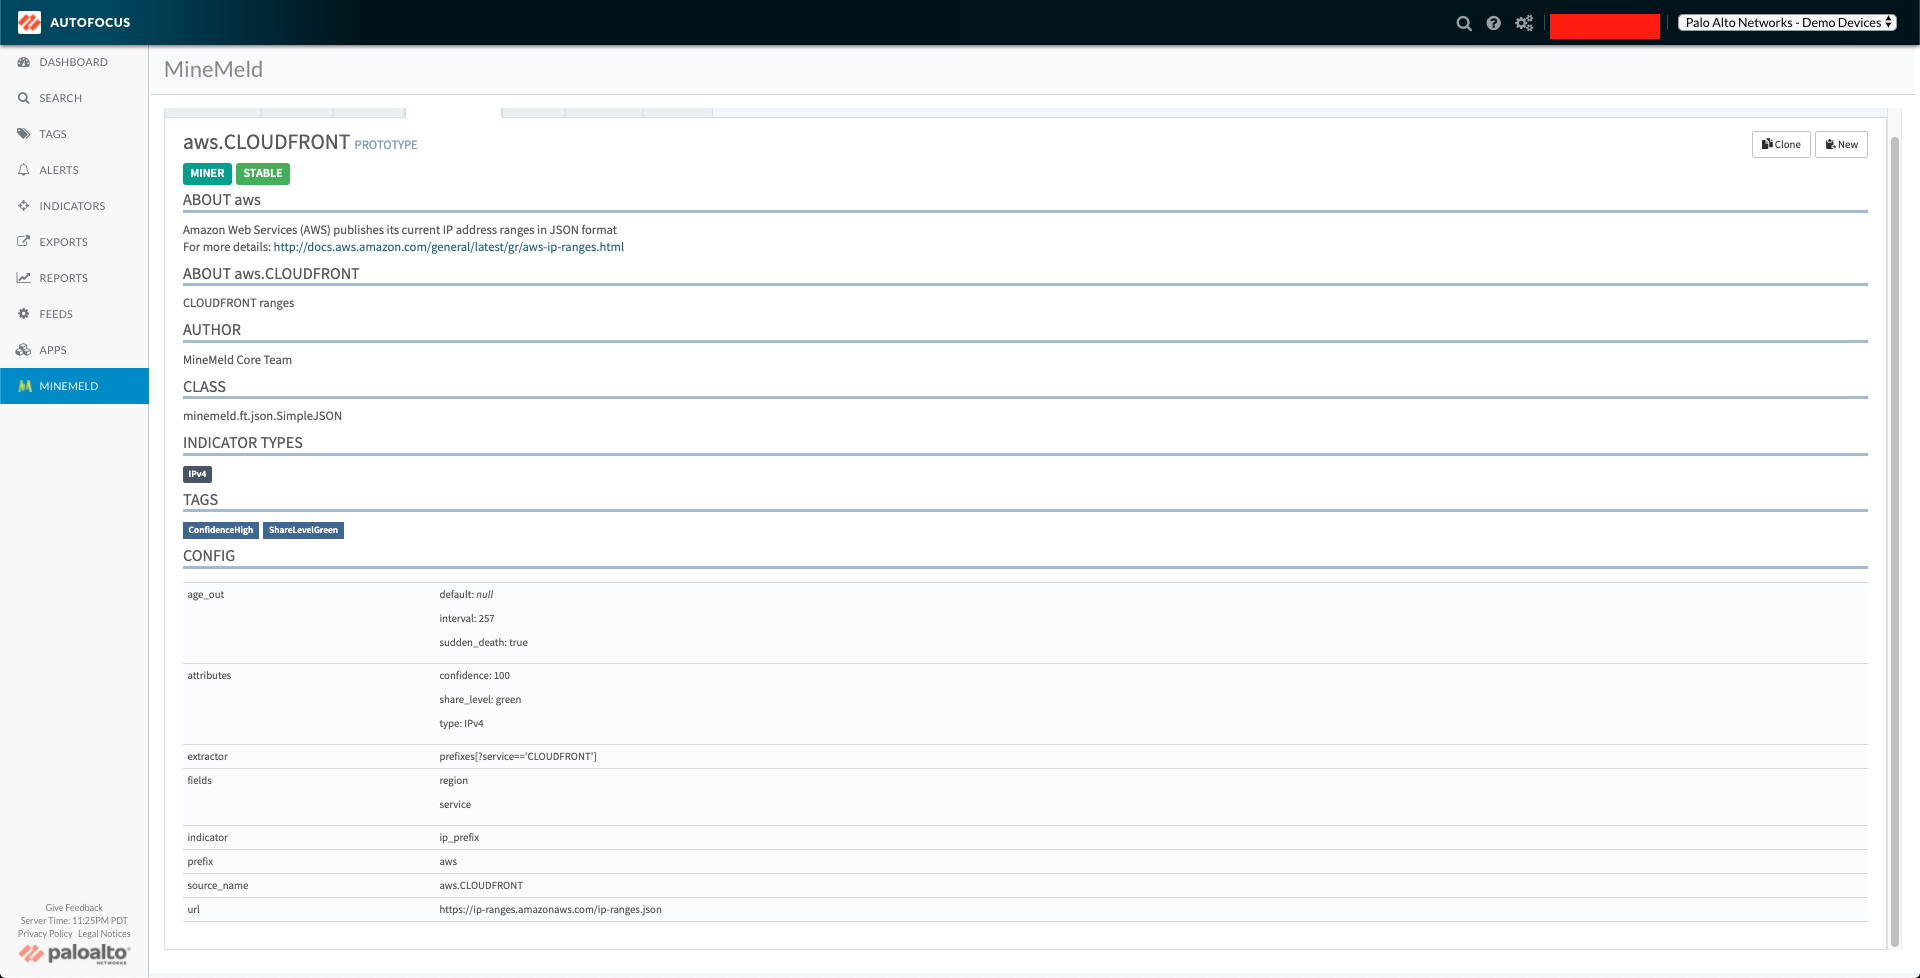
When we click the aws.CLOUDFRONT prototype, we are presented with additional details. The attributes that we need to configure for an instance of the Cortex XSOAR AWS Feed integration are under the config key.
Alternatively, we can also find all of this information in the MineMeld GitHub repository. You can find all out-of-the-box prototypes in the MineMeld repository on GitHub. In this repository are the files for all MineMeld prototypes. Since the prototype in our example begins with the prefix aws, we know the prototype we are looking for can be found in the aws.yml file. In this file, if we look under the prototypes key for CLOUDFRONT, we see the following,
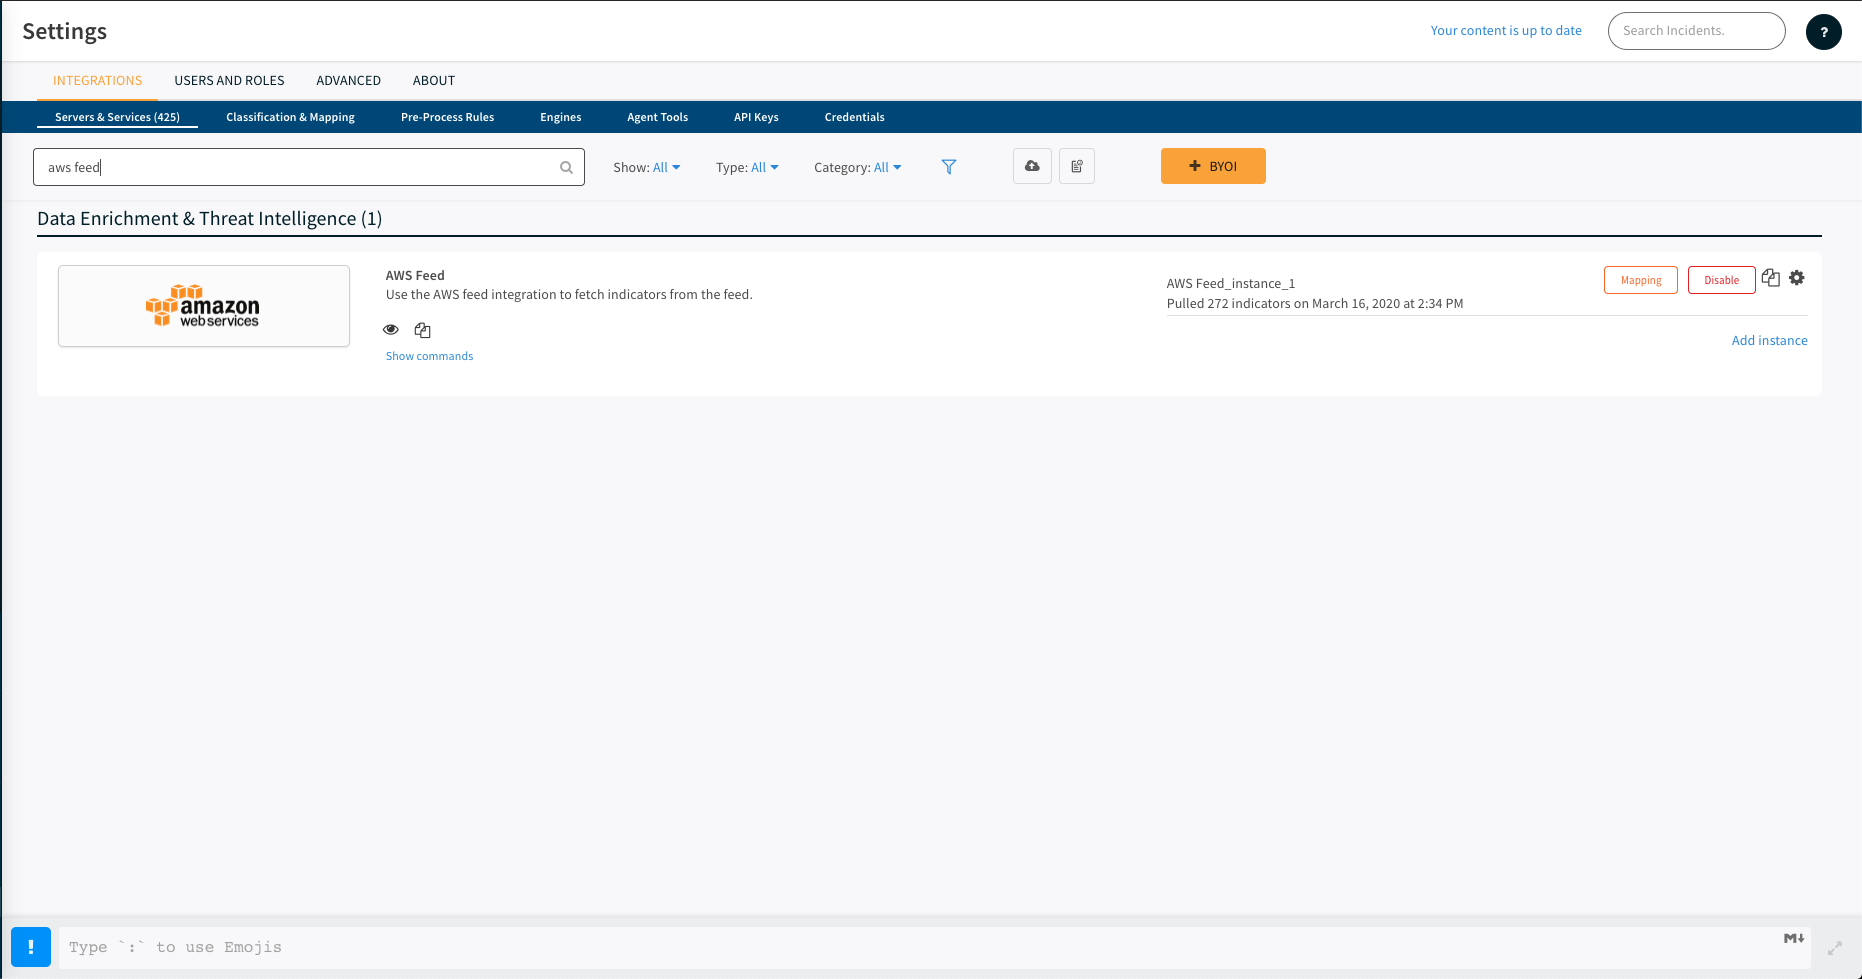
Let's look at the AWS Feed integration and see how to take these attributes from the MineMeld prototype and translate them to Cortex XSOAR. As shown in the screenshot below, if we do a search for 'aws feed', the AWS Feed integration appears.
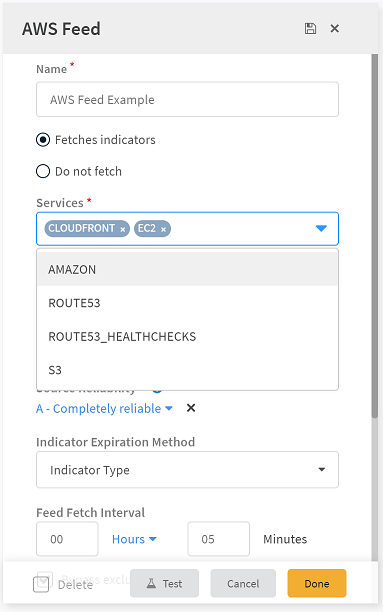
Let's configure an instance.
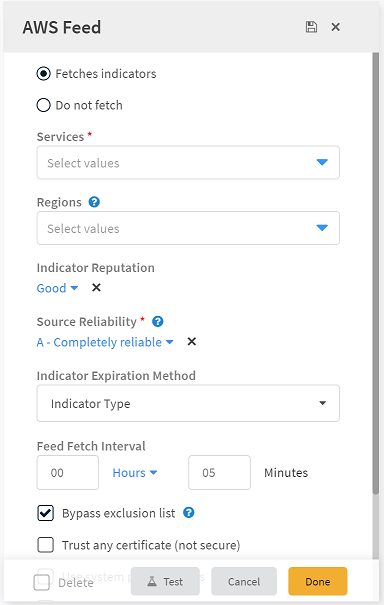
Cortex XSOAR provides default values for many of the configuration parameters as determined by the source of the feed. To configure the integration instance to fetch from the same source as the MineMeld node we are migrating from, we only need to update a single parameter. In this particular case, we only need to click the Services dropdown menu and click CLOUDFRONT.
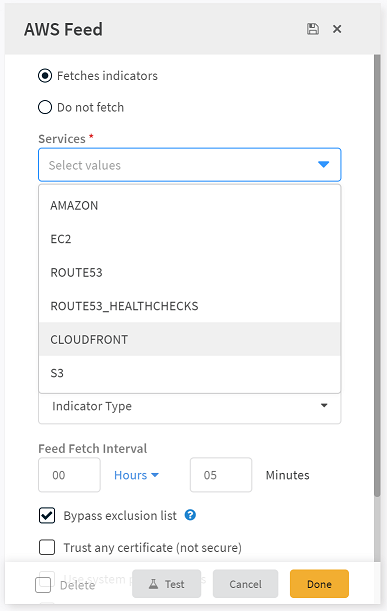
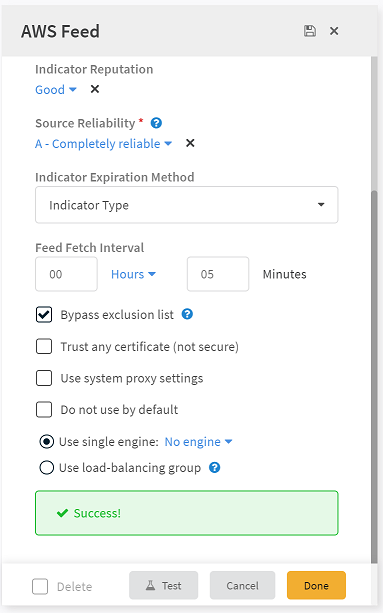
Notice that there is also a multi-select parameter, Regions. We could configure this parameter if we wanted to filter indicators returned by this AWS Feed integration instance by their associated region data field. For our example, we are returning indicators from all regions, so we do not need to change this parameter. And as easy as that, we've finished configuring an instance. Let's make sure that everything is working properly by clicking the Test button at the bottom of the configuration panel. If everything is working as expected, a green 'Success!' message will appear at the bottom of the configuration panel, as shown in the screenshot below.
Click Done at the bottom right of the configuration panel and you're all done!
AWS Feed Continued#
As you may have noticed when configuring the AWS Feed instance to pull indicators from CLOUDFRONT, there were additional services that you could select. So, if your MineMeld configuration contained multiple nodes whose prototypes were prefixed with aws as shown below, there are two options for configuring these additional AWS feeds in Cortex XSOAR.
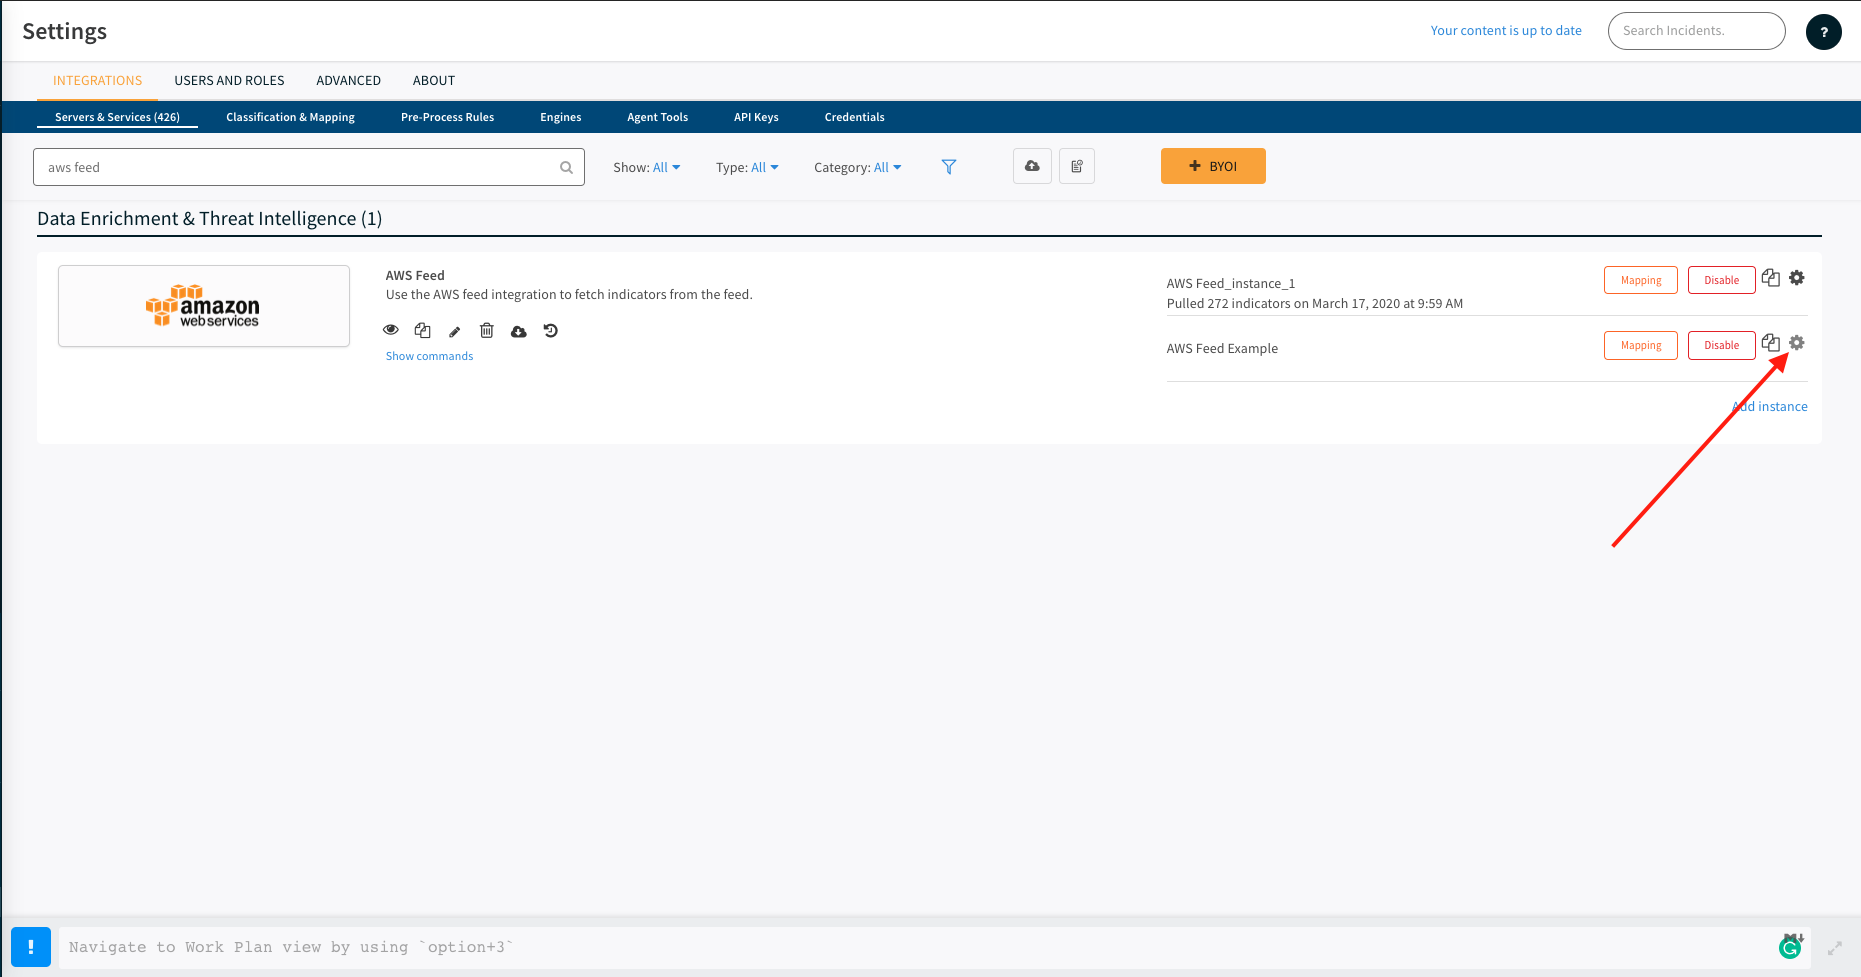
Let's see how to configure the allow-ip_aws_ec2 MineMeld node, whose prototype is aws.EC2, in Cortex XSOAR. If we want to leave the parameter values for fetching from this feed source the same as what we had for fetching indicators from CLOUDFRONT, then there is no need to even create a new instance. Click the cog icon next to the instance we already configured.
In the drop-down menu for the Services multi-select field, click EC2.
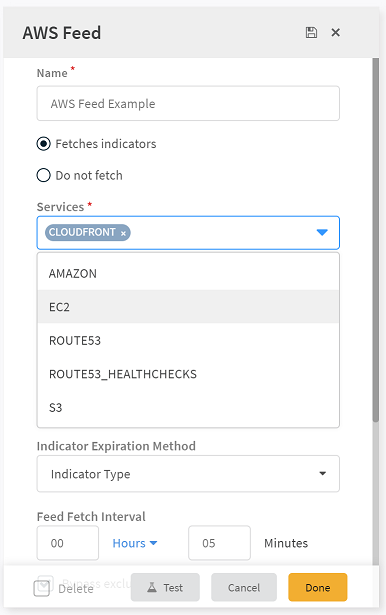
Now, both CLOUDFRONT and EC2 are selected for this instance. Click Done and this AWS Feed integration instance will now fetch indicators from AWS's CLOUDFRONT and EC2 feeds.
If we wanted to configure an instance of the AWS Feed integration to fetch from AWS's EC2 feed but we wanted it configured for different regions than the instance fetching from the CLOUDFRONT feed, then we would simply configure a new, separate instance of the AWS Feed as described in the AWS Feed Example section.
Office 365 Feed Example#
Let's say we wanted to migrate this sample Office 365 node shown in a MineMeld configuration,
There is a node named allow-multi_o365-worldwide-any that uses the prototype o365-api.worldwide-any. The o365-api prototypes appear in the AutoFocus-hosted MineMeld UI.
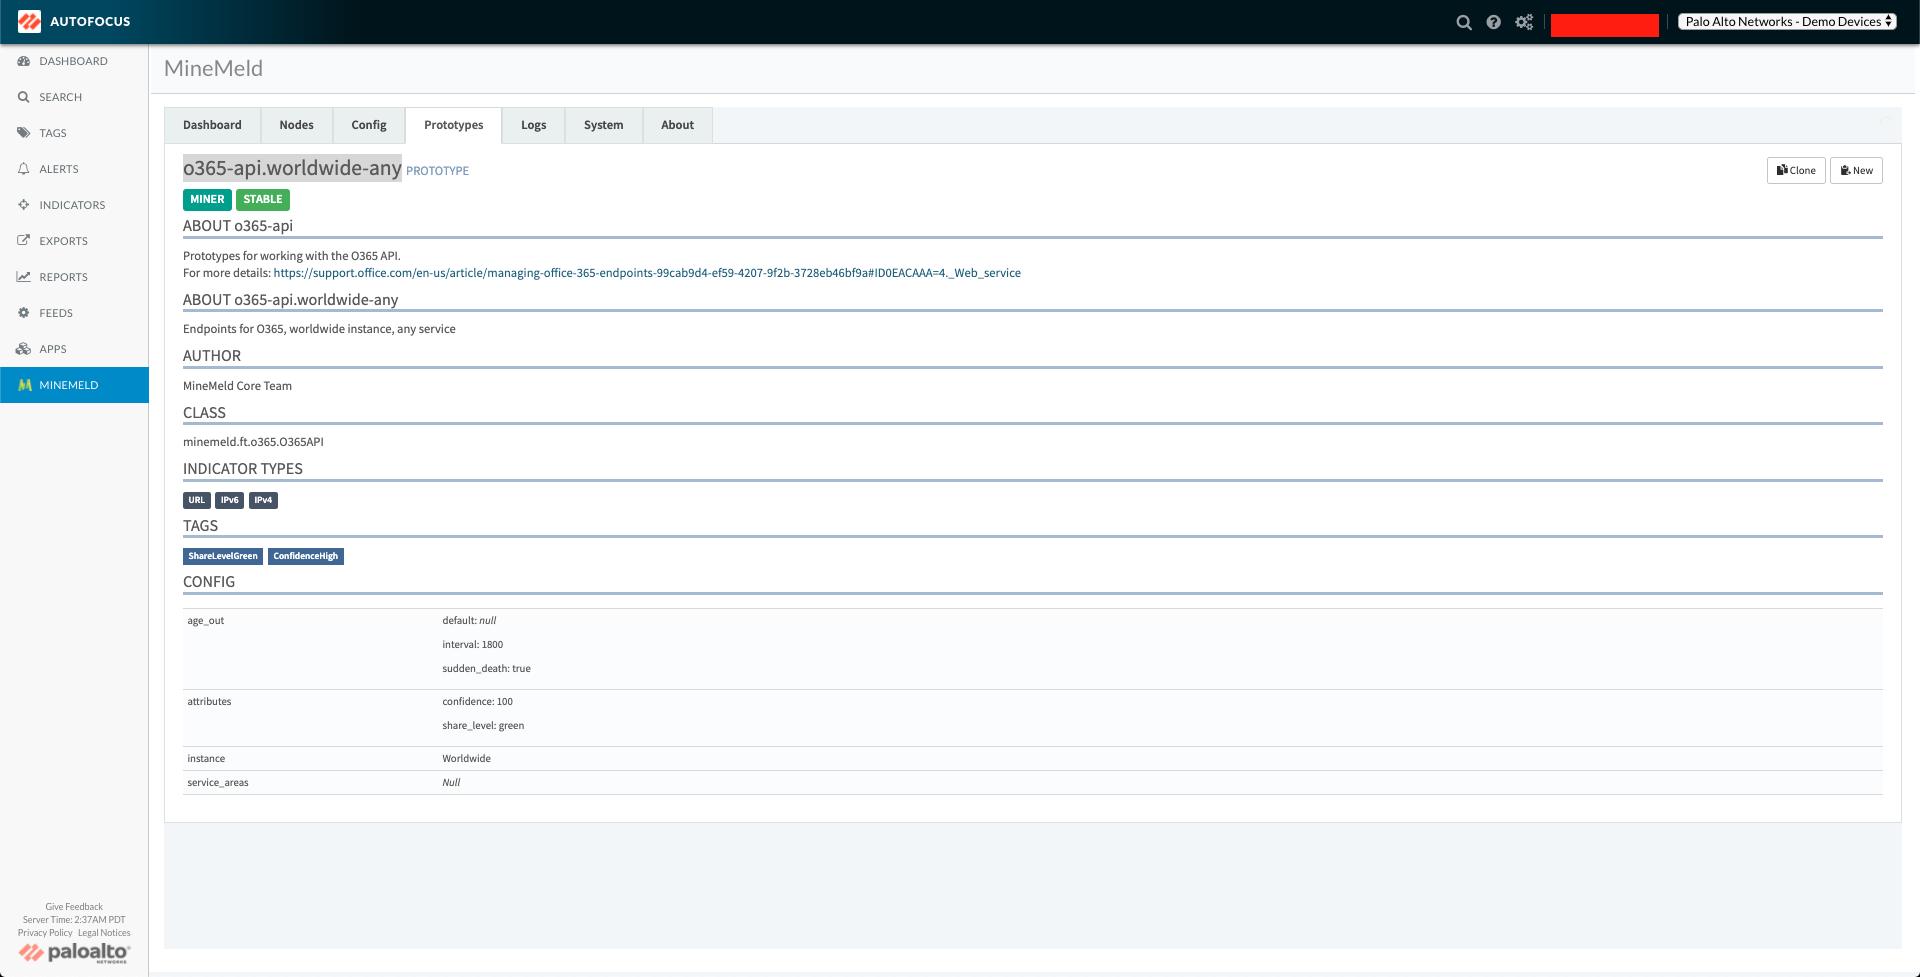
When we click the o365-api.worldwide-any prototype, we are presented with additional details. The attributes we need to configure for an instance of the Cortex XSOAR Office 365 Feed integration are under the config key.
Alternatively, we can also find all of this information in the MineMeld GitHub repository. You can find all out-of-the-box prototypes in the MineMeld repository on GitHub. In this repository are the files for all MineMeld prototypes. Since the prototype in our example begins with the prefix o365-api, we know the prototype we are looking for can be found in the o365-api.yml file. In this file, if we look under the prototypes key for worldwide-any, we see the following,
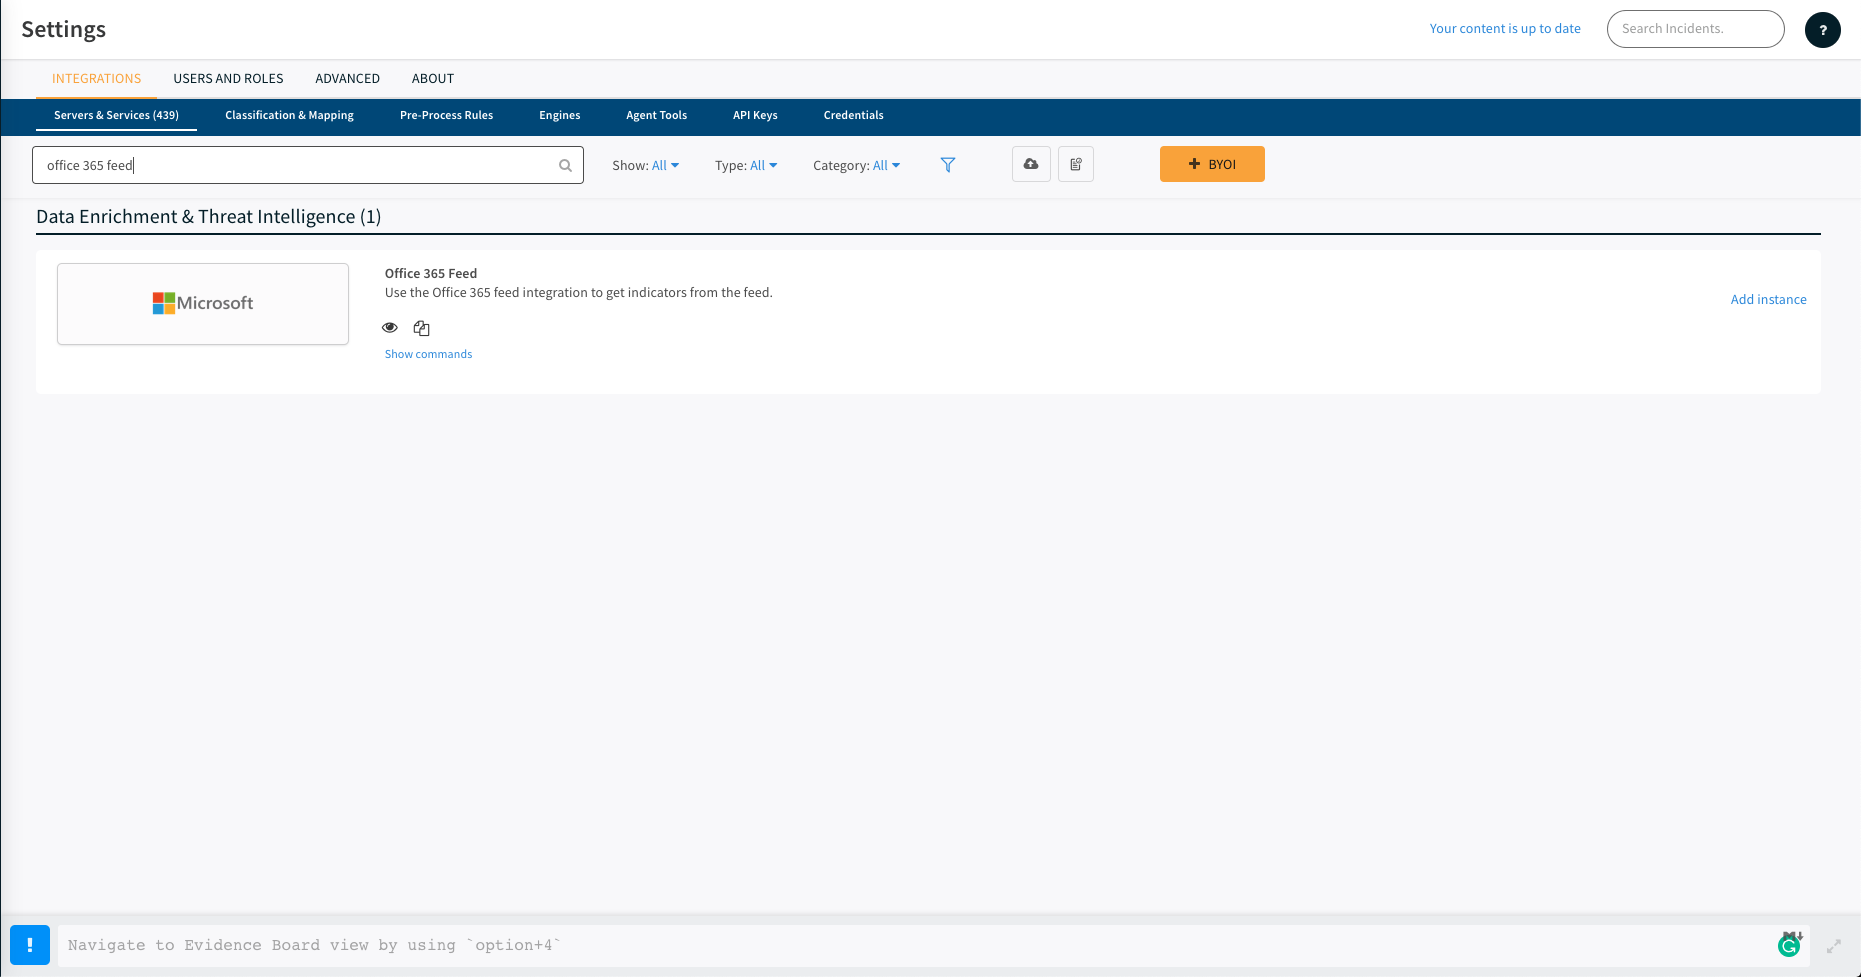
Let's look at the Office 365 Feed integration and see how to take these attributes from the MineMeld prototype and translate them to Cortex XSOAR. As shown in the screenshot below, when we search for 'office 365 feed', the Office 365 Feed integration appears.
Let's configure an instance.
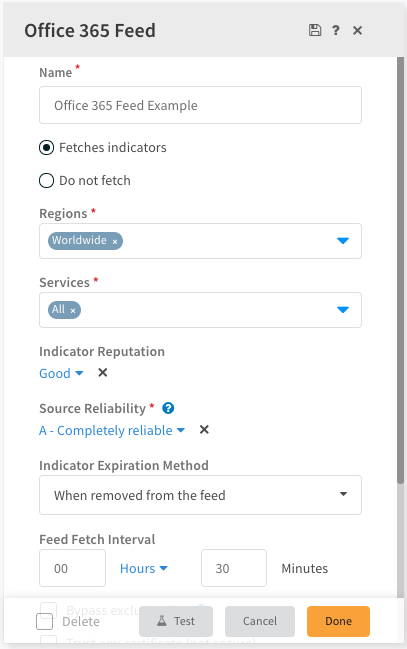
As you can see in the screenshot above, Cortex XSOAR provides default values for many of the configuration parameters, as determined by the source of the feed. To configure the integration instance to fetch from the same source as the MineMeld node we are migrating from, we do not need to make any adjustments because the default values for the Regions and Services configuration parameters are Worldwide and All respectively, which are the values we need to migrate this particular prototype.
Now, click Done at the bottom right of the configuration window.
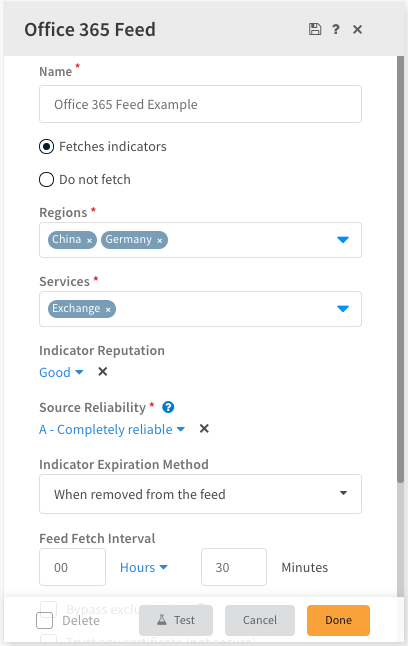
Here are two other cases. Let's say you want to migrate two other Office 365 prototypes instead of the one previously described, for example,
We can configure one instance of the Office 365 Feed integration with Regions set to China and Germany and Services set to Exchange, as shown in the following screenshot.
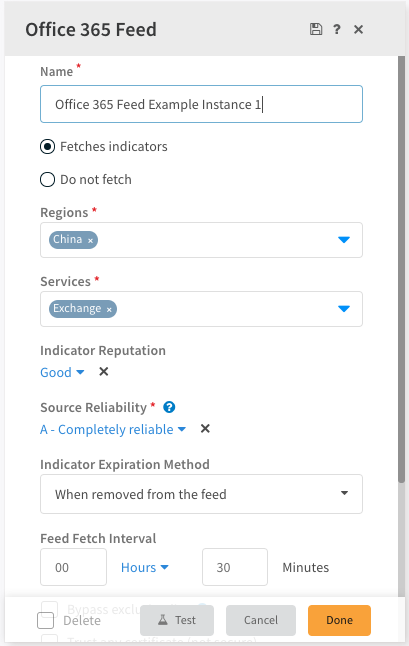
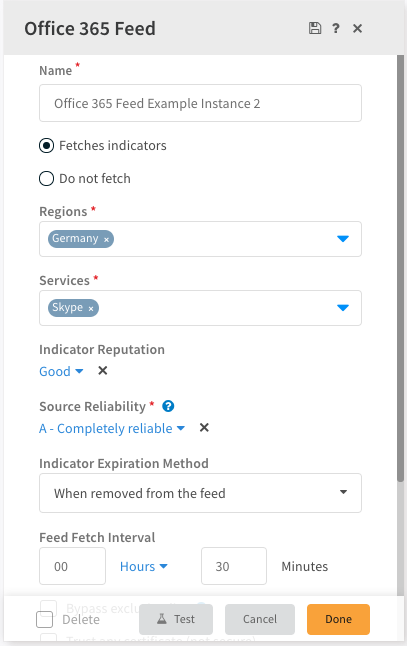
In the second case, let's say you wanted to migrate the two nodes from your MineMeld configuration that appear as follows,
Since these do not overlap, we should configure two instances of the Office 365 Feed integration. One instance with Regions set to China and Services set to Exchange and the other instance with Regions set to Germany and Services set to Skype as shown in the screenshots below.
Migrating Output Nodes#
You can output indicators with Cortex XSOAR by using two integrations, Palo Alto Networks PAN-OS EDL Service and Export Indicators Service. Migrating MineMeld output nodes to Cortex XSOAR is a process that requires looking at the prototype of a given output node, as well as the prototypes of all of the nodes that flow into that output node. We need to do this to understand how to construct the query we will enter when configuring an instance of the Palo Alto Networks PAN-OS EDL Service or Export Indicators Service integration.
A concrete example will demonstrate how this is done. Here is an example output node in MineMeld.
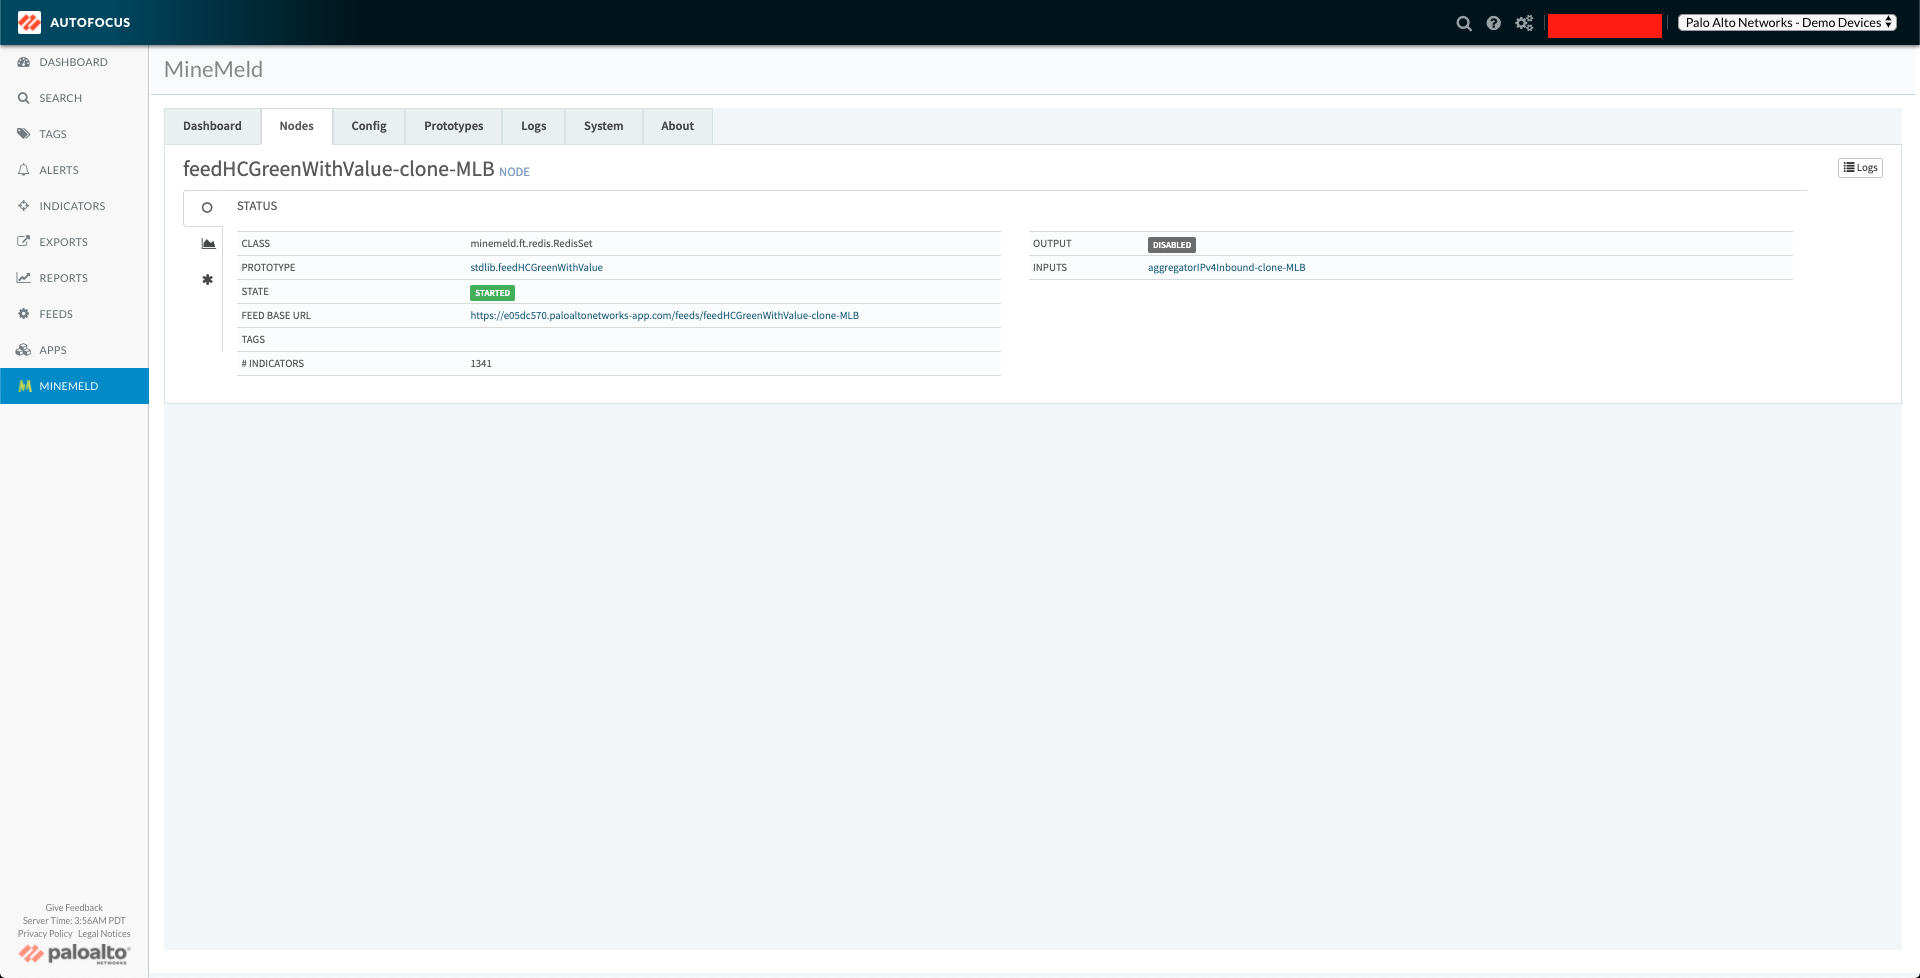
The first step is to look at the output node's prototype, which we can do by clicking the link stdlib.feedHCGreenWithValue as seen in the previous screenshot. It appears as follows.
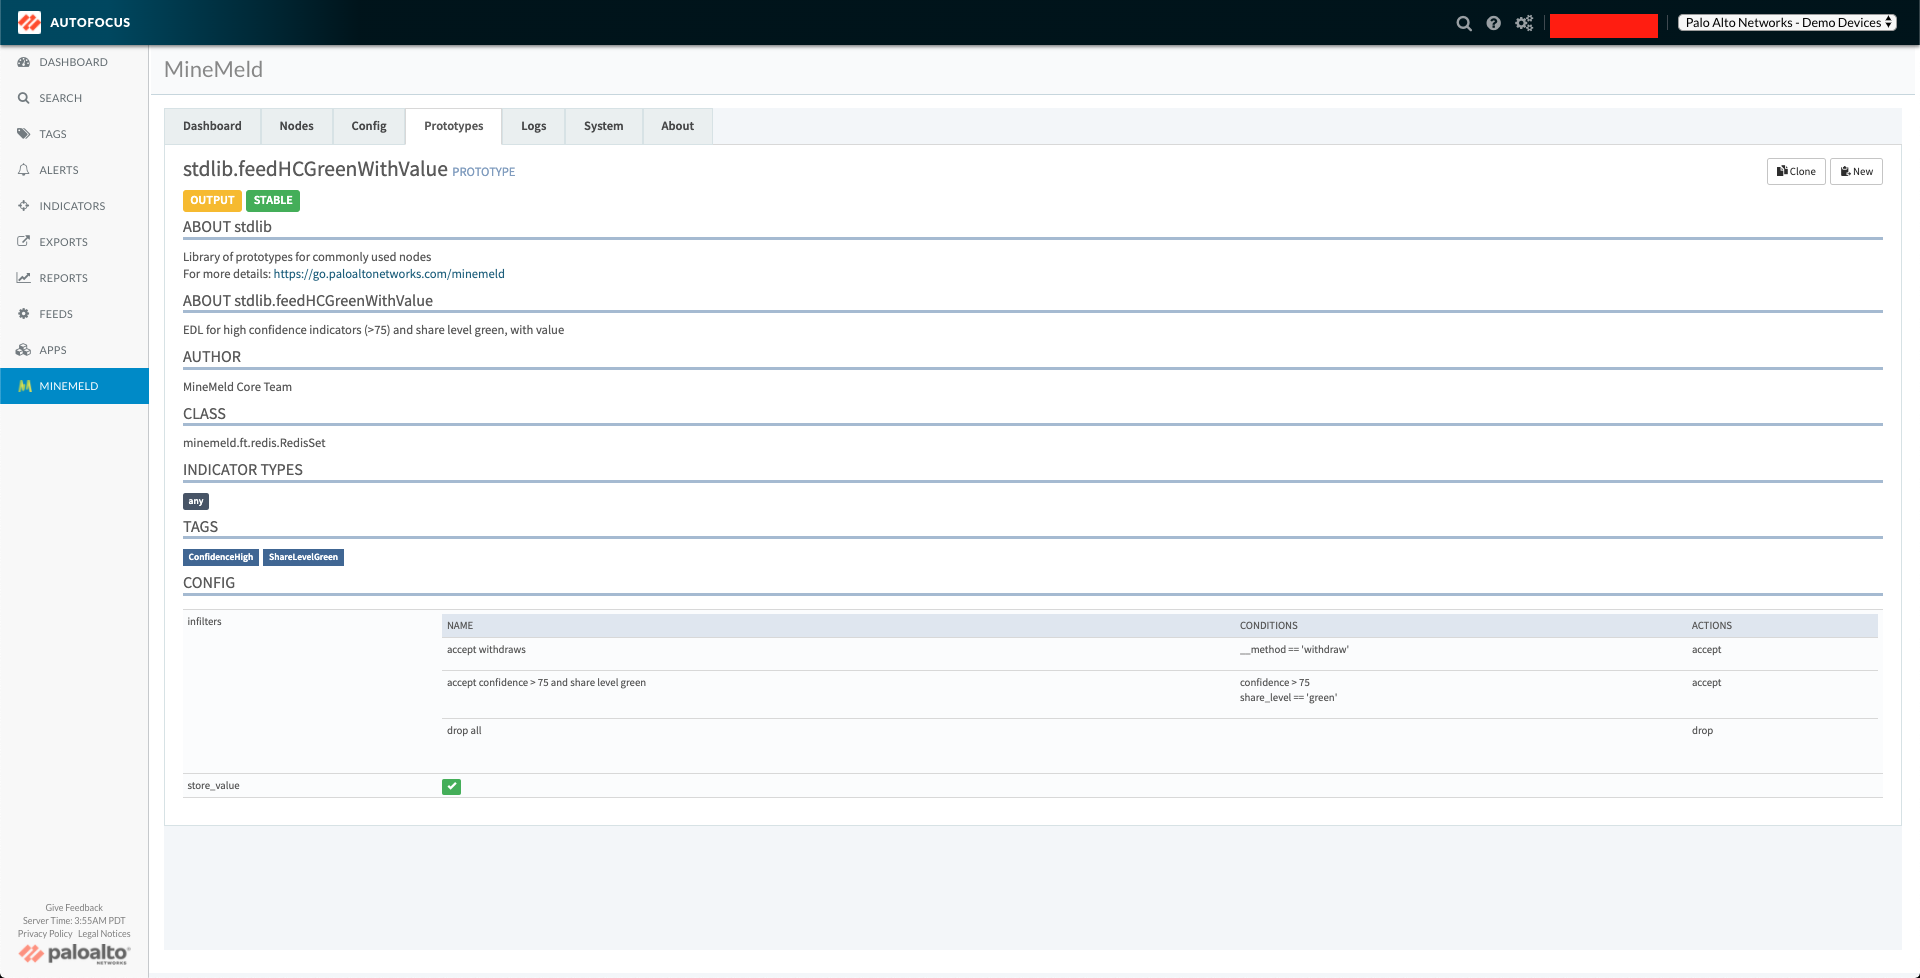
We see in the config section that this prototype filters for indicators whose confidence is greater than 75 and whose share_level is 'green' - this is the first bit of information we need.
Now let's go back to the node's inputs. We need to explore each one. Our example only has one input node listed - let's explore it by clicking the link there aggregatorIPv4Inbound-clone-MLB.
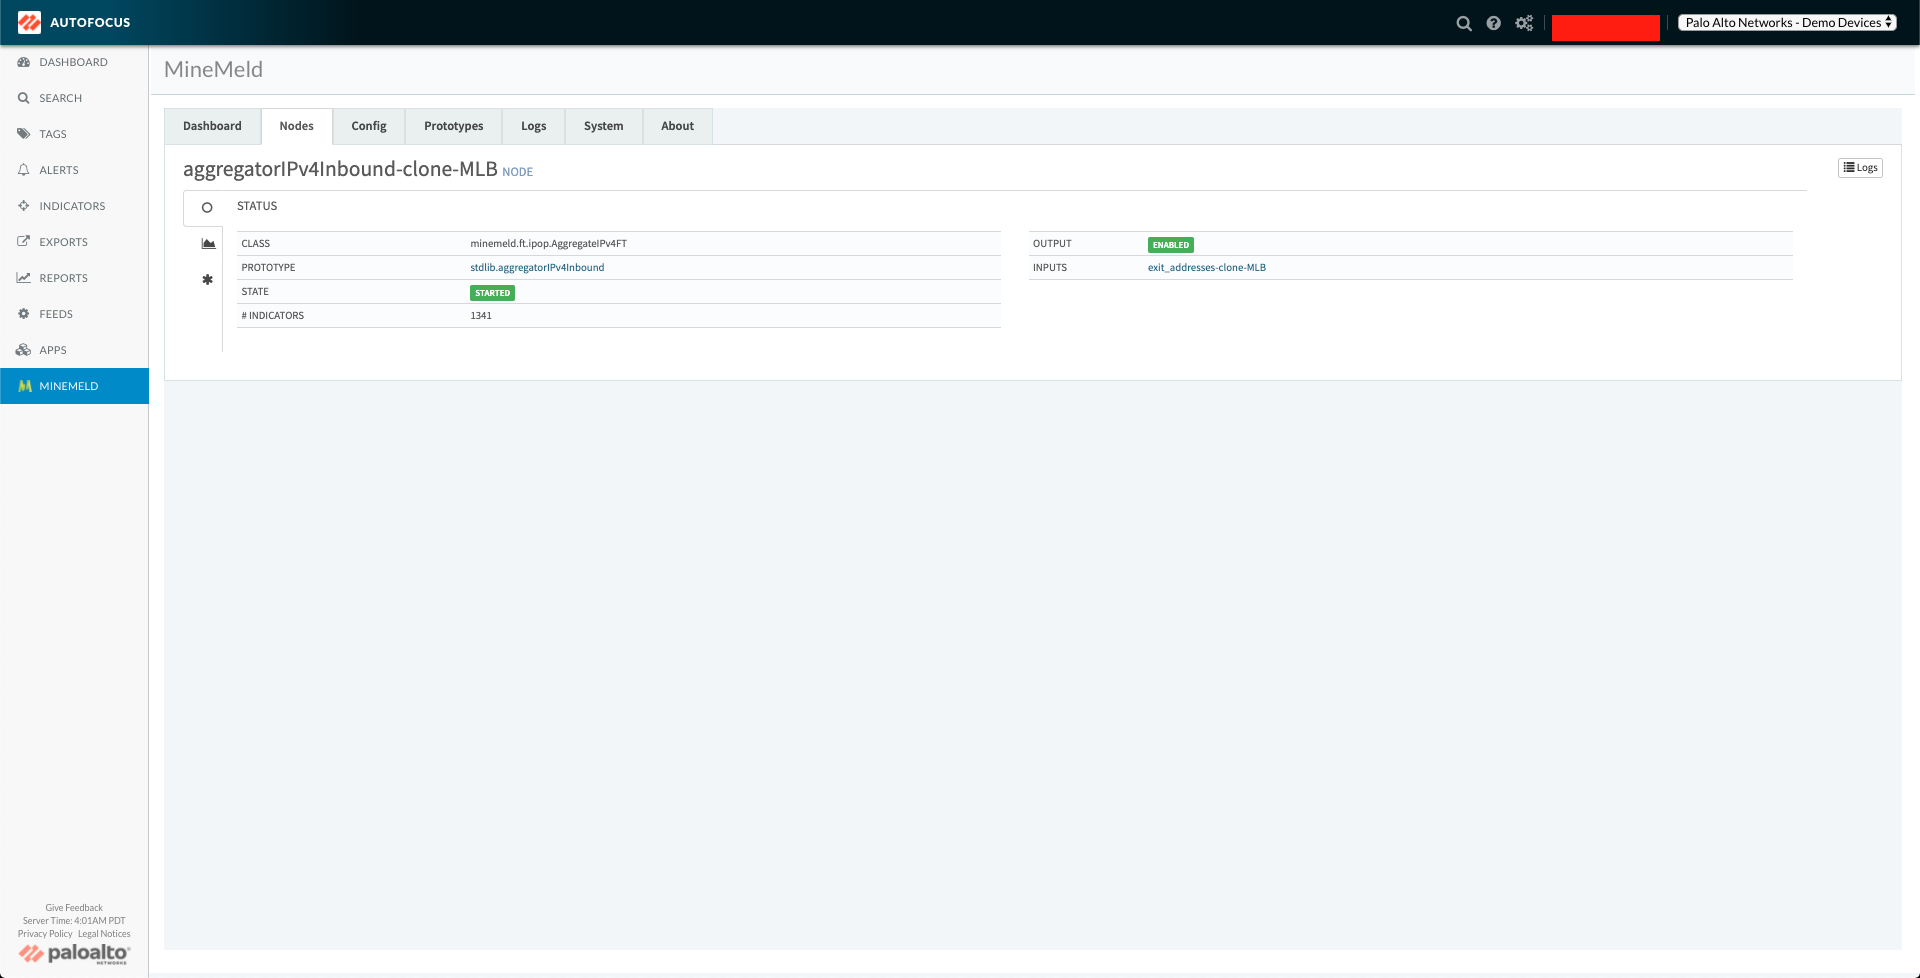
Let's see the details of the node's prototype by clicking the prototype linked there - stdlib.aggregatorIPv4Inbound.
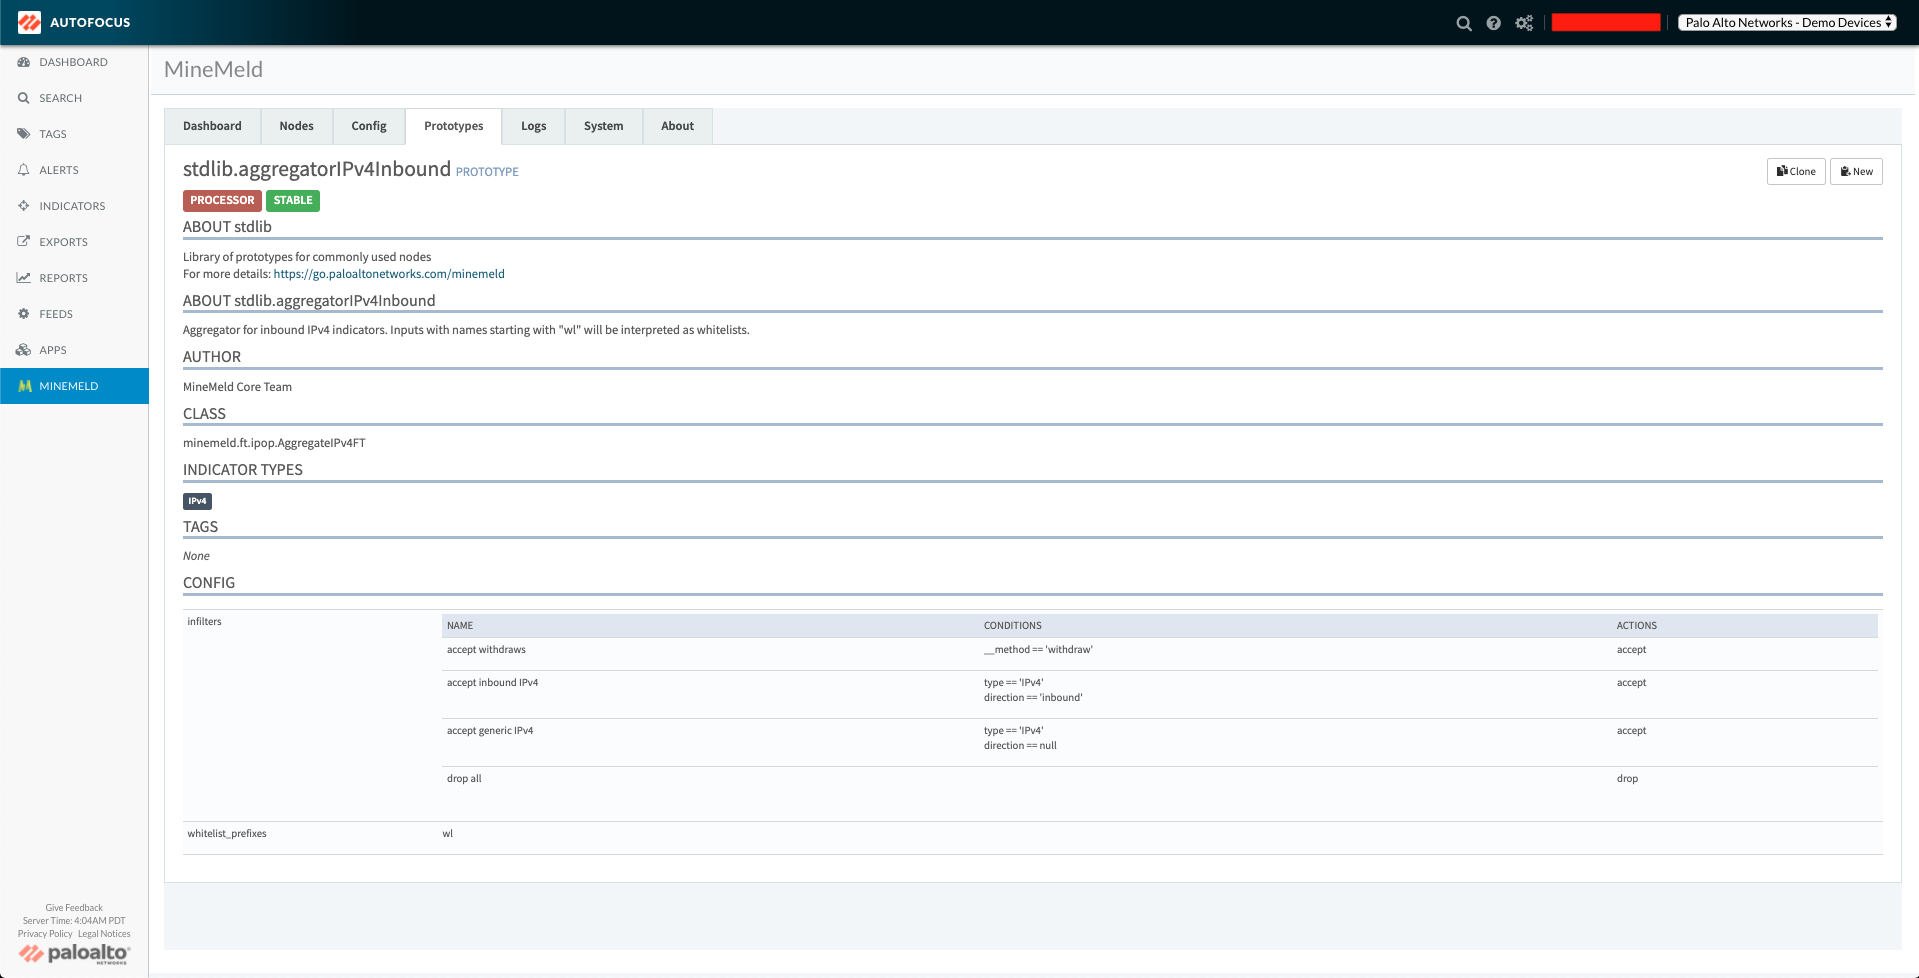
We see in the config section that this prototype filters for indicators whose type is 'IPv4' - let's file this information away for when we configure an integration instance in Cortex XSOAR.
Now if we go back to the aggregator node, we see that it too only has one input node listed. Let's perform the same actions as before and we'll be finished gathering the information we need. Let's click on the input node linked as exit_addresses-clone-MLB.
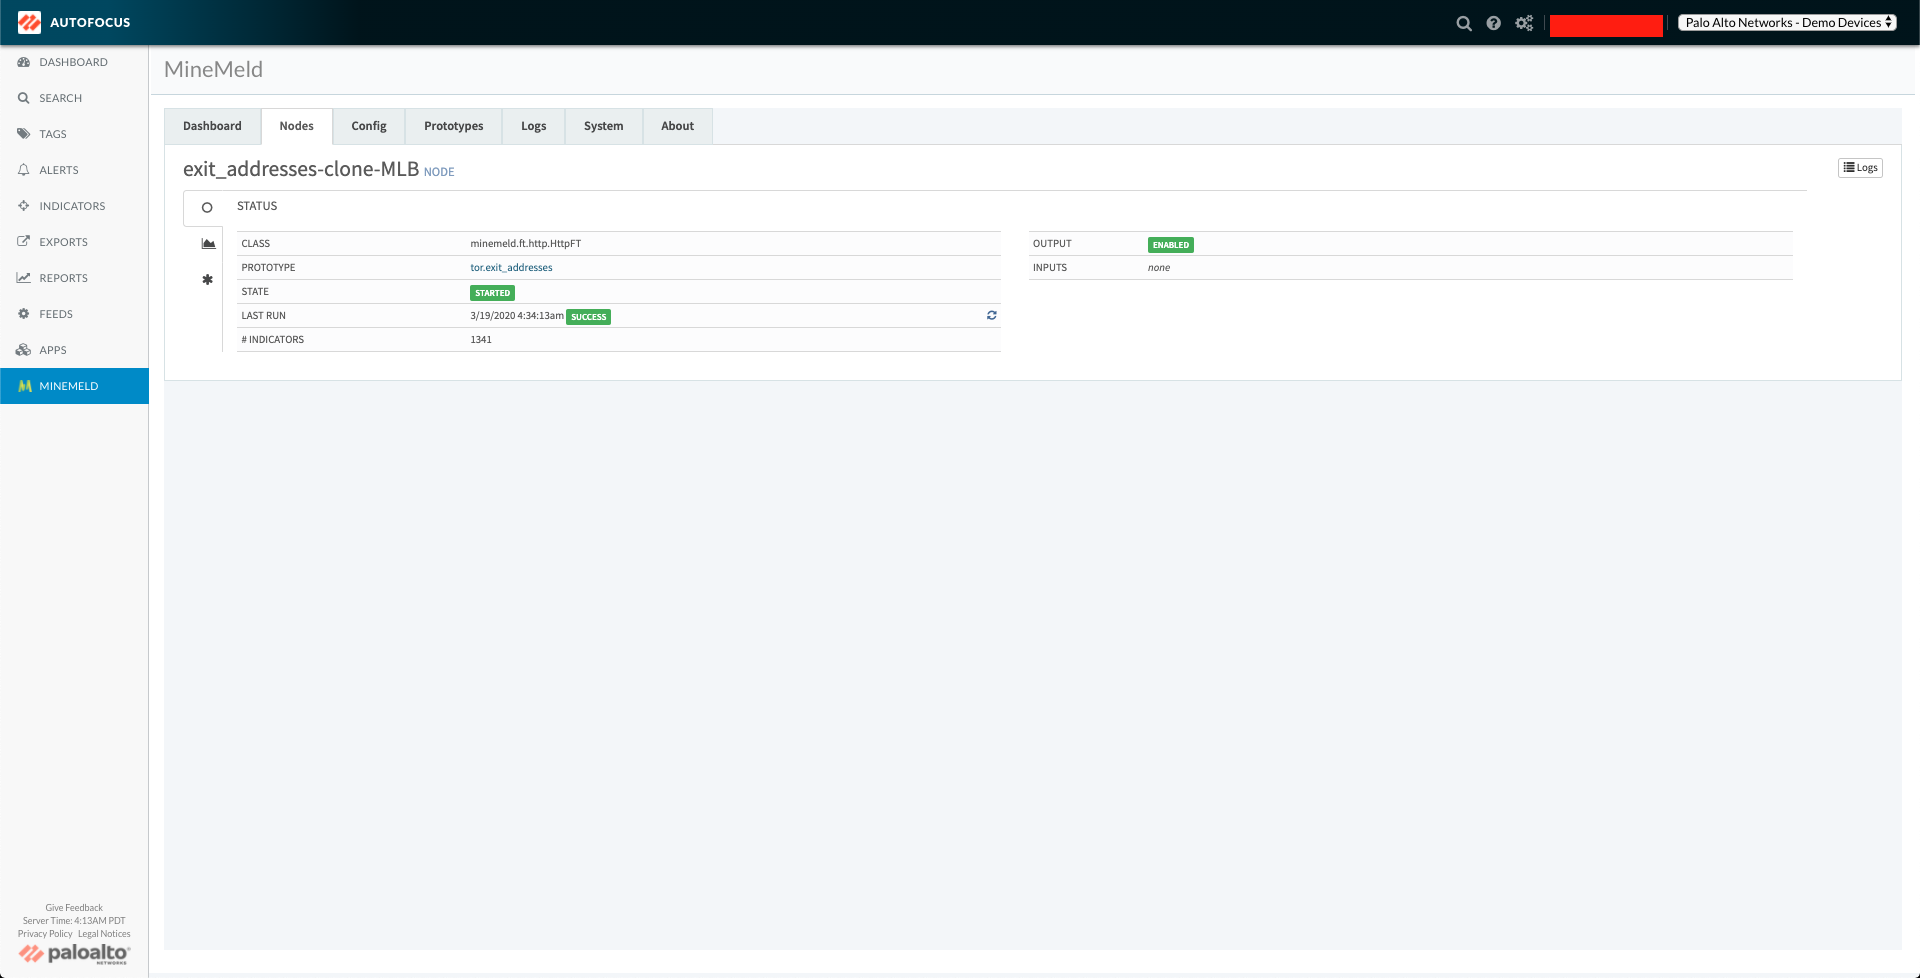
Click on the prototype listed there, tor.exit_addresses, to see more details.
We know from the table mapping MineMeld prototypes to Cortex XSOAR integrations detailed above that the tor.exit_addresses prototype maps to the Tor Exit Addresses Feed integration. And with that, we have all the information we need to move forward. Let's review and gather here the information we collected from looking at the output node we want to migrate, and all the nodes that flow into it.
- Filters for indicators whose
confidenceis greater than 75 and whoseshare_levelis 'green' - Filters for indicators whose
typeis 'IPv4' - The
tor.exit_addressesprototype maps to the Tor Exit Addresses Feed integration
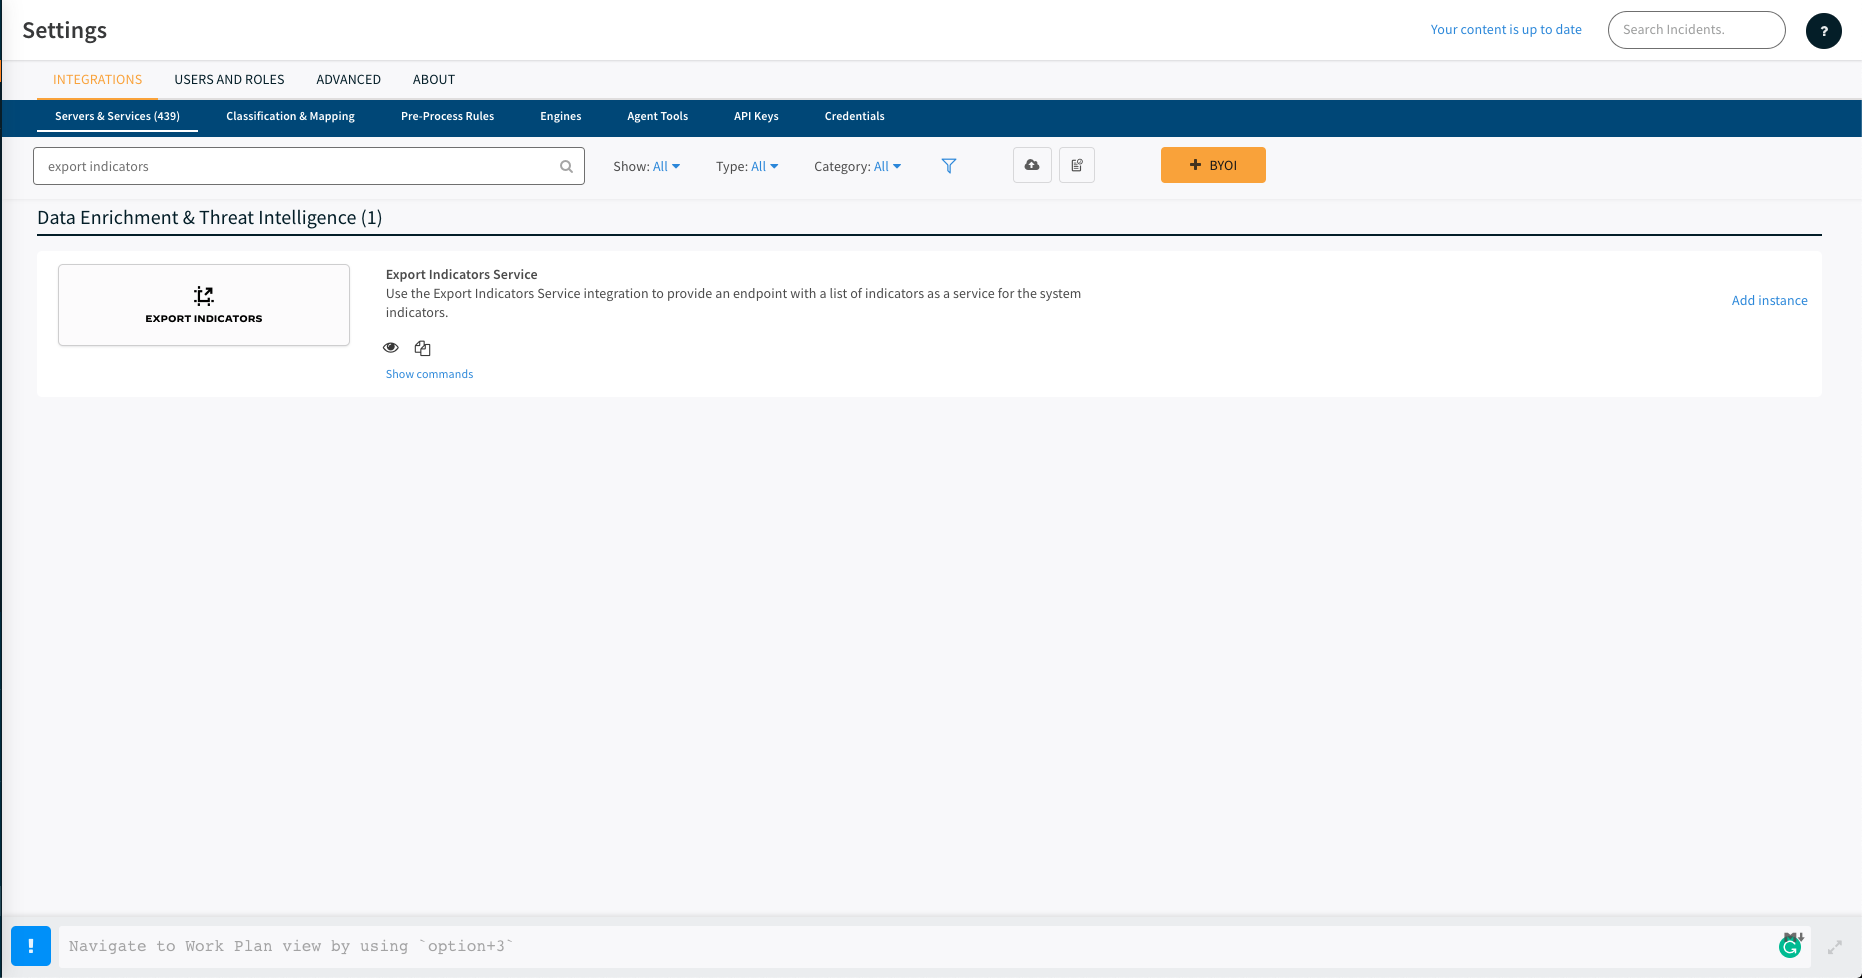
Let's configure an instance of the Export Indicators Service integration using the information we collected to construct the query that defines which indicators are made available. Search for 'export indicators' in your Cortex XSOAR's integrations page as seen in the following screenshot.
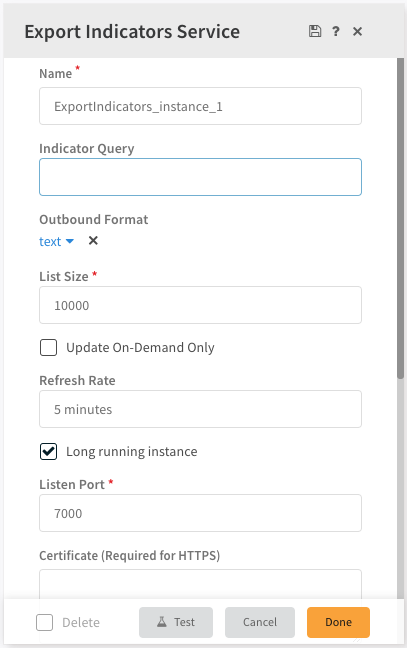
When configuring an instance of this integration, we need to provide an Indicator Query. The value entered here uses the same query syntax one would use in the Cortex XSOAR's indicators page to filter and search for specific indicators.
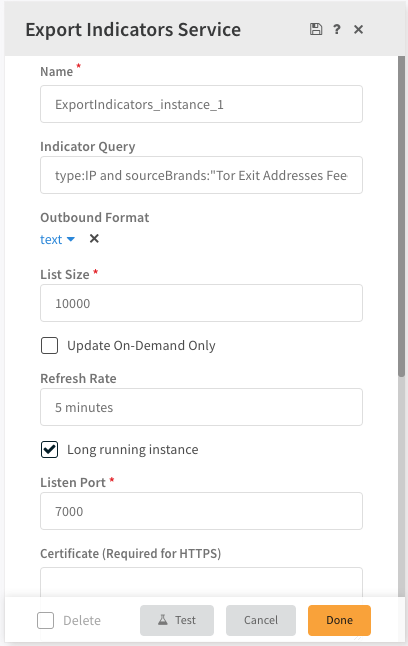
So the information we gathered previously, translated to Cortex XSOAR's indicators query syntax would be,
Enter that value for the Indicator Query.
Note that if you had set the Traffic Light Protocol Color parameter to GREEN when originally configuring an instance of the Tor Exit Addresses Feed integration, then you could include the addional filter - and trafficlightprotocol:Green - as part of your indicator query.
Finish configuring the integration to your desired specifications and press Done.