XSOAR CI/CD
Supported versions
Available on Cortex XSOAR, Cortex XSIAM, and Cortex XPANSE.
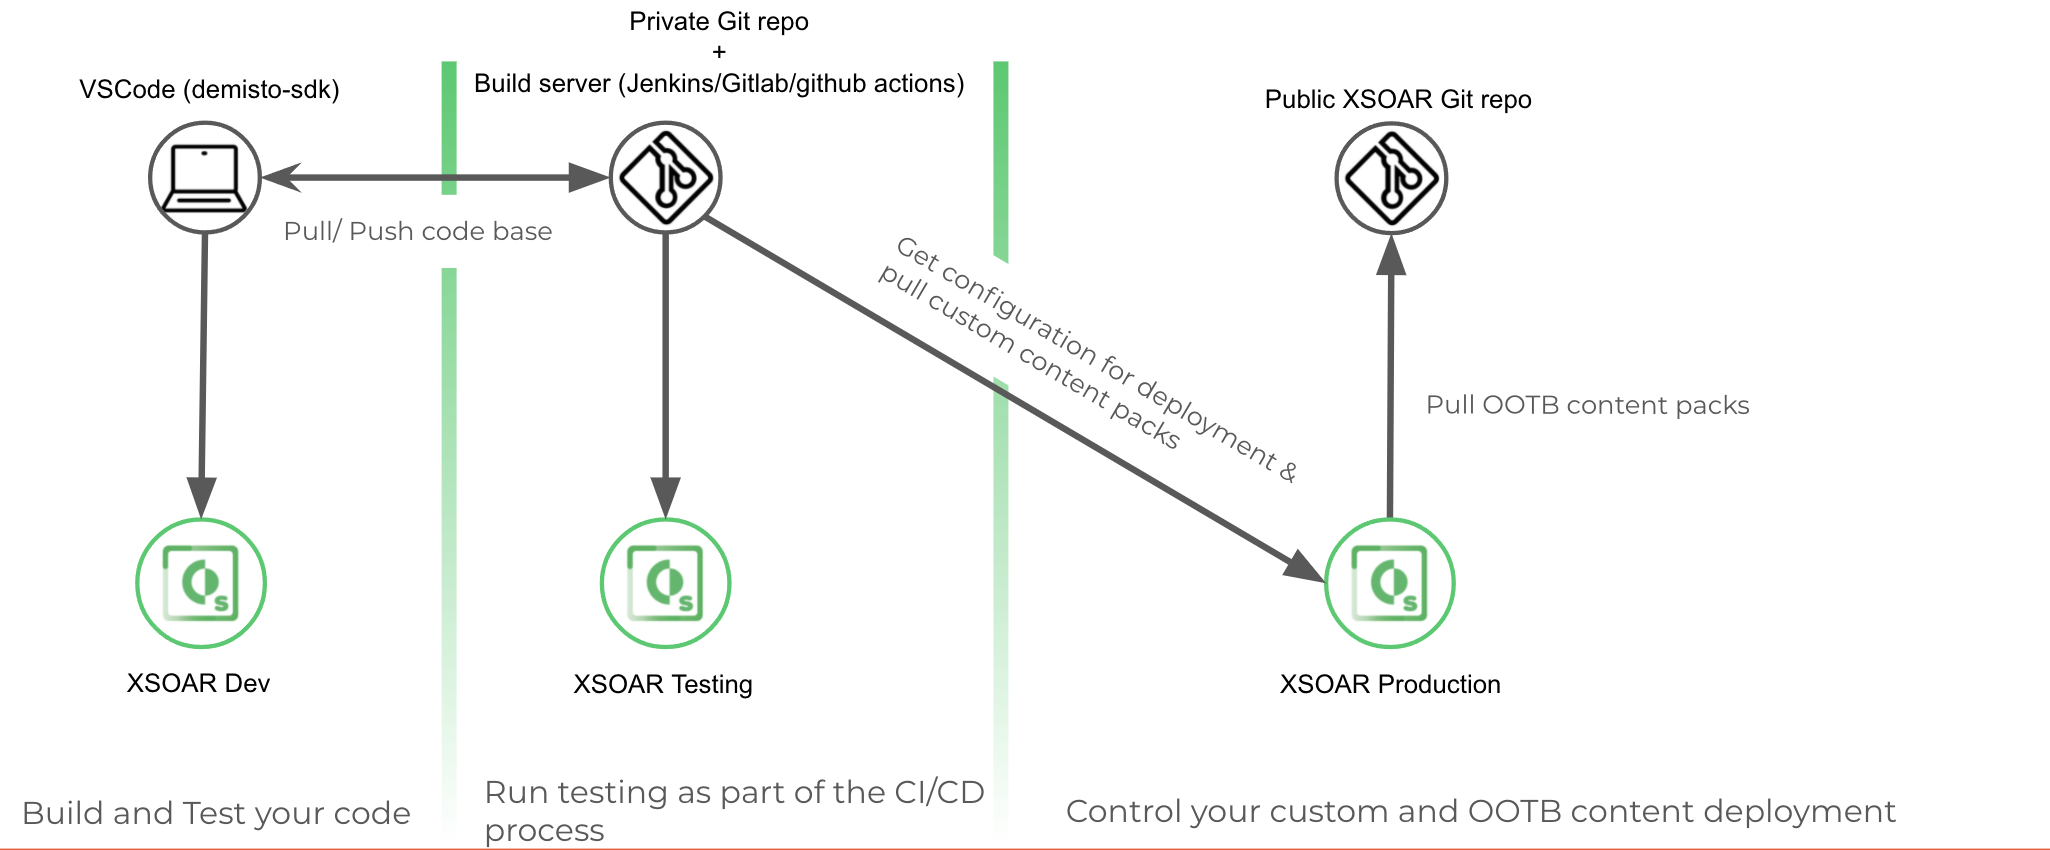
The XSOAR CI/CD content pack is intended to help security engineers develop, test, review, implement, and maintain their content in a smooth and secure process. It allows you to create your content alongside other members of your security team, and merge that content to ensure you have not overwritten work done by someone else, or vice versa. In addition, you can manage your content in a single, yet separate, repository with the out-of-the-box content provided by Cortex XSOAR. Also, you can track the versioning of your content to support rolling back, if necessary. For example, you can implement unit tests, make sure that the content that you have created is compatible with your integrations, etc. The pack is used to make sure that content that is developed is implemented in your environment while making certain that changes you make to your content does not break existing flows. This enables you to develop and implement with confidence that and security. The CI/CD process works as follows:
- create your own repository in which to create your content. The examples provided in the pack are based on GitHub, however, you can use any git-supported platform.
- set up the repository using the hierarchy provided in the content pack. For example, Packs -> Entities -> etc.
- configure your CI/CD - the pack provides a template to execute your CI/CD process.
- content is saved in a bucket in your cloud provider. The examples in the pack are based on Google Cloud Storage, but the pack can be configured to work with other vendors, too.
- run a playbook that reads from a configuration file that determines which content to install in your environment. The configuration file contains a list of content to install from your bucket.
In Cortex XSOAR, you can develop and test your content on other machines, before using it in a production environment. You can do this by using the remote repository feature in the UI or using the CI/CD process. The CI/CD process was developed and verified on Cortex XSOAR version 6.x and 8.x.
The CI/CD process#
The CI/CD process helps you develop and maintain content for complex content development using the full functionality of a Git repository, enabling you to run unit tests, review code, run test playbooks, etc. Instead of building and maintaining code on a Cortex XSOAR development environment, you can build content from your own repository, build servers, and utilize third party tools (like CircleCI, Jenkins, etc). You can also use version control, undertake code reviews, do lint and validations, use automatic testing, run tests on development machines, etc.
The process is designed for more advanced users who have an understanding of CI/CD concepts and have a number of developers who work on local machines. In particular, it is recommended that you should have the following knowledge:
- The ability to set up a build system
- The ability to use demisto-sdk
- A basic knowledge of Git
- A basic knowledge of containers (Docker)
The remote repository feature in the UI is designed for less complex content (one or two developers working on a local machine).
CI/CD has the following advantages over using the remote repository feature in Cortex XSOAR:
- Controls the code base with a multi-branch approach. Multiple developers can work on different branches. You can have code reviews, issue pull requests, etc.
- Use CI/CD solutions (like CircleCI, Jenkins, etc) as part of your testing (including running test playbooks) and deployment. You also have the ability to run automatic testing.
NOTE: To use this process you need to have a Git repository. GitHub, GitLab and Bitbucket are currently supported.
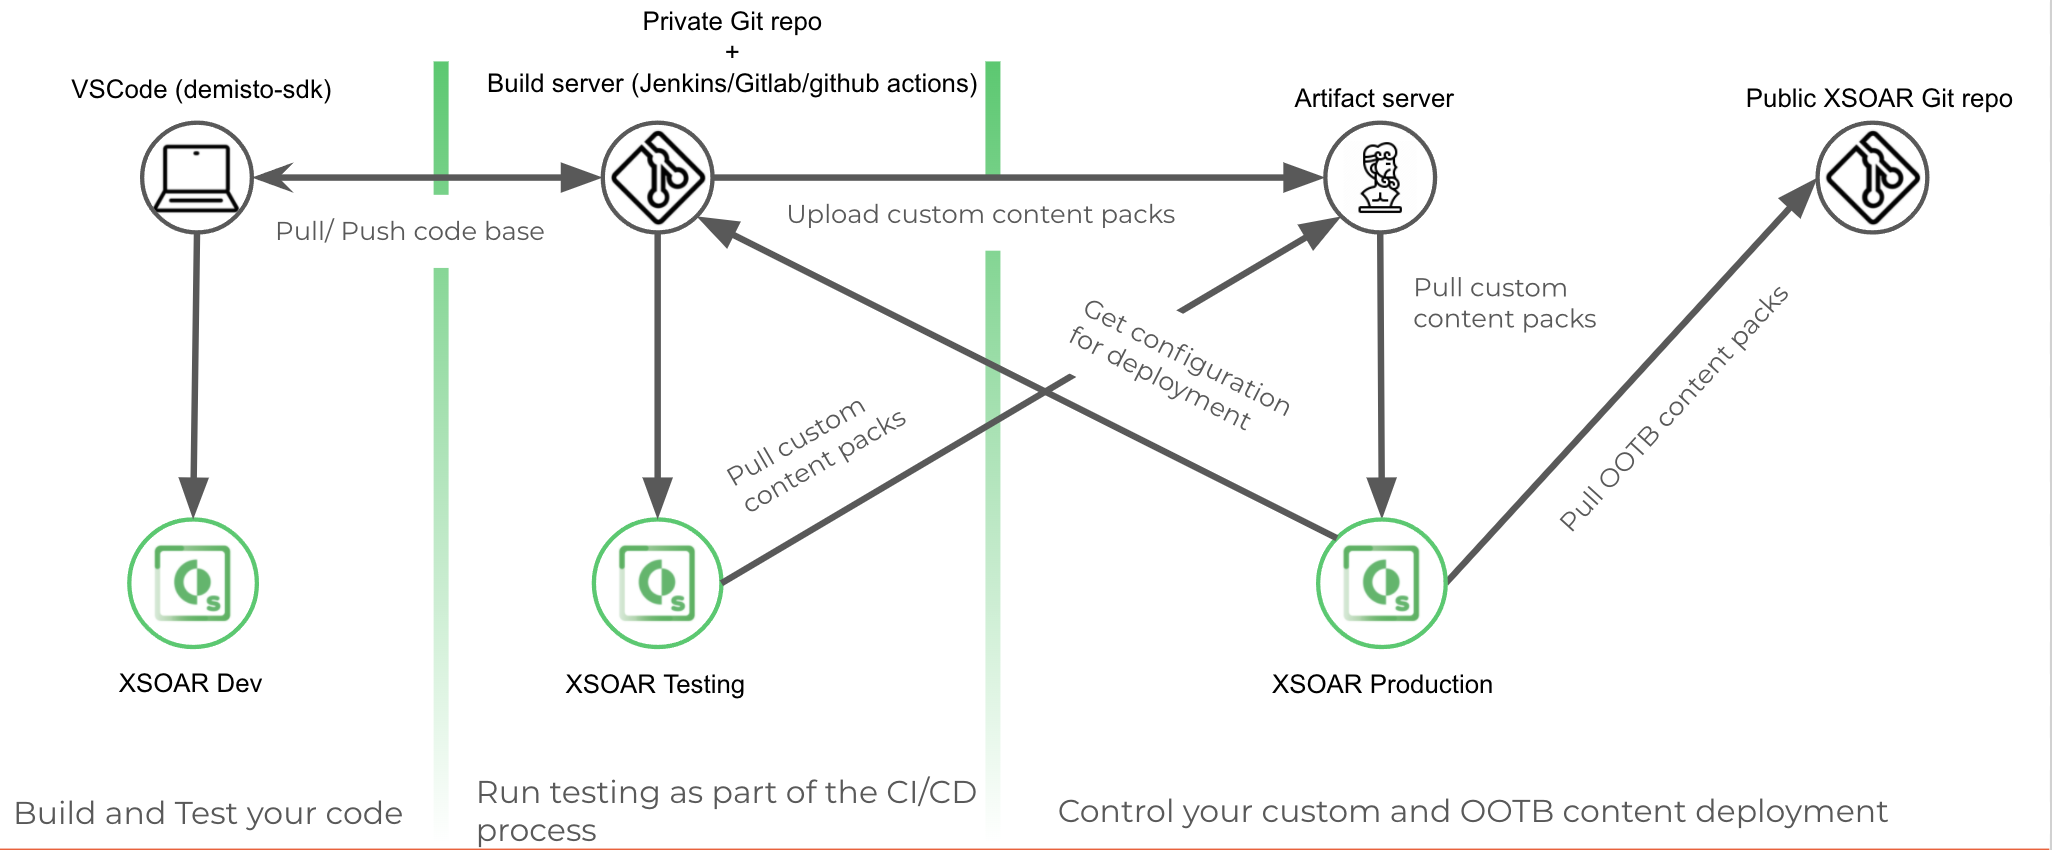
The CI/CD process involves the following stages:
For general information about the CI/CD process, see CI/CD FAQs.
Overview Demo Video#
Development#
In the development stage, set up the CI/CD process by creating or cloning a Git repository based on the CI/CD template repository. You can then create and maintain your custom content with the built-in functionality of demisto-sdk. The CI/CD process uses demisto-sdk to develop and deploy custom content packs. It downloads, uploads, validates, creates content, migrates content from a Cortex XSOAR server, etc. It also supports content pack structure generation, auto validation of custom content including running linters on the code, and generation of content pack documentation, etc. For a full list of features, commands, and arguments, see demisto-sdk-commands.
Set Up the CI/CD Development Process#
Before you begin, download and install the demisto-sdk on your machine. For more information, see Demisto Installation and Setup.
Ensure that the DEMISTO_BASE_URL and DEMISTO_API_KEY are set to the server environment that you want to use. For example, if you want to upload content directly to the server without using an artifact server you need to point the server to this environment. When working on a branch and you want to download/upload to a development environment, ensure that the demisto-sdk points to the development server.
Create the CI/CD Repository.
Create or fork a Git repository (such as GitHub, GitLab, Bitbucket). Use CI/CD template repository as your base structure. The
demisto-sdkconnects to this Git repository and then automatically connects to Cortex XSOAR servers using the API, to ensure that it validates Cortex XSOAR content. The repository contains the following content:Content Description config.ymlThe CI/CD configuration file (in the .github\workflowsfolder), which validates the content pack, creates an ID set, runs tests, etc. When you want to deploy your content, you need to update the file with your repository and whether you want to use an artifact server. For more information, see Configure the config.yml file in Deployment.pre-commitWithin the .hooksfolder, the pre-commit file uses the Git rebase interactive tool for manual control of your history revision process..vscodeUsed when using VSC as your IDE. build_related_scriptsContains the CI/CD scripts. The build_related_scripts/bucket_upload.pyscript enables you to upload to Google Cloud Storage (artifact server) and thebuild_related_scripts/bucket_upload_aws.pyscript enables you to upload to AWS s3. Before deploying your content, you need to update the name of the bucket list when uploading the Google Cloud Storage. For more information, see Configure the the bucket_upload.py file in Deployment.
Theget_modified_packs.pyscript enables you to get the latest version of the content pack before merging.dev_envs/pytestA folder that contains the conftest.py, which validates python files..demisto-sdk-confThe custom configuration file for the demisto-sdkcommands. For more information, see Setting a preset custom command configuration..gitignoreSpecifies intentionally untracked files that Git should ignore. .private-repo-settingsSet who can view your repository. For more information, see Setting repository visibility. CommonServerPowerShell.ps1Required when using Powershell. For more information, see Powershell code. CommonServerPython.pyRequired using Python. For more information, see Common server python. README.mdA markdown file that provides a description of the pack. demistomock.ps1Enables you to debug Powershell script. demistomock.pyEnables you to debug Python Script. For more information about the demistomock files see Debugging using demistomock the demisto-object. tox.iniThe command-line driven automated testing tool for Python. xsoar_config.jsonThe configuration file that defines what packs lists, and jobs will be set up on the machine. Update this when you are ready to deploy. See step 3 under Deployment. (Optional) Set up the repository to work with an IDE.
For example if working with GitHub via VSC, download Git desktop and then configure VSC. Ensure that you enable Git in your IDE tool (Code>Preferences>Settings).
Create branches for content.
Create content on separate branches for content packs. Different developers are able to create content independently, which makes it easier to review content, create pull requests, test the content on a machine, etc.
(Optional) Migrate custom content in Cortex XSOAR to Git Repository.
You can migrate all custom content, separate content items, or detach out-of-the-box content.
NOTE: Ensure that the DEMISTO_BASE_URL and DEMISTO_API_KEY are set to the server environment that you want to download.
Migrate all custom content
If you currently use the existing remote repository feature in Cortex XSOAR and now want to use the CI/CD process, download the content from your development machine using the
demisto-sdk downloadcommand. For example, to download content from your remote repository to your repository created in step 1, run the following command:demisto-sdk download -o address_of_the_pack_folder -i name_of_the_contentIf you have a lot of content, downloading can take a substantial amount of time, as it creates separate folders for each pack. It is recommended to create one folder with a general name and then separate them into branch repositories.
Migrate some custom content
If you want to migrate some custom content like an integration, run the download command by specifying the content. For example, to add an
CICDExampleintegration to the CICDExample Content Pack, run the following command:demisto-sdk download -o Packs/CICDExample -i CICDExampleTheCICDExampleintegration file appears in theIntegrationsfolder, which separates the content into Python and YML files together with aREADME.md.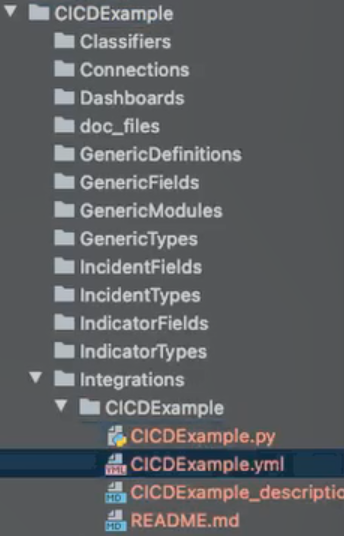
NOTE: You can download directly from the development server. If downloading Automation and integrations, you need to use the demisto-sdk split command to split the content into the correct format.
Migrate detached out-of-the-box content
If you have out-of-the-box content from a content pack that is detached (such a Phishing incident type) and want to use the CI/CD process, run the following command:
demisto-sdk download --system -item-type <object to download such as layouts, playbooks, scripts> -i <the name of the object to download> -o <the output directory>It is recommended to download to a new
SystemPacksfolder to avoid validation errors. The object needs to be stored in theSystemPacksfolder to preserve the pack structure.NOTE: Only the detached items are stored and not other files such as pack metadata, release notes, readme, etc.
For example, to download the detached phishing incident type layout, run
demisto-sdk download --system -item-type layouts -i Phishing -o SystemPacks/Phishing/LayoutsIf you want to download the Phishing Investigation - Generic v2 playbook run the following:
demisto-sdk download --system -item-type Playbook -i Phishing_investigation_-_Generic_v2 -o SystemPacks/Phishing/Playbooks
Create New Content.
In a branch that has been created in step 3 above, create new content, by running the following command:
demisto-sdk initThe
initcommand automatically generates the content pack structure.Follow the on-screen instructions by typing the name of the content pack, metadata, description, type of pack, category, author, email address, tags, integration, etc. The pack appears in the repository with the required folders. You can delete those items that are not needed. In this example, we create a new content pack, called
CICDExample.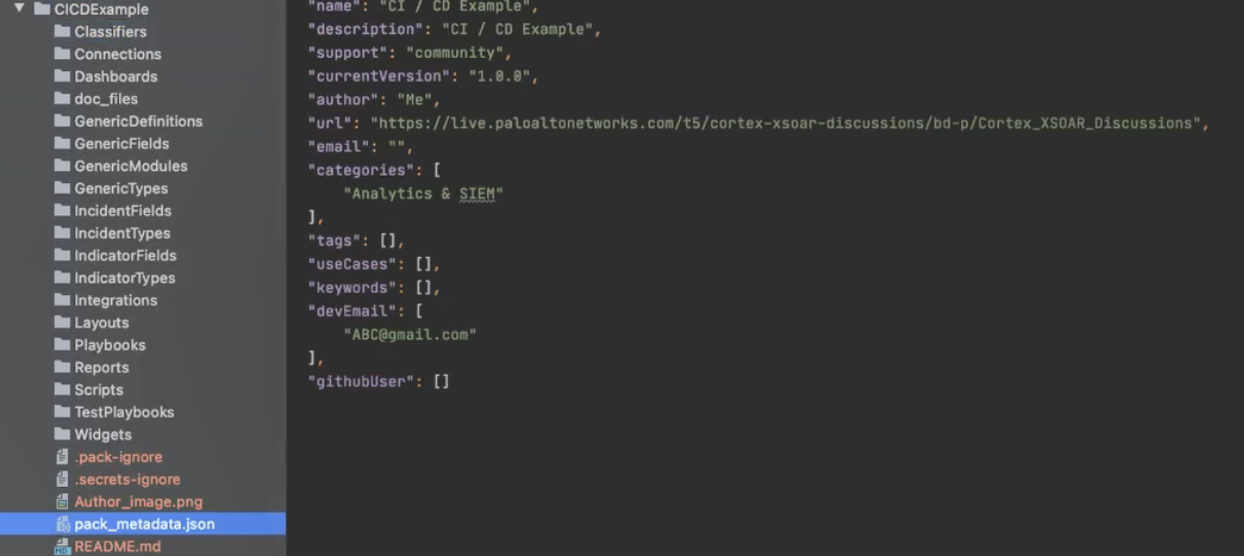
The content pack contains the following content:
Content Description ClassifiersContains the classifiers in JSON format. DashboardsDashboards in JSON format. GenericDefinitionsContains JSON files that define the generic object that you create.
NOTE: Although available from version 6.5, it is currently not supported. You can delete this.GenericFieldsIncludes subfolders of custom incidents and custom indicator fields.
NOTE: Although available from version 6.5, it is currently not supported. You can delete this.GenericModulesThe context in which the object will be used. Contains the views (pages) displaying the new objects.
NOTE: Although available from version 6.5, it is currently not supported. You can delete this.GenericTypesIncludes subfolders of custom incident and indicator types. Each directory uses the same structure as incident/indicator types.
NOTE: Although available from version 6.5, it is currently not supported. You can delete this.IncidentFieldsIncident fields in JSON format. IncidentTypesIncident types in JSON format. IndicatorTypesIndicator types in JSON format. IntegrationsContains YML, PNG, Markdown, and Python files for integrations. LayoutsLayouts in JSON format. PlaybooksContains YML and Markdown files. README.mdInformation about the content packs. ReportsReports in JSON format. ScriptsContains automations in YML, Python and Markdown files. TestPlaybooksContains test files. WidgetsWidgets in JSON format. doc_filesContains images in PNG format. pack_metadata.jsonMetadata about the content pack. For example, name, version, description. Every time it changes, you should update the version Add any additional files that are required.
You might want to add a
Release Notes,.secrets-ignore, or.pack-ignorefiles/folders. You can see how the content hierarchy appears in the Hello World content pack.
Generate a README for your integration, script, or playbook.
Run the following command:
demisto-sdk generate-docs --insecure -e directoryFor more information, see creating documentation.(Optional) Run SDK Validate and SDK Lint on your changes
Run the
demisto-sdk formatcommand, which ensures that your new or modified files comply with Cortex XSOAR's standard. To check that your code is valid, run thedemisto-sdk validatecommand and thedemisto-sdk lintcommand on your code.
Troubleshooting: If you receive many errors from the validate/lint commands, it is not a major issue, as you can control the validations you want to ignore. For example, if you receive theBA111- Problematic fields names error, or theIN135orIN145- Integration params issues, you can add it to the.pack-ignorefile in your pack like this:For the
DOXXX- Docker Images errors, you can add--no-docker-checksflag to your validate command or addno_docker_checksto the.demisto-sdk-confrepository file like this:
Development Video Tutorial#
Testing/Staging#
In the testing/staging process, you can do the following:
- Utilize 3rd party CI/CD Solutions, such as CircleCI, Jenkins, etc.
- Run validations and automated tests from a testing server as part of a build process.
- Run test playbooks.
To test content:#
Before you begin, ensure that you have installed the following:
- Your CI/CD solution (such as CircleCI).
- Docker, or applications like Mypy, Flake8, pylint, pytest, etc., for validations and lint commands.
Review the lint and the validation in the
.demisto-sdk-conffile.(Optional): Upload the content to a test staging environment.
Run the following command:
Demisto-sdk upload -i Packs/mypackFor example, to upload an integration, typedemisto-sdk upload -i Packs/CICDExample/Integrations/CICDExampleNOTE: Update theDEMISTO_BASE_URLandDEMISTO_API_KEY, if required.Test the content and run test playbooks, as required.
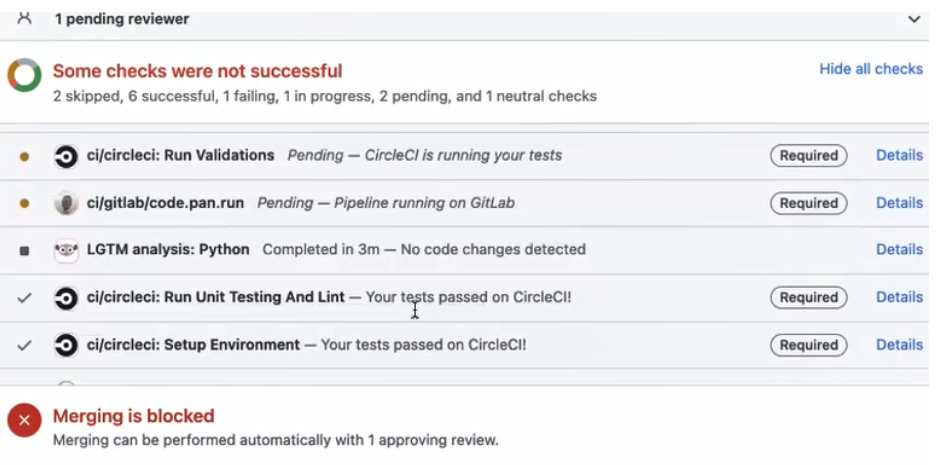
Open a Pull Request for other developers to review.
Using your CI/CD solution, it checks the changes - validations, lints, etc. If it requires approval, you have to wait before being able to merge. The validation is done according to the hooks in your repository. When you create the pull request, the CI/CD process runs automatically.
After the testing has completed successfully, you are now ready to deploy content.
Testing/Staging Video Tutorial#
Deployment#
In the deployment stage, you can do the following:
- Control both custom and out-of-the-box content packs deployed into production.
- Deploy via an artifact server or directly to the Cortex XSOAR production server.
By default, deployment occurs when content is pushed from a branch repository to a master repository. Before deployment, you need to consider whether to deploy via an artifact server.
Artifact Server#
An artifact server such as Google Cloud Services, enables you to maintain and control version deployment and rollbacks, so you can keep track of your work. Each content pack version is saved in separate folders in the artifact server. You can use the XSOAR CI/CD content pack, to fetch the content from the artifact server to the Cortex XSOAR server. The content pack enables you to monitor, install content packs via a Playbook, incident type, etc.
NOTE: In Multi-tenant environments you cannot run the playbook in the XSOAR CI/CD content pack, as its not possible to create incidents or playbooks on the Main account. Instead you can upload the content via the CI/CD build.
Although you can choose your own artifact repository, (such as AWS, GCP, Git, FTP server, etc.) by default, the CI/CD process uses Google Cloud Storage. You need to install the Google Cloud Storage content pack and configure the integration. If using another storage provider, such as AWS you need to install the relevant content pack and set up the integrations as necessary.
The main advantage of the artifact server is version control and rollback. You update the xsoar_config.json file with any version change, rather than having to update the repository.
Without an Artifact Server#
You can deploy your content without the need for an artifact server. If you do not use an artifact server, the demisto-sdk upload command, uploads the content pack directly to your Cortex XSOAR instance. When content is pushed to master, the content is automatically deployed to the server.
By default the CI/CD process uses an artifact server. You can update this in the config.yml file.
Although you do not have the flexibility of version control and rollback, it is relatively easy to set up, as you do not need to configure the artifact server and you do not need an integration or set up the XSOAR CI/CD content pack. The user can decide whether to install from Marketplace.
To deploy content:#
Configure the
config.ymlfile.When you fork the repository, a config.yml file is included in the repository (
github\workflowsfolder).1.1 Update the repository details under
steps:For example:
1.2 If not using an artifact server, replace the following section:
With:
(Artifact Server only) Configure the
bucket_upload.pyfile.Update the bucket name, main bucket path and format file before pushing any content from your Git repository. The artifact server is based on Google Cloud Storage.
If using a different storage provider, you need to update the
bucket_upload.pyfile with the required artifact server information. Contact Customer Support if you need to change this.Configure the
xsoar_config.jsonfile.The
xsoar_config.jsonfile defines how custom packs, content packs, lists, and jobs are set up on the production machine. It consists of the following sections:Content Description custom_packsCustom content packs, which are installed through the build process. marketplace_packsMarketplace packs to be installed on the machine. listsLists that are created in the machine. jobsJobs that are created in the machine. 3.1 Update the ID and URLs for each custom content pack.
For a non-artifact server, change the
URLto the name of the pack in the following format (using a local URL):"Url": "Packs\name”NOTE: For a non-artifact server, if you want to change the version, you need to change it in the branch repository and not in this file. If using an artifact server, update the version in the
URL. This enables you to have version control. If there was an error in a content pack, you can change the version number to an earlier version in your repository.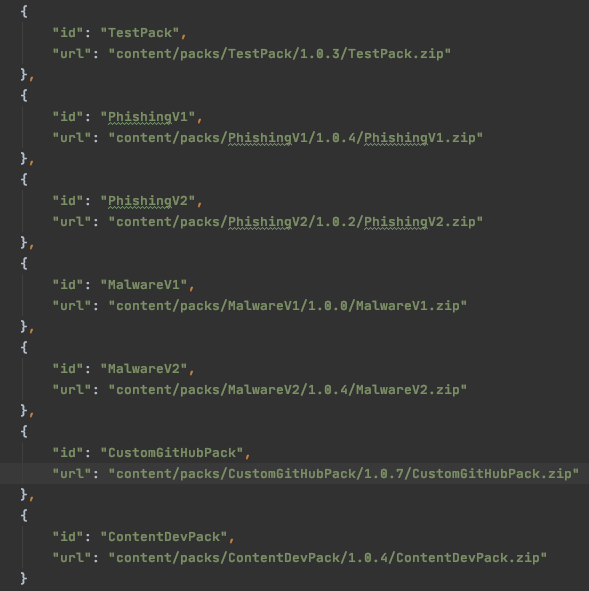
3.2 (Optional) Update Marketplace Content Packs.
You can also add any Marketplace content packs to update. You have the option to deploy from here with the latest version. If you have a lot of out-of-the-box content, use the
demisto-sdk xsoar-config-file --add-all-marketplace-packscommand which automatically adds all the installed out-of-the-box content packs to the configuration file.Check that all the changes are validated and are successful.
The Git repository should look similar to this: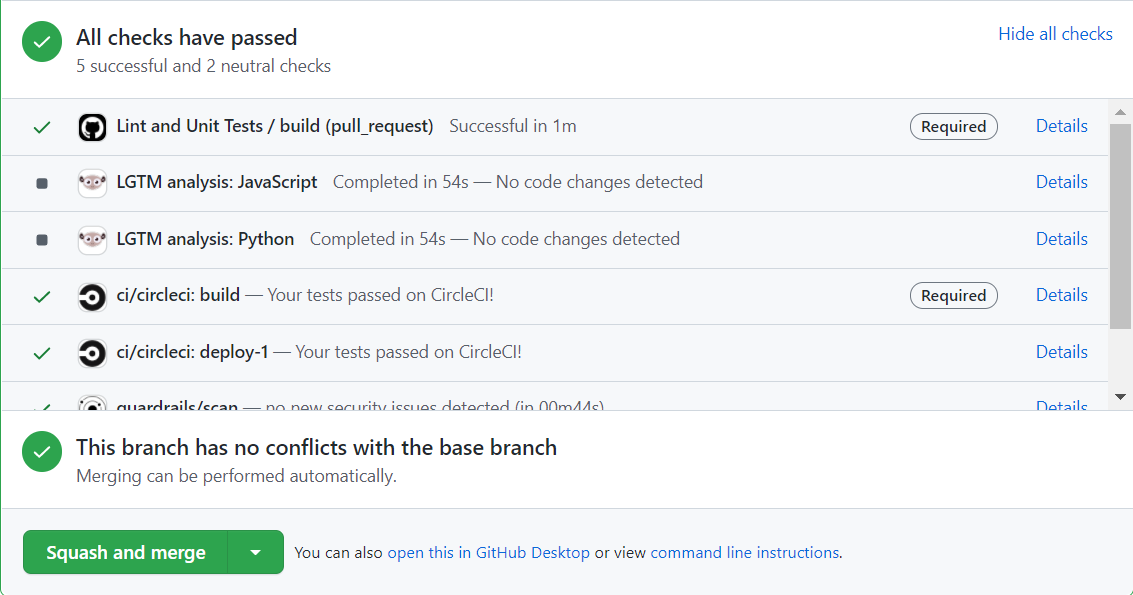
In the Master Repository, ensure that the repository is in a structure similar to this:
Merge the changes to the master repository.
The content is uploaded to the artifacts server or directly to the machine. If using an artifact server, open the folder in the artifact server. The hierarchy should appear similar to this:
(Non-artifact server) Install the content to Cortex XSOAR.
In Cortex XSOAR go to Installed Packs and see your custom content packs.
(Artifact Server) Add the content to Cortex XSOAR. You can either use the XSOAR CI/CD content pack or download content manually. If using Google Cloud Services, download the Google Cloud Storage content pack and set up the integration instance. If using another storage application you need to download the appropriate content pack such as AWS.
- Download the XSOAR CI/CD content pack. The content pack includes the Configuration Setup playbook, the configuration setup layout, incident fields, automations, etc. The playbook can run via a job or manually. The playbook fetches the configuration file and loads the contents to the machine. It downloads, and installs the custom content packs and configures lists and jobs if part of the content packs. The XSOAR CI/CD content pack uses either Google Cloud Storage or HTTP requests to fetch the content packs. If running a different storage provider, you need to download the integration (such as AWS - S3). You need to either create or duplicate the Configuration Setup incident field and add the provider (such as AWS) as the source. You also need to update the Configuration Setup playbook by adding a task at the same level as Google Cloud Storage.
- If not using the XSOAR CI/CD content pack, install content manually. For example, if using the Google Cloud Services integration run the
gcd-download-filecommand.
If you have any detached content which you have downloaded in step 4 in the Set Up the CI/CD Development Process above, run the following command:
sdk upload --input-config-file -reattachThe command uploads all the detached content automatically and compares the content to content in Cortex XSOAR. The files that exist in the
SystemPacksfolder remain detached and all other items are attached when uploaded to Cortex XSOAR.NOTE: When you upload detached content to Cortex XSOAR it overrides any existing detached content. To keep any changes, make a duplicate of the existing detached content in Cortex XSOAR before uploading.
Deployment Video Tutorial#
Prerequisites#
The following are the prerequisites for using this pack:
Create the Repository#
The repository is used to organize your custom content packs and your configuration files.
You should clone our example repository to use as a baseline.
The structure of the repository is as follows:
| Content of repo | Description |
|---|---|
| .hooks | --- |
| Packs | Your customized packs that contain your incident fields, incident types, layouts, playbooks, scripts, integrations, and release notes. You can define multiple packs. |
| README.md | A markdown file that provides a description of the pack. |
| xsoar_config.json Example file | The configuration file that defines what packs lists, and jobs will be set up on the machine. It consists of the following sections: - custom_packs - Your own internal packs to be installed through the build process. - marketplace_packs - Marketplace packs to be installed on the machine. - lists - Lists to be created in the machine, when the list type set to dynamic then the list won’t be overwritten. - jobs - Jobs to be created in the machine. |
| .private-repo-settings | --- |
| .demisto-sdk-conf | Your custom configuration file for the demisto-sdk commands. For details, click here. |
| requirements.txt | Contains a list of all the project’s dependencies. |
| tox.ini | The command-line driven automated testing tool for Python. |
| demistomock.py | You can copy this file from the Content repo (content/Tests/demistomock/). |
| demistomock.ps1 | You can copy this file from the Content repo (/content/Tests/demistomock/). |
| CommonServerPython.py | You can copy this file from the Content repo (/content/Packs/Base/Scripts/CommonServerPython/). |
| CommonServerPowerShell.ps1 | You can copy this file from the Content repo (/content/Packs/Base/Scripts/CommonServerPowerShell/). |
| conftest.py | You can copy this file from the Content repo (/content/Tests/scripts/dev_envs/pytest/). |
Create the CI/CD Process#
Create a yml file for the CI/CD process. The Example File is a GitHub actions YML file that can be used as a template for creating your CI/CD process.
- Prepare the environment and the virtual environment on which to run the demisto-sdk.
- Create an ID set for the private repository using the demisto-sdk create-id-set command.
- Merge the ID set with the Content repository's ID set using the following command: demisto-sdk merge-id-sets -i1 <path_to_private_repo_id__set> -i2 <path_to_content_repo_id_set> -o <path_to_output>.
- Validate the packs' files using the demisto-sdk validate command.
- Run unit tests and linters on the packs using the demisto-sdk pre-commit command.
- Create uploadable pack zips using the demisto-sdk zip-packs command. Or Upload zipped packs directly to your machine using the demisto-sdk upload command.
- Upload the artifacts to your artifact repository.
Create the Structure for the Artifacts Server#
This artifacts server structure enables you to keep track of your work. Your versions are saved in the production folder. The builds folder saves your test packs before your deploy them.
Manage a Pull Request#
In order to use this option in the Cortex XSOAR platform, download the XSOAR CI/CD content pack from Marketplace. (Search for the Content Management content pack).
In the pull request management there are 2 options:
- Pull request creation.
- Pull request update.
The platform supports GitHub, GitLab, and Bitbucket. The default Git code management is GitHub.
To change the default values in the Pull Request Creation - Generic playbook:
In the Cortex XSOAR platform, go to Playbooks.
Search for and select the Pull Request Creation - Generic playbook.
Click the Playbook Triggered task (located in the beginning of the playbook) and update the values as required:
Field Description Default GitIntegration Git code management. Possible values are github, gitlab, bitbucket. github MainBranch The branch that the pull request will be merged into. master ChannelName The application to send your message to. Possible values are Slack or Teams. --- Click Save.
Pull Request Creation#
To create a new pull request in your repository:
- In the Cortex XSOAR platform, go to Incidents.
- Click New Incident, and a new window will open.
- In the new window, fill in the following fields:
- The name of the incident.
- The type of the incident: Pull Request Creation.
- The playbook: Pull Request Creation - Generic.
- In the CI/CD Pull Request Attachment field, attach the files to add to the new pull request.
- (Optional) - In the CI/CD Branch field, write the name of the new branch for the pull request. The name of the branch should be a new one that wasn't used before. If you don't fill this field, a new name will be generated automatically during the run of the playbook.
- (Optional) - In the CI/CD Pull Request Reviewer field, add reviewer information.
- If you are using GitHub, write the username of the reviewer.
- If you are using Bitbucket, write the account ID of the reviewer. (Use the !bitbucket-workspace-member-list command to retrieve the relevant account ID).
- If you are using GitLab, enter a username or user ID.
- (Optional) - In the CI/CD Pull Request Comment field, write a comment for the pull request description.
- Click Create New Incident to create the pull request. If a channel is configured (as described above), at the end of the process a message will be sent with the new pull request details in the configured channel.
Pull Request Update#
To update an exiting pull request in your repository:
- In Cortex XSOAR platform, go to Incidents.
- Click New Incident, and a new window will open.
- In the new window,fill in the following fields:
- The name of the incident.
- The type of the incident: Pull Request Update.
- The playbook: Pull Request Creation - Generic.
- In the CI/CD Pull Request Attachment field, attach the files to add or update in the pull request.
- Choose the pull request source branch from the list in CI/CD Pull Request Branch field, or write the name of the source branch in the CI/CD Branch field. If a name is not given, a new branch name will be generated automatically and a new pull request will be created.
- Click Create New Incident to update the pull request. If a channel is configured (as described above), at the end of the process a message will be sent with the updated pull request details in the configured channel.
CI/CD Pull Request Creation#
What's in this Content Pack#
The XSOAR CI/CD pack includes several content items.
Automations#
There are 5 automations in this pack.
- ConfigurationSetup - Configuration loader for the XSOAR CI/CD pack.
- CustomPackInstaller - Custom Pack Installer for the XSOAR CI/CD pack.
- JobCreator - Job creator for the XSOAR CI/CD pack.
- ListCreator - List creator for the XSOAR CI/CD pack
- MarketplacePackInstaller - Marketplace pack installer for the XSOAR CI/CD pack.
Incident Fields#
There are 8 incident fields.
- Branch Name - The branch from which to fetch the file. Default is the main branch. (Optional)
- Configuration File Path - The relative path within the repository to the xsoar_config.json file. (Optional)
- Configuration File Source - The source of the configuration file.
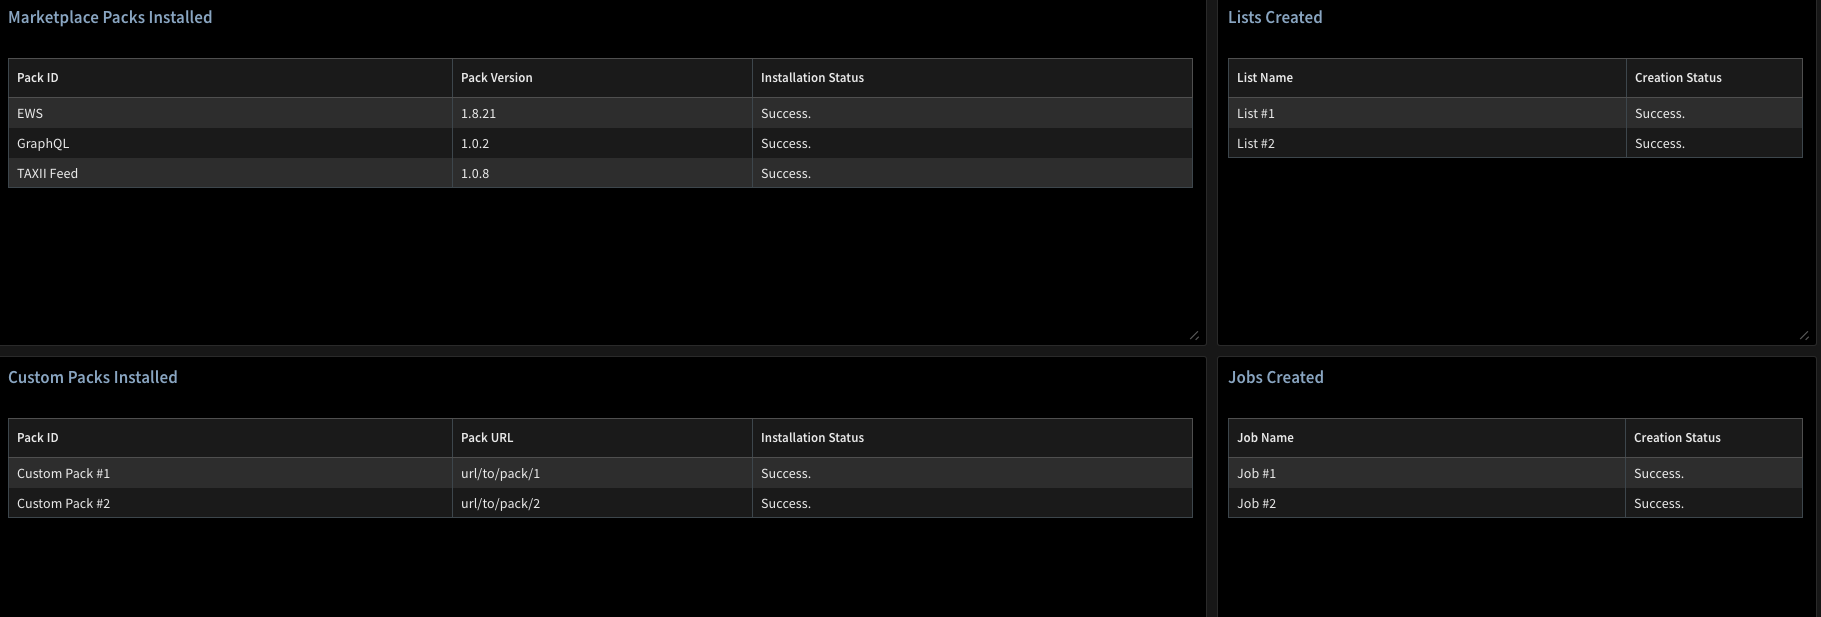
- Custom Packs Installed - Custom packs that were installed.
- Custom Packs Source - The source of the custom packs.
- Jobs Created - Jobs that were created.
- Lists Created - Lists that were created.
- Marketplace Packs Installed - Content packs that were installed.
Incident Type#
There is 1 incident type - Configuration Setup.
Layout#
There is 1 layout - configuration setup
Playbook#
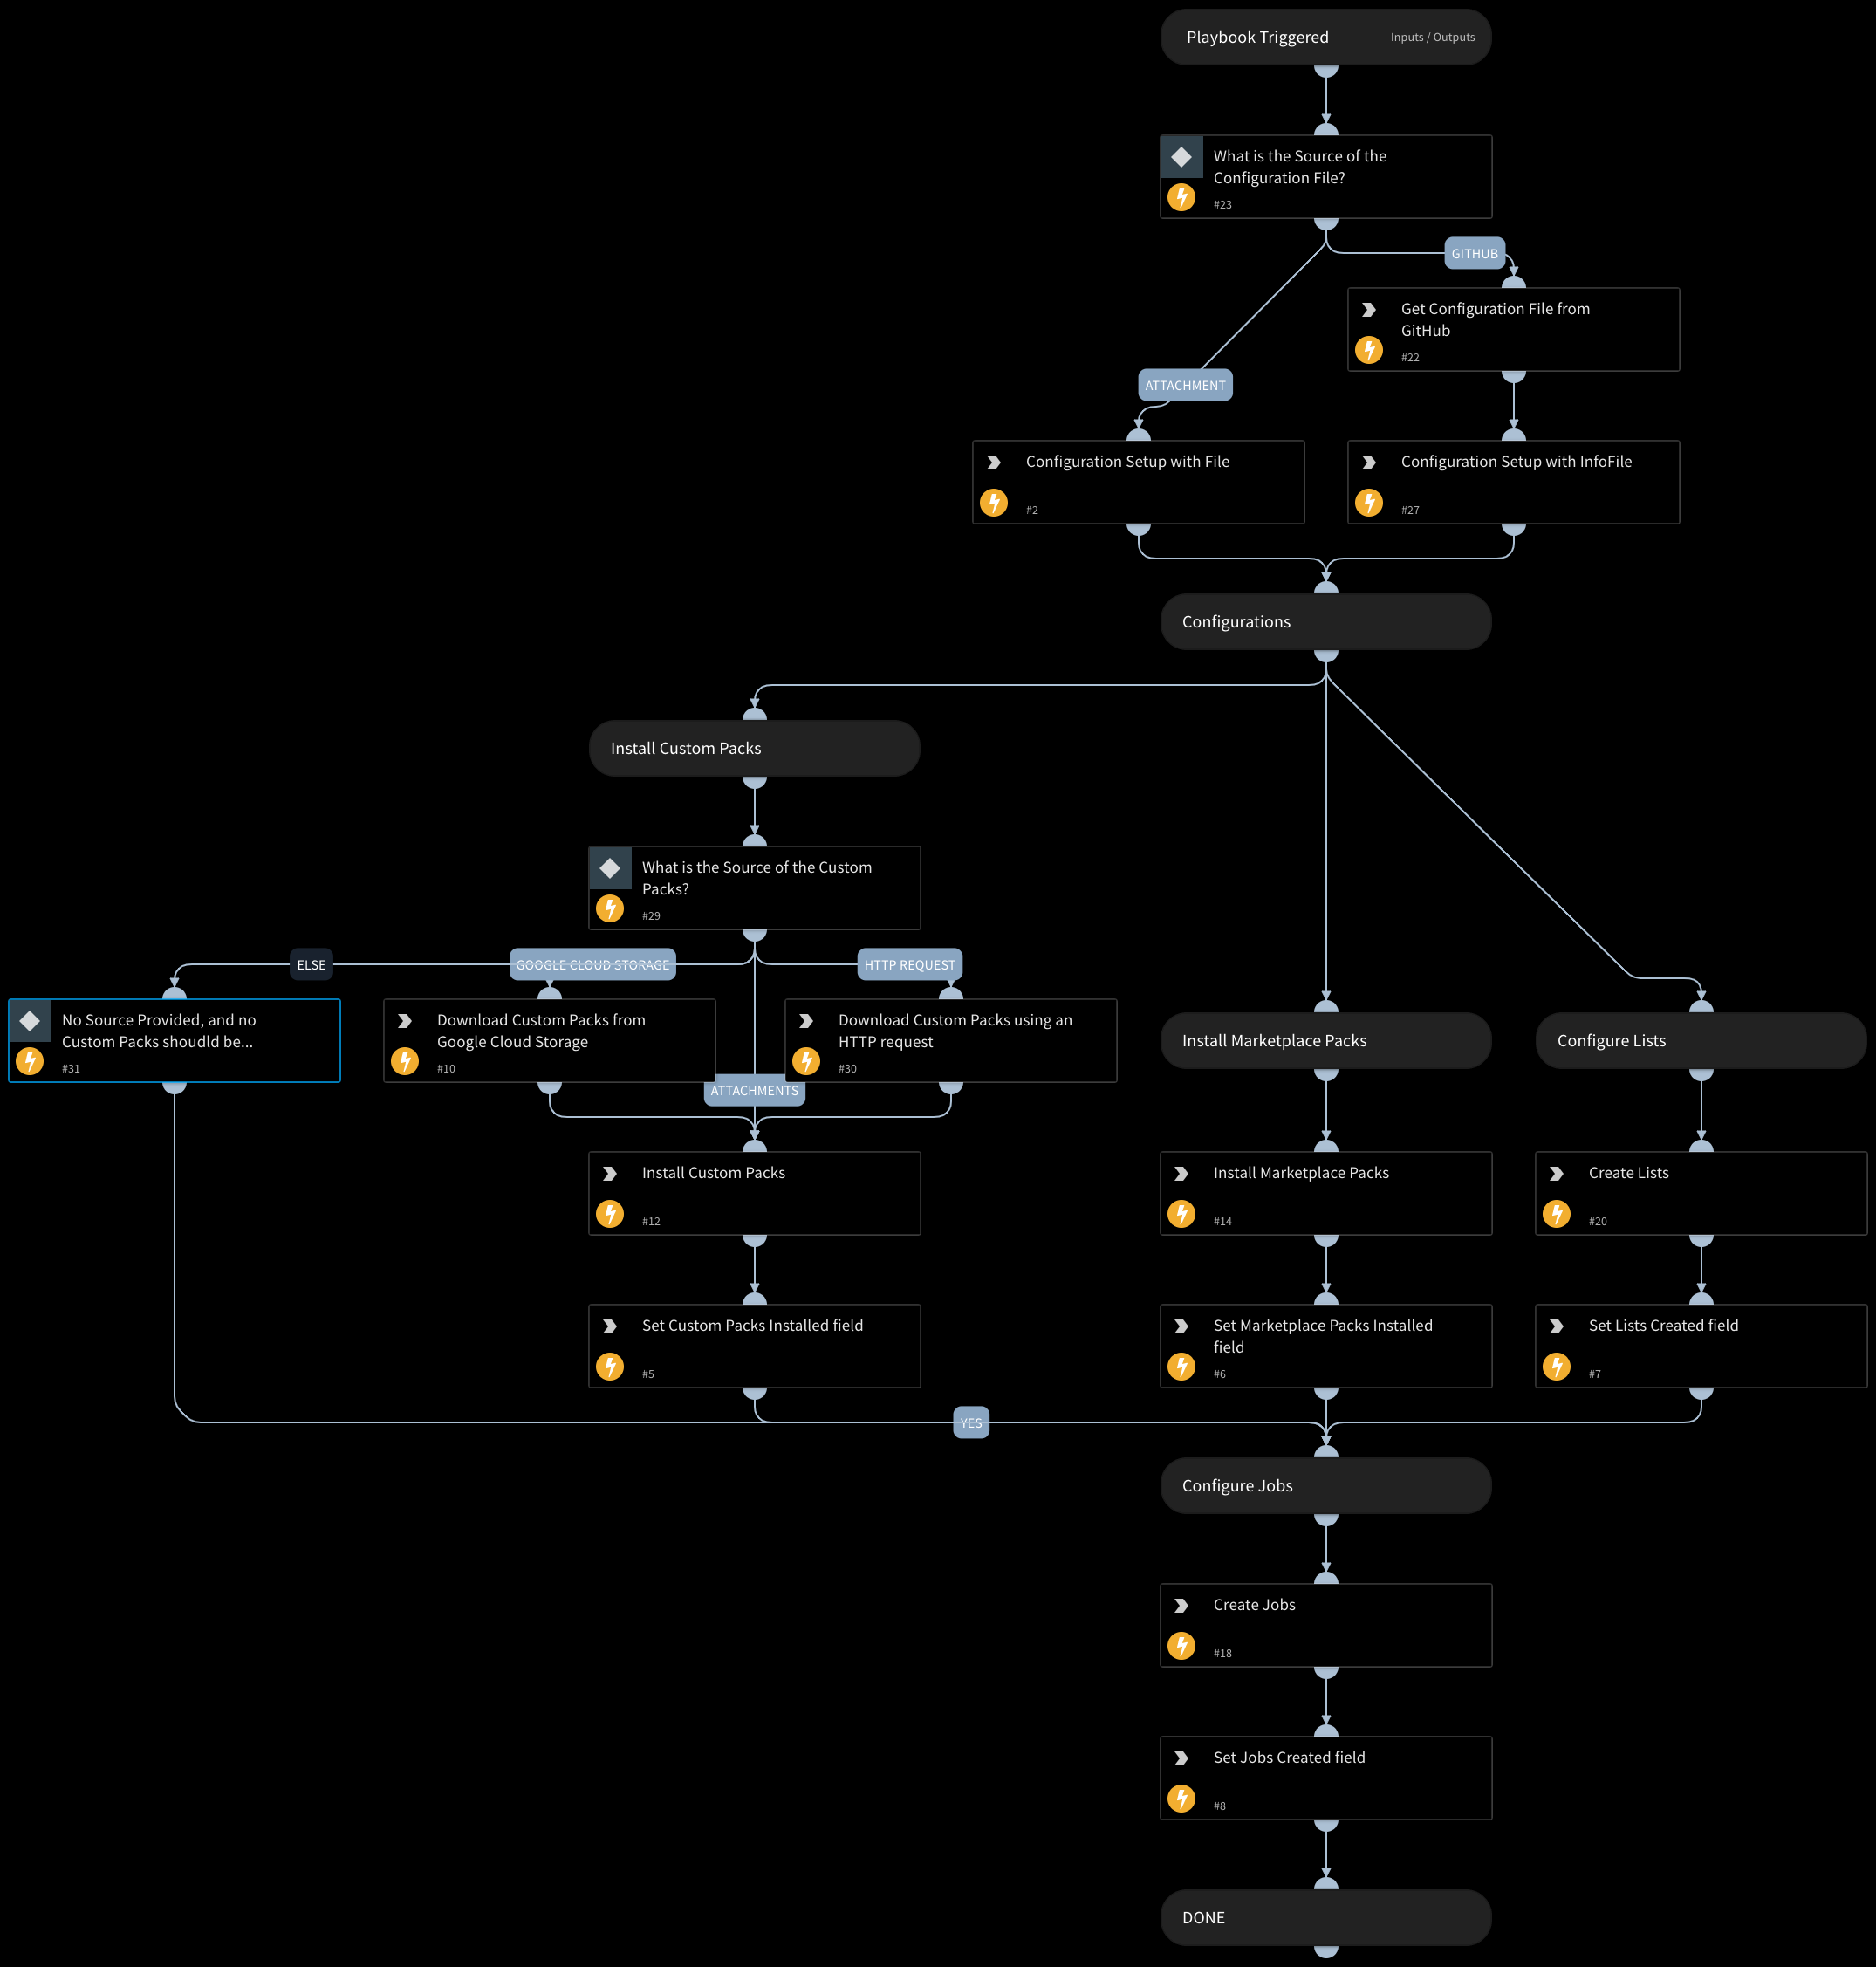
There is 1 playbook - Configuration Setup
This playbook will manage the entire configuration process and needs to run through a Configuration Setup incident type.
It consists of five stages:
- Fetching the configuration file and loading its content to the machine.
- Downloading and installing the custom packs.
- Installing Marketplace packs.
- Configuring lists.
- Configuring jobs.
How to Use the Pack#
Run the Pack Manually#
- Navigate to Incidents.
- Click New Incident.
- Enter a name for the incident.
- From the Type drop down list, choose Configuration Setup.
- (Optional) From the Configuration File Source field in the Configurations section, select the source of the configuration file for the playbook run. If left empty, the master configuration will be used.
- Attachment - Attach the file to the incident. It's information is located under the File context path.
- GitHub - Use the GitHub integration will fetch the configuration file. If you select this option, you will also need to enter relative location in the Configuration File Path field and the Git branch in the repository to fetch the file from in the Branch Name field.
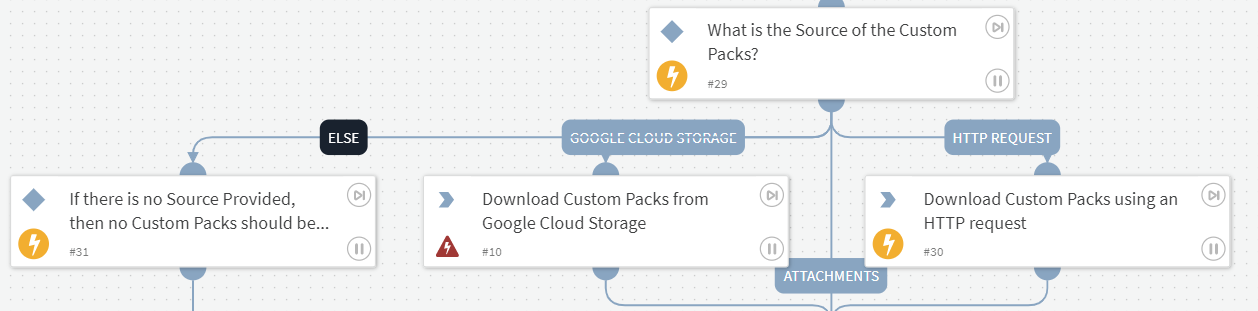
- (Optional) From the the Custom Packs Source field in the Configurations section, select the source of the custom packs files for the playbook run.
- Attachments - Attach the file to the incident. It's information is located under the File context path.
- Google Cloud Storage - Use the Google Cloud Storage() integration to download the files.
- HTTP request - Use the http script to download the files. The playbook will now run automatically.
Run the Pack as a Scheduled Job#
- Navigate to Jobs.
- Click New Job.
- Select if the job is time-triggered or feed-triggered.
- Time-triggered jobs run at pre-determined times. You can schedule the job to run at a recurring time or one time at a specific time or date.
- Feed-triggered jobs run when a feed has completed an operation.
- Enter a name for the job.
- From the Type drop down list, choose Configuration Setup.
- (Optional) From the Configuration File Source field in the Configurations section, select the source of the configuration file for the playbook run. If left empty, the master configuration will be used.
- Attachment - Attach the file to the incident. It's information is located under the File context path.
- GitHub - Use the GitHub integration will fetch the configuration file. If you select this option, you will also need to enter relative location in the Configuration File Path field and the Git branch in the repository to fetch the file from in the Branch Name field.
- (Optional) From the the Custom Packs Source field in the Configurations section, select the source of the custom packs files for the playbook run.
- Attachments - Attach the file to the incident. It's information is located under the File context path.
- Google Cloud Storage - Use the Google Cloud Storage() integration to download the files.
- HTTP request - Use the http script to download the files.
The playbook will now run automatically.
To run the pack as a scheduled job, you will need to set up a new job for a
Configuration Setuptype incident.
Limitations#
Currently, the pack does not support the following features:
- Integration instances.
- Server configuration keys.
CI/CD FAQs#
We use Dev/Prod. Do I still need this feature? What is the difference?
This feature is an alternative for the Dev/Prod environment. Instead of building and maintaining your code on a development Cortex XSOAR platform, you can do so from your own chosen Git repository and utilize 3rd party tools like CI/CD infrastructures, build servers, artifact servers and more. This adds to your development and testing process. These multiple powerful tools do not exist with the Cortex XSOAR UI feature like version control, code review, distributed developing environments, automatic testing, etc.
Do I need to have GitHub in order to use this pack?
You need a Git repository, but the choice is yours. We currently support GitHub/GitLab/Bitbucket.
How does it work with propagation tags and/or in a multi-tenant environment?
Once the custom content is pulled to the main account, it will be propagated to the tenants per the propagation labels on the content items.
Can I take all the current marketplace packs and turn it into the configuration format?
Yes, that is supported.
Migration Guide from Dev-Prod to CI/CD#
This guide will help you migrate from the Dev-Prod environment to the CI/CD environment. In the process, you will need to download all your custom content from the Prod environment and also to delete some types of content from the Prod environment to avoid conflicts.
note
If you have custom mappers, classifiers or incident types attached to integrations (OOTB or custom), after the initial upload using CI/CD you may need to reconfigure the mappers, classifiers and incident types in the integrations' instances.
Use the
demisto-sdkto download the custom content from the Prod environment.Run
demisto-sdk downloadwith the following flags:-a- to download all the custom content.-o <output_path>- to specify the output path.- (Optional)
--init- to create a directory structure for the content. - (Optional)
--run-format- to format the code.
For example:
demisto-sdk download -a -o /Users/user/CustomContent --init --run-formatFollow the on-screen instructions by typing the name of the content pack, metadata, description, type of pack, category, author, email address, tags, integration, etc.
This will create a new folder named Packs (if it does not already exist), and inside it, a folder with the name of the pack you specified. Inside the pack folder, you will find the all content items you downloaded.
NOTE: Make sure that all your content items are downloaded.
Run the Delete Custom Content playbook, to delete some of the content items.
You need to delete the following types of content items to be able to upload the content via the CI/CD process:
Playbooks, Scripts, Layouts, Classifiers, Mappers, Incident Types and Incident Fields.Inputs:
dry_run- Boolean.
If set totrue, the playbook will only print the content items that will be deleted.
If set tofalse, the playbook will delete the content items.
By default, the input is set totrue.instance_name- String.
The Core REST API instance name to use.
To run the playbook:
- In the Cortex XSOAR platform, go to Incidents.
- Click New Incident.
- Enter a name for the incident.
- From the Playbook drop down list, choose Delete Custom Content.
- Click Create New Incident to run the playbook.
- Go into the incident to the Work Plan tab.
- In the Results section of the Delete Content task, you will see the content items that will be deleted.
caution
Make sure that the content items that will be deleted are downloaded in the previous step.
- Change the dry_run input to
falseand run the playbook again.
(Optional) Add a Server Configuration only if you have custom Integrations (Available from Cortex XSOAR 6.11.0).
- In the Cortex XSOAR platform, go to Settings > About > Troubleshooting.
- Click Add Server Configuration.
- In the Key field, enter
allow.name.override.propagation. - In the Value field, enter
true. - Click Save.
Now you can use the CI/CD process to upload the content to the Cortex XSOAR platform.